1 引言
接触机器学习半年多了,也看了三四十篇论文,复现了不少模型,自认为Python基础还可以。但看着写好的代码,仿佛空中楼阁,想一想自己真正代码上的入门到头来其实只有小土堆的那一门速成的课程,还是不够深入、代码、相关经验其实都远远落后。趁着开学事情少巩固一下技术,积累一些知识。
强推李沐,我素未谋面的恩师 - 跟李沐学AI的个人空间-跟李沐学AI个人主页-哔哩哔哩视频 (bilibili.com)
本文是博主在学习《动手学深度学习v2》这门课程时的笔记,水平有限,如有错误与不足欢迎指正。
GNN相关内容年底补充
2 预备知识
2.3 线性代数
1.一些容易忘记的特殊矩阵。
- 正定矩阵,矩阵A满足如下条件:
- 正交矩阵,所有行都相互正交且所有行都有单位长度,可以写成
- 置换矩阵,每行和每列都有一个 1 条目,其他地方有 0。
2.特征向量与特征值。
矩阵就是一次空间的扭曲,而特征向量就是不会被矩阵改变方向的向量。
对称矩阵总是可以找到特征矩阵。
矩阵特征值和特征向量详细计算过程_特征向量怎么求-CSDN博客
3.矩阵按照特定轴作sum。
xx = torch.arange(24).reshape([2,3,4])xout>tensor([[[ 0, 1, 2, 3], [ 4, 5, 6, 7], [ 8, 9, 10, 11]],
[[12, 13, 14, 15], [16, 17, 18, 19], [20, 21, 22, 23]]])注意在求x.sum()时,下面的这几个的区别:
xxxxxxxxxxx.sum()x.sum(axis=0)x.sum(axis=1)x.sum(axis=2)x.sum(axis=[0,1])4.torch在矩阵与向量相乘时,是不区分行向量与列向量的。
xxxxxxxxxxA.shape, x.shape, torch.mv(A, x)out>(torch.Size([5, 4]), torch.Size([4]), tensor([ 14., 38., 62., 86., 110.]))2.4 微积分
1.亚导数?
将导数扩展到不可微的函数:
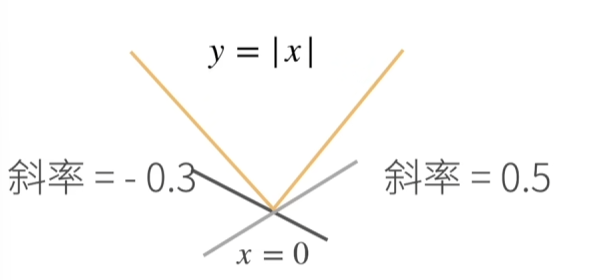
另一个例子:
2.梯度?
将导数扩展到向量,下面的图表使用分子布局来表示。
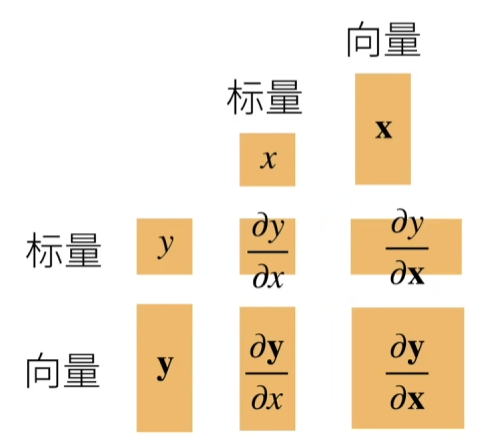
关于列向量的导数是一个行向量,举个例子:
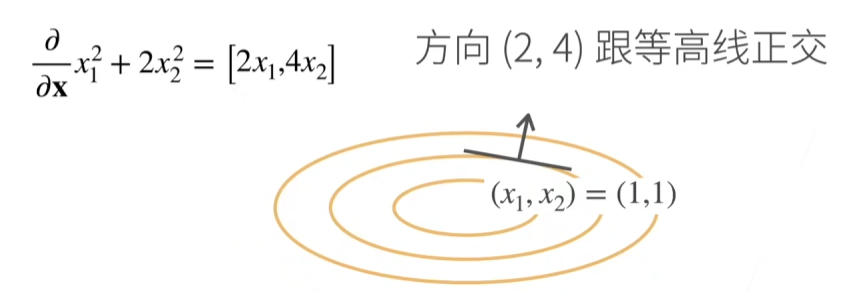
2.5 自动微分
1.两个手动求导的例子,快速回忆。
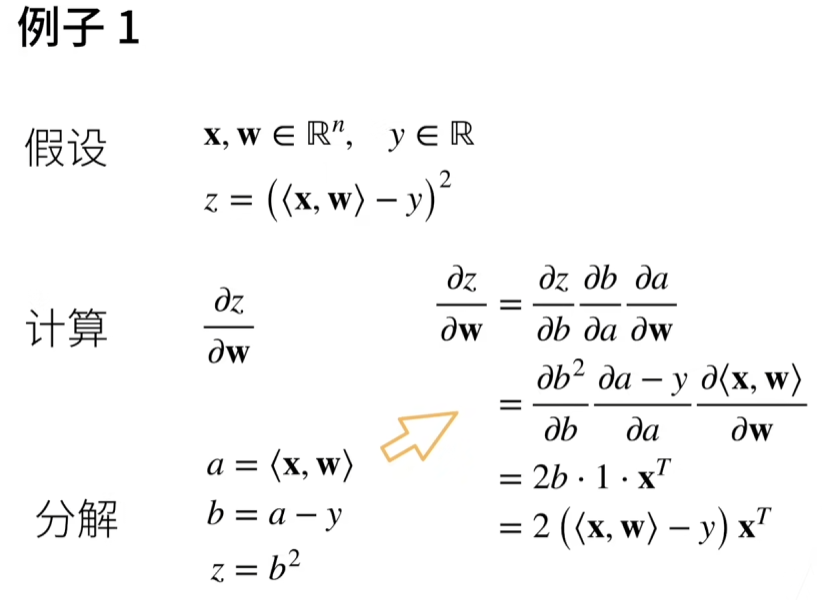
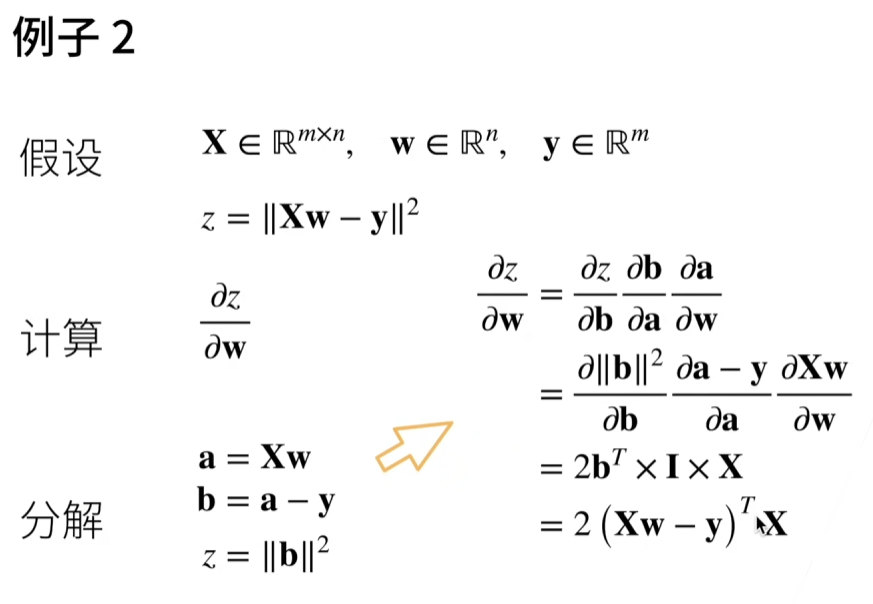
但是神经网络动不动就几百层链式,很难手动求导,所以我们需要自动求导。
2.计算图
自动求导是计算一个函数在指定值上的导数。
它有别于:
- 符号求导
- 数值求导
数值求导不需要知道函数到底长什么样子,他就是带入一个特别小的h现场算一个近似值即可。
在了解自动求导之前,我们先引入计算图的概念:
- 将代码分解为操作子
- 将计算表示成一个无环的图
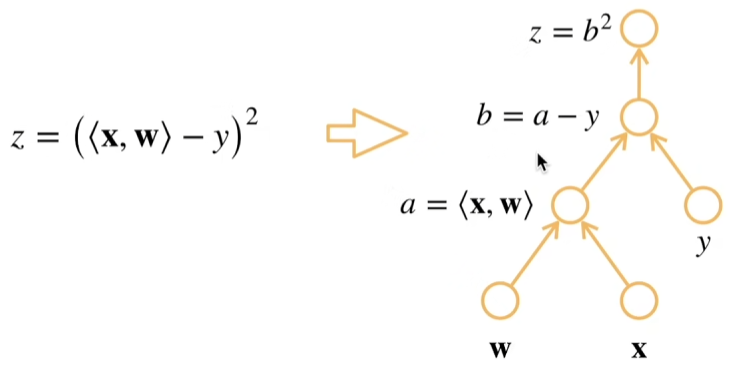
显示构造
类似于数学中公式的定义,先定义好再计算。
xxxxxxxxxximport tensorflow as tf# 定义计算图x = tf.placeholder(tf.float32)y = tf.placeholder(tf.float32)z = x + y# 执行计算图with tf.Session() as sess:result = sess.run(z, feed_dict={x: 1, y: 2})print(result) # 输出: 3.0- TensorFlow(早期版本)/Theano/MXNet(支持静态图和动态图)
隐式构造
xxxxxxxxxximport torch# 即时执行x = torch.tensor(1.0)y = torch.tensor(2.0)z = x + yprint(z) # 输出: tensor(3.0)- PyTorch/MXNet(支持静态图和动态图)
3.自动求导
链式法则:
自动求导的两种方式:
- 正向积累:
- 反向积累、又称反向传递:

因此,前向是执行图,存储中间结果;反向从是相反方向执行图,去除不需要的枝。
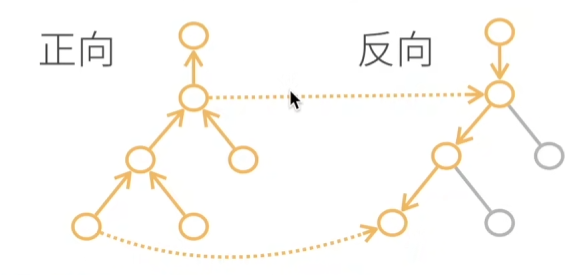
复杂度:
- 计算复杂度:O(n),n 是操作子个数。(常正向和方向的代价类似)
- 内存复杂度:O(n),因为需要存储正向的所有中间结果。(正向的是O(1))
4.pyTorch隐式求导示例:
xxxxxxxxxxdef f(a):    b = a * 2    while b.norm() < 1000:        b = b * 2    if b.sum() > 0:        c = b    else:        c = 100 * b    return c

a = torch.randn(size=(), requires_grad=True)d = f(a)d.backward()
a.grad == d / a> tensor(True)
3 线性神经网络
3.2 Softmax回归
1.交叉熵:交叉熵常用来衡量两个概率的区别
将他们作为损失函数
可以证明只有当真实值与预测值相等时,才有最小值。
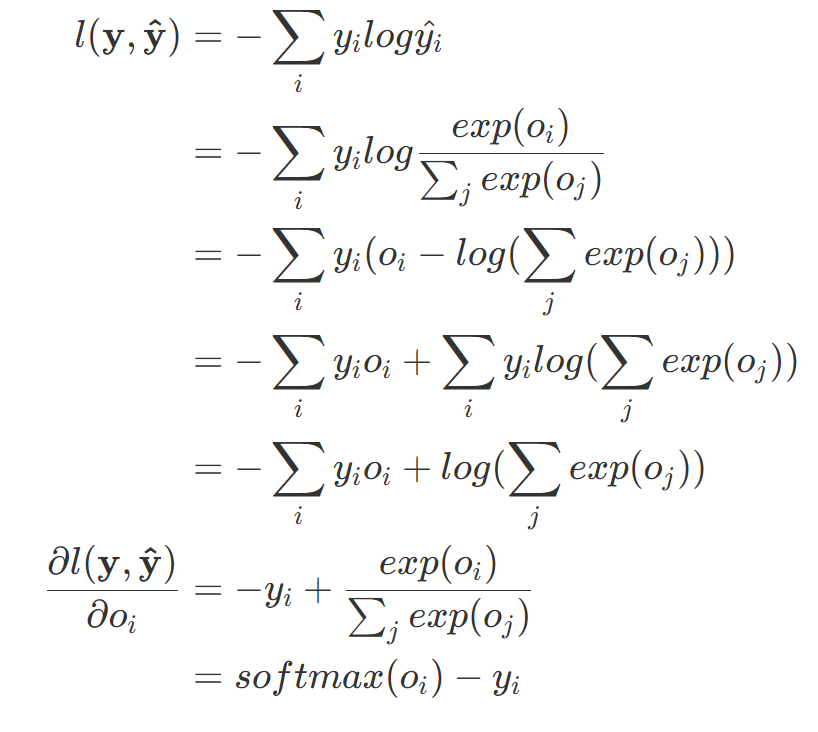
2.梯度:梯度就是真实概率与预测概率的区别
证明如下:
4 多层感知机
4.1 单层感知机
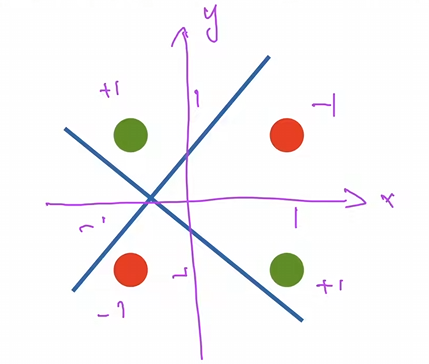
1.局限性:例如不能拟合XOR函数,它只能产生线性分割面。(下面这张图是无法通过一条线来分割的)
4.2 多层感知机

1.为什么要激活函数?以单隐藏层-单分类问题为例。
- 输入
- 隐藏层
- 输出层
是按元素的激活函数

4.4 权重衰退
1.使用均方范数作为硬性限制
通过限制参数值的选择范围来控制模型容量
- 通常不限制便宜b(限不限制都差不多)
- 小的
2.使用均方范数作为柔性限制
L2正则化:
对每个θ,都可以找到使得之前的目标函数等价于下面
可以通过拉格朗日乘子来证明!超参数
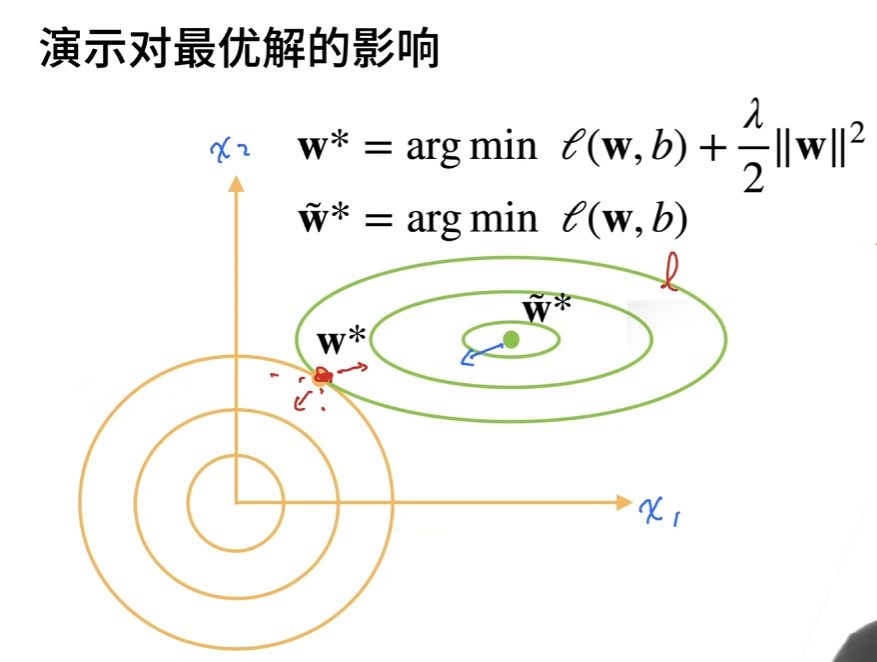
这张图还是挺直观的
那么为什么叫权重衰退呢?
计算梯度
时间t更新参数
权重衰退时最广泛使用的正则化技术之一。
4.5 丢弃法

xxxxxxxxxxdef dropout_layer(X, dropout): assert 0 <= dropout <= 1 # 在本情况中,所有元素都被丢弃 if dropout == 1: return torch.zeros_like(X) # 在本情况中,所有元素都被保留 if dropout == 0: return X mask = (torch.rand(X.shape) > dropout).float() return mask * X / (1.0 - dropout)一般都是通过一个mask来实现,因为矩阵乘法往往要比选择快。
根据此模型的设计,其期望值保持不变,即
4.6 数值稳定性
考虑如下有d层的神经网络:
计算损失
中间包含(d-t)次矩阵乘法。
这就会带来两个问题,梯度爆炸与梯度消失。
例如:
梯度爆炸:以一个MLP为例
加入如下MLP,为了简单省略了偏移
这里求导用了链式法则,可以自己再琢磨一下,其实很简单
如果我们使用ReLU作为激活函数
那么对角矩阵不是1就是0,最后的值的一些元素就会
如果(d-t)很大,值就会很大
值超出值域(对于16位浮点数尤为严重,数值区间6e-5-6e4)
对学习率比价敏感
- 如果学习率太大-》大参数值-》更大的梯度
- 如果学习率太小-》训练无进展
- 我们可能需要在训练过程不断调整学习率
梯度消失
使用sigmoid作为激活函数
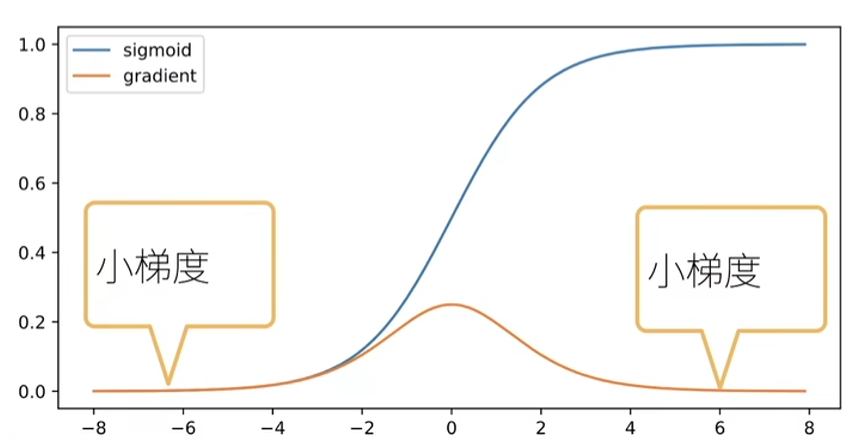
梯度值变为0(对于16位浮点数尤为严重,数值区间6e-5-6e4)
不管如何选择学习率,训练都没有进展
对于底部层尤为严重
- 仅仅顶部层训练的更好
- 无法让神经网络更深
4.7 让训练更加稳定
目标:让梯度值在合理的范围内,例如[1e-6, 1e3]
将乘法变加法
- ResNet,LSTM
归一化
- 梯度归一化,梯度裁剪
合理的权重初始和激活函数
合理的权重初始化和激活函数
- 将每层的输出和梯度都看做随机变量
- 让它们的均值和方差都保持一致

1.权重初始化
在合理值区间里随机初始参数
训练开始的时候更容易有数值不稳定

- 远离最优解的地方损失函数表面可能很复杂
- 最优解附近表面会比较平
使用N(0,0.01)来初始可能对小网络没问题,但不能保证深度神经网络
2.Xavier初始(比较常用)
- 难以需要满足
- Xavier 使得
- 正态分布
- 均匀分布
- 分布
- 适配权重形状变换,特别是
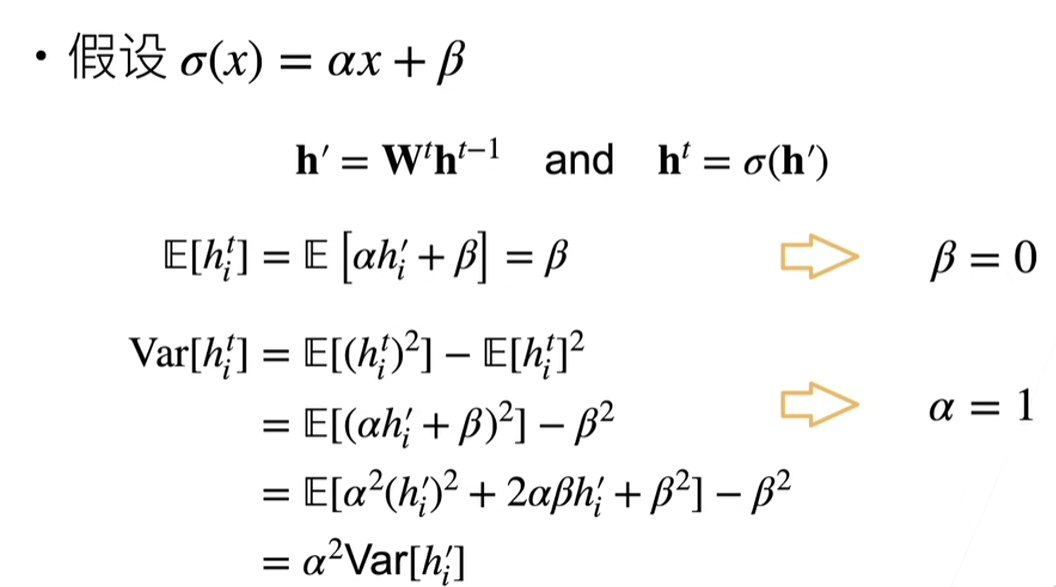
3.假设线性的激活函数
4.检查常用激活函数
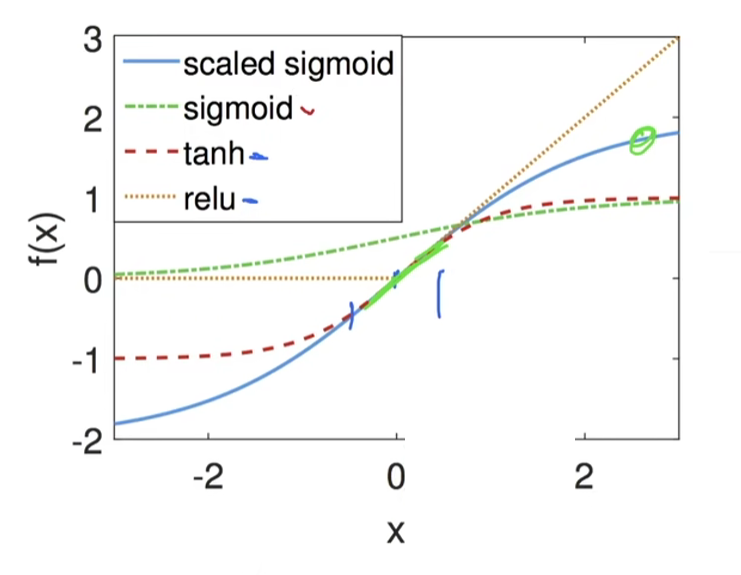
使用泰勒展开
调整sigmoid:
5 深度学习计算
5.1 层和块
xxxxxxxxxximport torchfrom torch import nnfrom torch.nn import functional as F
# 网络中没有自己设置w和b,会自动初始化net = nn.Sequential(nn.Linear(20, 256), nn.ReLU(), nn.Linear(256, 10))
# 2是你的批量大小,20是输入的维度X = torch.rand(2, 20)net(X)xxxxxxxxxxtensor([[-0.0669, -0.0667, -0.1325, 0.0877, 0.0250, -0.1648, 0.1947, 0.1535, 0.0227, -0.0684], [-0.0293, 0.0540, -0.1153, 0.0521, 0.1237, -0.0733, 0.0426, 0.0997, 0.0257, -0.0520]], grad_fn=<AddmmBackward0>)nn.Sequential定义了一种特殊的Module,Module在Pytorch中是一个很重要的概念。
Module可以认为是,任何一个层或者任何一个神经网络都可以认为是Module的一个子类。
自定义块
在实现我们自定义块之前,我们简要总结一下每个块必须提供的基本功能。
- 将输入数据作为其前向传播函数的参数。
- 通过前向传播函数来生成输出。请注意,输出的形状可能与输入的形状不同。例如,我们上面模型中的第一个全连接的层接收一个20维的输入,但是返回一个维度为256的输出。
- 计算其输出关于输入的梯度,可通过其反向传播函数进行访问。通常这是自动发生的。
- 存储和访问前向传播计算所需的参数。
- 根据需要初始化模型参数。
在下面的代码片段中,我们从零开始编写一个块。 它包含一个多层感知机,其具有256个隐藏单元的隐藏层和一个10维输出层。 注意,下面的MLP类继承了表示块的类。 我们的实现只需要提供我们自己的构造函数(Python中的__init__函数)和前向传播函数。
xxxxxxxxxxclass MLP(nn.Module):    # 用模型参数声明层。这里,我们声明两个全连接的层    def __init__(self):        # 调用MLP的父类Module的构造函数来执行必要的初始化。        # 这样,在类实例化时也可以指定其他函数参数,例如模型参数params(稍后将介绍)        super().__init__()        self.hidden = nn.Linear(20, 256)  # 隐藏层        self.out = nn.Linear(256, 10)  # 输出层
# 定义模型的前向传播,即如何根据输入X返回所需的模型输出 def forward(self, X): # 注意,这里我们使用ReLU的函数版本,其在nn.functional模块中定义。 return self.out(F.relu(self.hidden(X))) net = MLP()net(X)xxxxxxxxxxtensor([[-0.0203, -0.0231, 0.1462, 0.1428, -0.1055, -0.0453, -0.1232, -0.1168, 0.2106, 0.2049], [ 0.0708, -0.0984, -0.0216, 0.0652, -0.0192, 0.1467, -0.3095, -0.3248, 0.1947, 0.1943]], grad_fn=<AddmmBackward0>)顺序块
现在我们可以更仔细地看看Sequential类是如何工作的, 回想一下Sequential的设计是为了把其他模块串起来。 为了构建我们自己的简化的MySequential, 我们只需要定义两个关键函数:
- 一种将块逐个追加到列表中的函数;
- 一种前向传播函数,用于将输入按追加块的顺序传递给块组成的“链条”。
下面的MySequential类提供了与默认Sequential类相同的功能。
xxxxxxxxxxclass MySequential(nn.Module): def __init__(self, *args): super().__init__() for block in args: self._modules[block] = block def forward(self, X): for block in self._modules.values(): x = block(x) return X net = MySequential(nn.Linear(20, 256), nn.ReLU(), nn.Linear(256, 10))net(X)# 这不是起那面的自己实现版吗,这下理解了吧在正向传播函数中执行代码
反向计算是不需要定义的,都是自动求导
Sequential类使模型构造变得简单, 允许我们组合新的架构,而不必定义自己的类。 然而,并不是所有的架构都是简单的顺序架构。 当需要更强的灵活性时,我们需要定义自己的块。 例如,我们可能希望在前向传播函数中执行Python的控制流。 此外,我们可能希望执行任意的数学运算, 而不是简单地依赖预定义的神经网络层。
xxxxxxxxxxclass FixedHiddenMLP(nn.Module):    def __init__(self):        super().__init__()        # 不计算梯度的随机权重参数。因此其在训练期间保持不变        self.rand_weight = torch.rand((20, 20), requires_grad=False)        self.linear = nn.Linear(20, 20)
def forward(self, X): X = self.linear(X) # 使用创建的常量参数以及relu和mm函数 X = F.relu(torch.mm(X, self.rand_weight) + 1) # 复用全连接层。这相当于两个全连接层共享参数 X = self.linear(X) # 控制流 while X.abs().sum() > 1: X /= 2 return X.sum() net = FixedHiddenMLP()net(X)xxxxxxxxxxtensor(0.2183, grad_fn=<SumBackward0>)混合搭配各种组合块的方法
xxxxxxxxxx# 定义 NestMLP 类class NestMLP(nn.Module):    def __init__(self):        super().__init__()        self.net = nn.Sequential(            nn.Linear(20, 64),  # 第一层:20 -> 64            nn.ReLU(),            nn.Linear(64, 32),  # 第二层:64 -> 32            nn.ReLU()        )        self.linear = nn.Linear(32, 16)  # 额外的线性层:32 -> 16
def forward(self, X): return self.linear(self.net(X)) chimera = nn.Sequential( NestMLP(), # 使用 NestMLP nn.Linear(16, 20), # 增加一层:16 -> 20 FixedHiddenMLP() # 使用 FixedHiddenMLP)chimera(X)xxxxxxxxxxtensor(0.2624,grad_fn=<SumBackward0>)5.2 参数管理
我们首先关注具有单隐藏层的多层感知机
xxxxxxxxxximport torchfrom torch import nn
net = nn.Sequential(nn.Linear(4, 8), nn.ReLU(), nn.Linear(8, 1))X = torch.rand(size=(2, 4))net(X)xxxxxxxxxxtensor([[-0.0970], [-0.0827]], grad_fn=<AddmmBackward0>)参数访问

xxxxxxxxxxprint(net[2].state_dict())xxxxxxxxxxOrderedDict([('weight', tensor([[-0.0427, -0.2939, -0.1894, 0.0220, -0.1709, -0.1522, -0.0334, -0.2263]])), ('bias', tensor([0.0887]))])1.目标参数
xxxxxxxxxxprint(type(net[2].bias))print(net[2].bias)print(net[2].bias.data)xxxxxxxxxx<class 'torch.nn.parameter.Parameter'>Parameter containing:tensor([0.0887], requires_grad=True)tensor([0.0887])xxxxxxxxxxnet[2].weight.grad == None# grad是梯度的意思们这里还没有做计算,所以为空
True2.一次性访问所有参数
xxxxxxxxxxprint(*[(name, param.shape) for name, param in net[0].named_parameters()])print(*[(name, param.shape) for name, param in net.named_parameters()])xxxxxxxxxx('weight', torch.Size([8, 4])) ('bias', torch.Size([8]))('0.weight', torch.Size([8, 4])) ('0.bias', torch.Size([8])) ('2.weight', torch.Size([1, 8])) ('2.bias', torch.Size([1]))# relu是没有参数的,所以第1层没有拿出参数xxxxxxxxxxnet.state_dict()['2.bias'].data
tensor([0.0887])3.从嵌套块收集参数
xxxxxxxxxxdef block1():    return nn.Sequential(nn.Linear(4, 8), nn.ReLU(),                         nn.Linear(8, 4), nn.ReLU())
def block2():    net = nn.Sequential()    for i in range(4):        # 在这里嵌套        net.add_module(f'block {i}', block1())    return net
rgnet = nn.Sequential(block2(), nn.Linear(4, 1))rgnet(X)xxxxxxxxxxtensor([[0.2596], [0.2596]], grad_fn=<AddmmBackward0>)设计了网络后,我们看看它是如何工作的。
xxxxxxxxxxprint(rgnet)
Sequential(  (0): Sequential(    (block 0): Sequential(      (0): Linear(in_features=4, out_features=8, bias=True)      (1): ReLU()      (2): Linear(in_features=8, out_features=4, bias=True)      (3): ReLU()    )    (block 1): Sequential(      (0): Linear(in_features=4, out_features=8, bias=True)      (1): ReLU()      (2): Linear(in_features=8, out_features=4, bias=True)      (3): ReLU()    )    (block 2): Sequential(      (0): Linear(in_features=4, out_features=8, bias=True)      (1): ReLU()      (2): Linear(in_features=8, out_features=4, bias=True)      (3): ReLU()    )    (block 3): Sequential(      (0): Linear(in_features=4, out_features=8, bias=True)      (1): ReLU()      (2): Linear(in_features=8, out_features=4, bias=True)      (3): ReLU()    )  )  (1): Linear(in_features=4, out_features=1, bias=True))
因为层是分层嵌套的,所以我们也可以像通过嵌套列表索引一样访问它们。 下面,我们访问第一个主要的块中、第二个子块的第一层的偏置项。
xxxxxxxxxxrgnet[0][1][0].bias.data
tensor([ 0.1999, -0.4073, -0.1200, -0.2033, -0.1573,  0.3546, -0.2141, -0.2483])
参数初始化
1.内置初始化
xxxxxxxxxxdef init_normal(m):    if type(m) == nn.Linear:        # _下划线的意思是“替换”函数,不会返回而是直接替换掉原来的        nn.init.normal_(m.weight, mean=0, std=0.01)        nn.init.zeros_(m.bias)        # apply的意思就是对于net里面所有的module,都调用一遍    net.apply(init_normal)net[0].weight.data[0], net[0].bias.data[0]
(tensor([1., 1., 1., 1.]), tensor(0.))xxxxxxxxxxdef init_constant(m): if type(m) == nn.Linear: # 初始化为给定的常量 nn.init.constant_(m.weight, 1) nn.init.zeros_(m.bias)net.apply(init_constant)net[0].weight.data[0], net[0].bias.data[0]为什么实际中我们不能把权重全部初始化为常数?
对称性问题(Symmetry Problem)
如果你将所有的权重初始化为相同的值(例如全零或者某个常数),神经网络中的每个神经元在每一层中都会执行完全相同的计算,并且在反向传播时更新的梯度也是相同的。这会导致所有神经元保持相同的权重更新,因此它们的行为无法多样化。具体来说:
- 每个神经元在每一层执行的操作都是相同的,无法学习到不同的特征。
- 网络的学习能力会被限制住,训练的效果非常差甚至没有效果。
梯度传播问题
如果将所有权重初始化为常数(特别是全零),可能会导致梯度在反向传播时变得非常小,尤其是使用基于梯度的优化算法(如 SGD、Adam 等)时,无法有效更新权重。特别是:
- 如果权重初始化为零,所有的神经元在反向传播时梯度都会变得一样,因此它们的权重更新也是相同的,这种更新无法让模型学到有意义的特征。
- 如果权重初始化为一个非常大的常数,则可能导致梯度爆炸,导致网络训练不稳定。
我们还可以对某些块应用不同的初始化方法。 例如,下面我们使用Xavier初始化方法初始化第一个神经网络层, 然后将第三个神经网络层初始化为常量值42。
xxxxxxxxxxdef init_xavier(m):    if type(m) == nn.Linear:        nn.init.xavier_uniform_(m.weight)def init_42(m):    if type(m) == nn.Linear:        nn.init.constant_(m.weight, 42)
net[0].apply(init_xavier)net[2].apply(init_42)print(net[0].weight.data[0])print(net[2].weight.data)
tensor([ 0.5236, 0.0516, -0.3236, 0.3794])tensor([[42., 42., 42., 42., 42., 42., 42., 42.]])2.自定义初始化
有时,深度学习框架没有提供我们需要的初始化方法。 在下面的例子中,我们使用以下的分布为任意权重参数𝑤定义初始化方法:
xxxxxxxxxxdef my_init(m):    if type(m) == nn.Linear:        print("Init", *[(name, param.shape)                        for name, param in m.named_parameters()][0])        nn.init.uniform_(m.weight, -10, 10)        m.weight.data *= m.weight.data.abs() >= 5
net.apply(my_init)net[0].weight[:2]
Init weight torch.Size([8, 4])Init weight torch.Size([1, 8])tensor([[5.4079, 9.3334, 5.0616, 8.3095],        [0.0000, 7.2788, -0.0000, -0.0000]], grad_fn=<SliceBackward0>)
更暴力的方法有...
xxxxxxxxxxnet[0].weight.data[:] += 1net[0].weight.data[0, 0] = 42net[0].weight.data[0]参数绑定
有时我们希望在多个层间共享参数: 我们可以定义一个稠密层,然后使用它的参数来设置另一个层的参数。
xxxxxxxxxx# 我们需要给共享层一个名称,以便可以引用它的参数shared = nn.Linear(8, 8)net = nn.Sequential(nn.Linear(4, 8), nn.ReLU(),                    shared, nn.ReLU(),                    shared, nn.ReLU(),                    nn.Linear(8, 1))net(X)# 检查参数是否相同print(net[2].weight.data[0] == net[4].weight.data[0])net[2].weight.data[0, 0] = 100# 确保它们实际上是同一个对象,而不只是有相同的值print(net[2].weight.data[0] == net[4].weight.data[0])
tensor([True, True, True, True, True, True, True, True])tensor([True, True, True, True, True, True, True, True])
5.3 自定义层
1.构造一个没有任何参数的自定义层
xxxxxxxxxximport torchimport torch.nn.functional as Ffrom torch import nn

class CenteredLayer(nn.Module):    def __init__(self):        super().__init__()
    def forward(self, X):        return X - X.mean()    layer = CenteredLayer()layer(torch.FloatTensor([1, 2, 3, 4, 5]))
tensor([-2., -1.,  0.,  1.,  2.])
将层作为组件合并到更复杂的模型中
xxxxxxxxxxnet = nn.Sequential(nn.Linear(8, 128), CenteredLayer())
Y = net(torch.rand(4, 8))Y.mean()xxxxxxxxxxtensor(7.4506e-09, grad_fn=<MeanBackward0>)2.带参数的层
xxxxxxxxxxclass MyLinear(nn.Module):    def __init__(self, in_units, units):        super().__init__()        self.weight = nn.Parameter(torch.randn(in_units, units))        self.bias = nn.Parameter(torch.randn(units,))            def forward(self, X):        # 通过.data访问参数        linear = torch.matmul(X, self.weight.data) + self.bias.data        return F.relu(linear)    linear = MyLinear(5, 3)linear.weight
Parameter containing:tensor([[ 0.1775, -1.4539,  0.3972],        [-0.1339,  0.5273,  1.3041],        [-0.3327, -0.2337, -0.6334],        [ 1.2076, -0.3937,  0.6851],        [-0.4716,  0.0894, -0.9195]], requires_grad=True)
torch.randn():生成 标准正态分布 的随机数,数值范围可能是正数或负数,均值为 0,标准差为 1。torch.rand():生成 均匀分布 的随机数,数值范围为[0, 1)。
pytorch一维张量不区分行跟列,会自动转换:

我们可以使用自定义层直接执行前向传播计算
xxxxxxxxxxlinear(torch.rand(2, 5))
tensor([[0., 0., 0.],        [0., 0., 0.]])
使用自定义层构建模型
xxxxxxxxxxnet = nn.Sequential(MyLinear(64, 8), MyLinear(8, 1))net(torch.rand(2, 64))
tensor([[0.],        [0.]])
5.4 读写文件
1.加载和保存张量
xxxxxxxxxximport torchfrom torch import nnfrom torch.nn import functional as F
x = torch.arange(4)torch.save(x, 'x-file')
x2 = torch.load('x-file')x2
tensor([0, 1, 2, 3])
存储一个张量列表,然后把它们读回内存
xxxxxxxxxxy = torch.zeros(4)torch.save([x, y],'x-files')x2, y2 = torch.load('x-files')(x2, y2)
(tensor([0, 1, 2, 3]), tensor([0., 0., 0., 0.]))
写入或读取从字符串映射到张量的字典
xxxxxxxxxxmydict = {'x': x, 'y': y}torch.save(mydict, 'mydict')mydict2 = torch.load('mydict')mydict2
{'x': tensor([0, 1, 2, 3]), 'y': tensor([0., 0., 0., 0.])}2.加载和保存模型参数
xxxxxxxxxxclass MLP(nn.Module):    def __init__(self):        super().__init__()        self.hidden = nn.Linear(20, 256)        self.output = nn.Linear(256, 10)
    def forward(self, x):        return self.output(F.relu(self.hidden(x)))
net = MLP()X = torch.randn(size=(2, 20))Y = net(X)
将模型的参数存储在一个叫做“mlp.params”的文件中
xxxxxxxxxxtorch.save(net.state_dict(), 'mlp.params')为了恢复模型,我们实例化了原始多层感知机模型的一个备份。 这里我们不需要随机初始化模型参数,而是直接读取文件中存储的参数。
xxxxxxxxxxclone = MLP()clone.load_state_dict(torch.load('mlp.params'))clone.eval()xxxxxxxxxxMLP( (hidden): Linear(in_features=20, out_features=256, bias=True) (output): Linear(in_features=256, out_features=10, bias=True))xxxxxxxxxxY_clone = clone(X)Y_clone == Yxxxxxxxxxxtensor([[True, True, True, True, True, True, True, True, True, True], [True, True, True, True, True, True, True, True, True, True]])
6 卷积神经网络
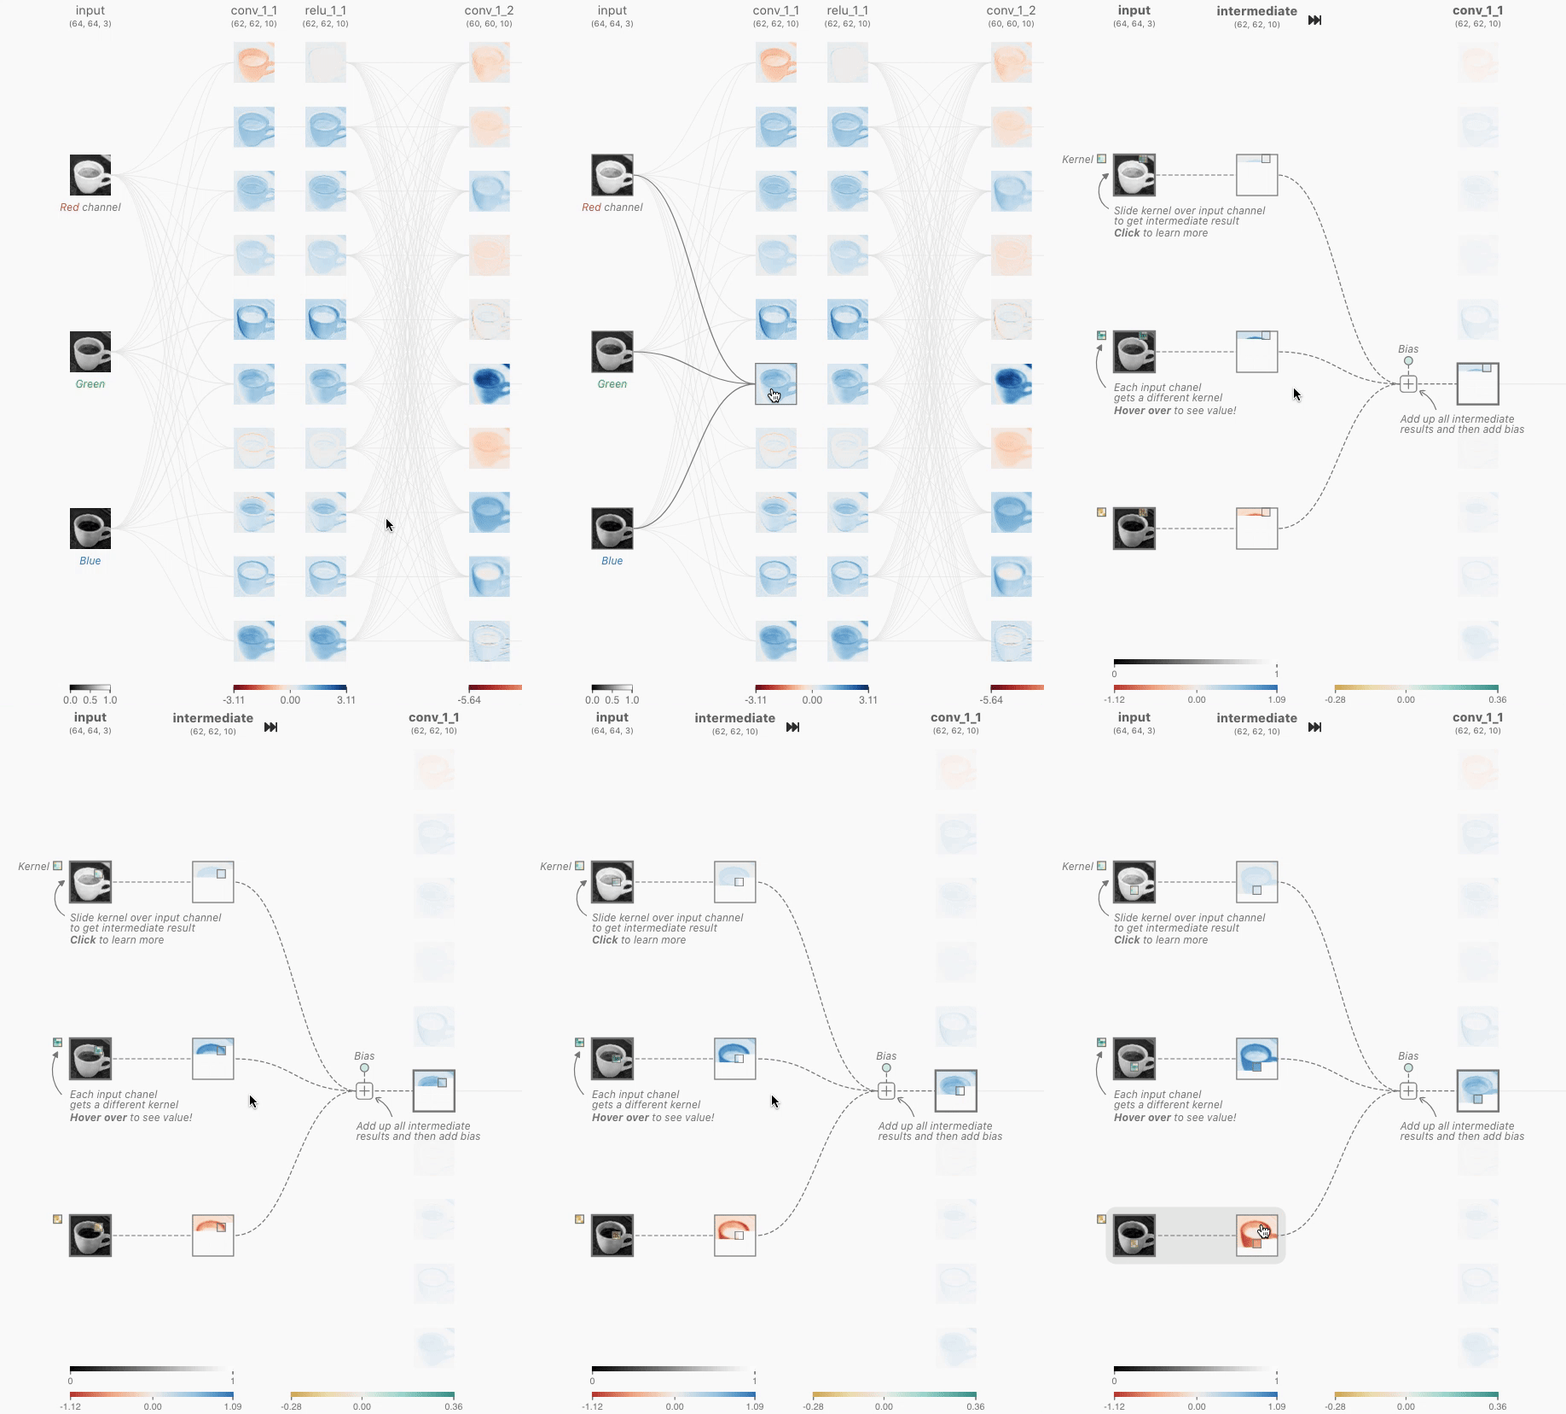
6.1 卷积层
1.对全连接层使用平移不变性和局部性得到卷积层。
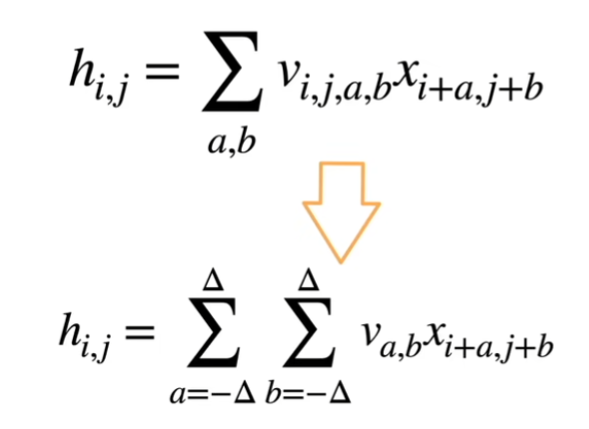
2.二维交叉相关
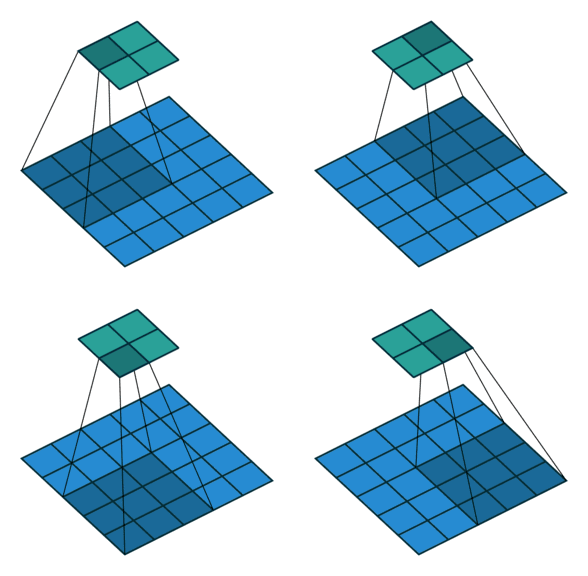
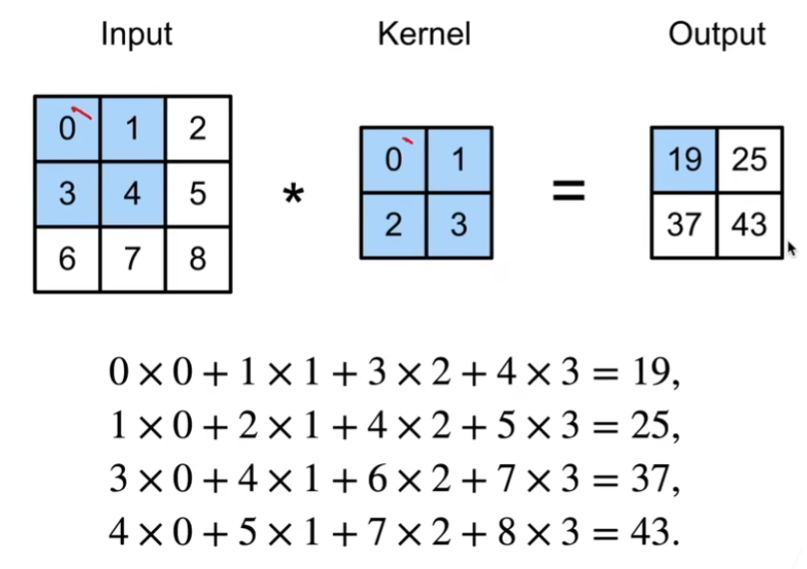
*一般表示的都是卷积操作。
3.二维卷积层

输入
核
偏差
输出
超参数是卷积核的大小,代表着而他的局部性。
卷积层其实就是一个特殊的全连接层
4.其他一些维度
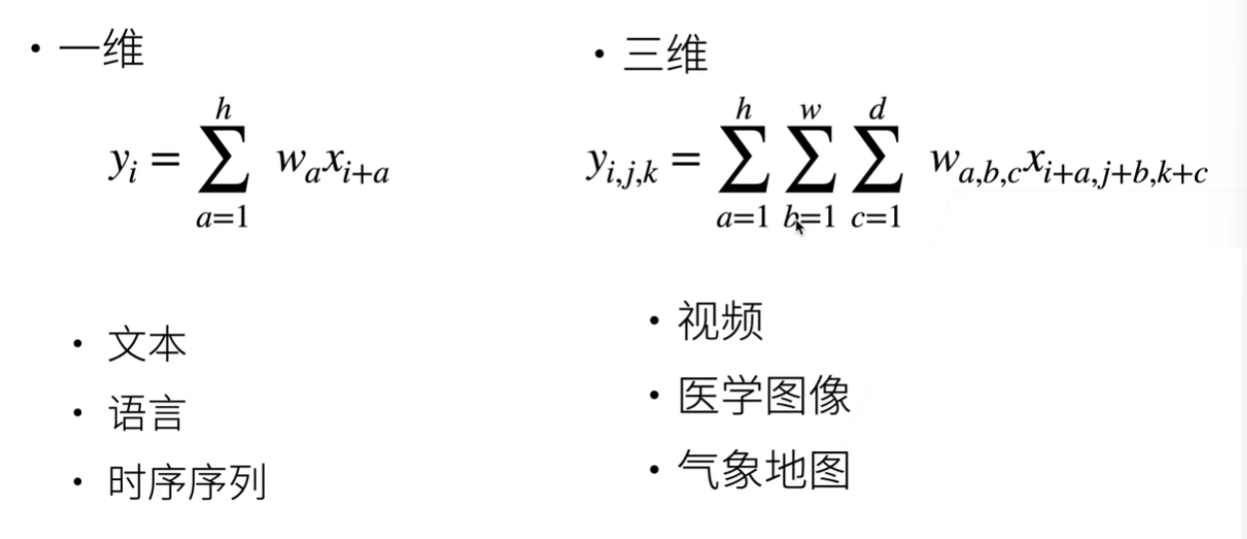
三维一般情况都是多一个时间维度。
5.我们以一个图像的卷积为例,关注他的代码实现
先实现他的互相关运算:
xxxxxxxxxximport torchfrom torch import nnfrom d2l import torch as d2ldef corr2d(X, K): #@save"""计算二维互相关运算"""h, w = K.shapeY = torch.zeros((X.shape[0] - h + 1, X.shape[1] - w + 1))for i in range(Y.shape[0]):for j in range(Y.shape[1]):Y[i, j] = (X[i:i + h, j:j + w] * K).sum()return YxxxxxxxxxxX = torch.tensor([[0.0, 1.0, 2.0], [3.0, 4.0, 5.0], [6.0, 7.0, 8.0]])K = torch.tensor([[0.0, 1.0], [2.0, 3.0]])corr2d(X, K)tensor([[19., 25.],[37., 43.]])实现二维卷积:
xxxxxxxxxxclass Conv2D(nn.Module):def __init__(self, kernel_size):super().__init__()self.weight = nn.Parameter(torch.rand(kernel_size))self.bias = nn.Parameter(torch.zeros(1))def forward(self, x):return corr2d(x, self.weight) + self.bias学习一个由X生成Y的卷积核:
xxxxxxxxxx# 构造一个二维卷积层,它具有1个输出通道和形状为(1,2)的卷积核conv2d = nn.Conv2d(1,1, kernel_size=(1, 2), bias=False)# 这个二维卷积层使用四维输入和输出格式(批量大小、通道、高度、宽度),# 其中批量大小和通道数都为1,(批量大小、通道、高度、宽度)X = X.reshape((1, 1, 6, 8))Y = Y.reshape((1, 1, 6, 7))lr = 3e-2 # 学习率for i in range(10):Y_hat = conv2d(X)l = (Y_hat - Y) ** 2conv2d.zero_grad()l.sum().backward()# 迭代卷积核conv2d.weight.data[:] -= lr * conv2d.weight.gradif (i + 1) % 2 == 0:print(f'epoch {i+1}, loss {l.sum():.3f}')epoch 2, loss 6.422epoch 4, loss 1.225epoch 6, loss 0.266epoch 8, loss 0.070epoch 10, loss 0.022xxxxxxxxxxconv2d.weight.data.reshape((1, 2))tensor([[ 1.0010, -0.9739]])
6.2 填充和步幅
都是超参数
填充
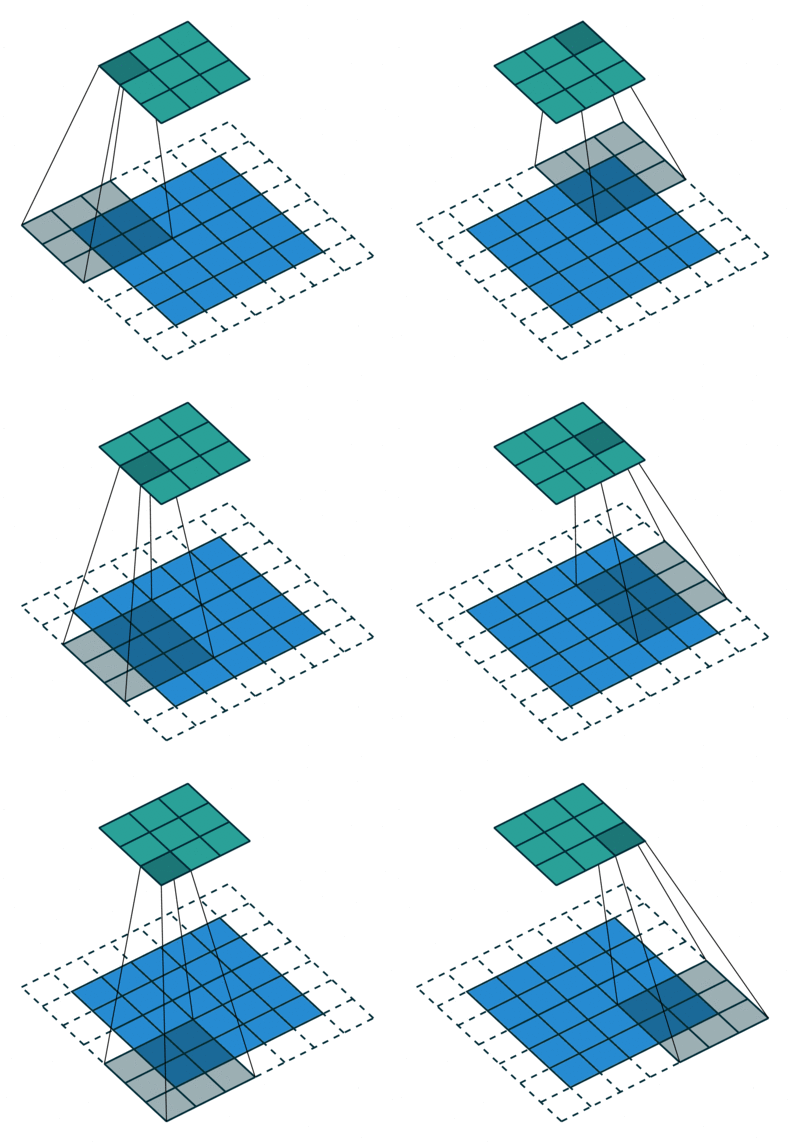
在应用多层卷积时,我们常常丢失边缘像素。 由于我们通常使用小卷积核,因此对于任何单个卷积,我们可能只会丢失几个像素。 但随着我们应用许多连续卷积层,累积丢失的像素数就多了。 解决这个问题的简单方法即为填充(padding):在输入图像的边界填充元素(通常填充元素是0)。
- 填充
- 当
- 当
- 这样不管核的大小为多少,都不会更改样本的形状。
xxxxxxxxxximport torchfrom torch import nn
# 为了方便起见,我们定义了一个计算卷积层的函数。# 此函数初始化卷积层权重,并对输入和输出提高和缩减相应的维数def comp_conv2d(conv2d, X):    # 这里的(1,1)表示批量大小和通道数都是1    X = X.reshape((1, 1) + X.shape)    Y = conv2d(X)    # 省略前两个维度:批量大小和通道    return Y.reshape(Y.shape[2:])
# 请注意,这里每边都填充了1行或1列,因此总共添加了2行或2列conv2d = nn.Conv2d(1, 1, kernel_size=3, padding=1)X = torch.rand(size=(8, 8))comp_conv2d(conv2d, X).shapexxxxxxxxxxtorch.Size([8, 8])当卷积核的高度和宽度不同时,我们可以填充不同的高度和宽度,使输出和输入具有相同的高度和宽度。在如下示例中,我们使用高度为5,宽度为3的卷积核,高度和宽度两边的填充分别为2和1。
xxxxxxxxxxconv2d = nn.Conv2d(1, 1, kernel_size=(5, 3), padding=(2, 1))comp_conv2d(conv2d, X).shapetorch.Size([8, 8])
步幅
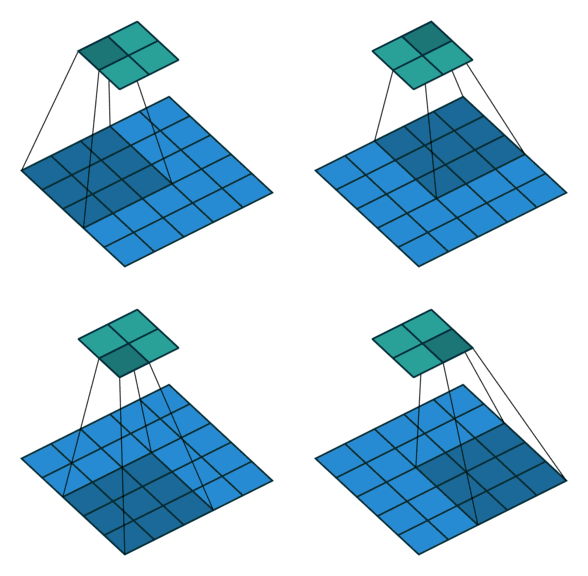
填充减小的输出大小与层数线性相关
- 给定输入大小224×224,在使用 5×5 卷积核的情况下,需要 44 层将输出降低到 4× 4
- 需要大量计算才能得到较小输出
xxxxxxxxxxconv2d = nn.Conv2d(1, 1, kernel_size=3, padding=1, stride=2)comp_conv2d(conv2d, X).shape
torch.Size([4, 4])
一个稍微复杂的例子
xxxxxxxxxxconv2d = nn.Conv2d(1, 1, kernel_size=(3, 5), padding=(0, 1), stride=(3, 4))comp_conv2d(conv2d, X).shape
torch.Size([2, 2])
6.3 多输入多输出通道
彩色图像可能有RGB三个通道,转换为灰度会丢失信息。


多个输入通道
每个通道都有一个卷积核,结果是所有通道卷积结果的和:
(1×1+2×2+4×3+5×4)+(0×0+1×1+3×2+4×3)=56
xxxxxxxxxximport torchfrom d2l import torch as d2l
def corr2d_multi_in(X, K):    # 先遍历“X”和“K”的第0个维度(通道维度),再把它们加在一起    return sum(d2l.corr2d(x, k) for x, k in zip(X, K))
X = torch.tensor([[[0.0, 1.0, 2.0], [3.0, 4.0, 5.0], [6.0, 7.0, 8.0]],               [[1.0, 2.0, 3.0], [4.0, 5.0, 6.0], [7.0, 8.0, 9.0]]])K = torch.tensor([[[0.0, 1.0], [2.0, 3.0]], [[1.0, 2.0], [3.0, 4.0]]])
corr2d_multi_in(X, K)
tensor([[ 56.,  72.],        [104., 120.]])
在 Python 中,
zip()是一个内置函数,用于将多个可迭代对象(如列表、元组等)的对应元素打包成一个个元组,并返回一个迭代器。
多个输出通道
互相关计算使用了具有3个输入通道和2个输出通道的 1×1 卷积核。其中,输入和输出具有相同的高度和宽度。
xxxxxxxxxxdef corr2d_multi_in_out(X, K):    # 迭代“K”的第0个维度,每次都对输入“X”执行互相关运算。    # 最后将所有结果都叠加在一起    return torch.stack([corr2d_multi_in(X, k) for k in K], 0)
K = torch.stack((K, K + 1, K + 2), 0)K.shape
> torch.Size([3, 2, 2, 2])
corr2d_multi_in_out(X, K)
> tensor([[[ 56.,  72.],         [104., 120.]],
        [[ 76., 100.],         [148., 172.]],
        [[ 96., 128.],         [192., 224.]]])
stack()是 PyTorch 中的一个函数,它用于沿着一个新的维度将多个张量(具有相同形状的张量)拼接起来,返回一个新的张量。换句话说,它会把一组形状相同的张量堆叠在一起。
K = torch.stack((K, K + 1, K + 2), 0)将三个张量(K, K + 1, K + 2)沿着第0维度拼接在一起。
1x1卷积
因为使用了最小窗口,1×1卷积失去了卷积层的特有能力——在高度和宽度维度上,识别相邻元素间相互作用的能力。 其实1×1卷积的唯一计算发生在通道上。
1x1的其实等价于一个全连接
为了验证这一观点,我们使用全连接的方法来构建模型,然后与先前的卷积方法作比较
xxxxxxxxxxdef corr2d_multi_in_out_1x1(X, K): c_i, h, w = X.shape c_o = K.shape[0] X = X.reshape((c_i, h * w)) K = K.reshape((c_o, c_i)) # 全连接层中的矩阵乘法 Y = torch.matmul(K, X) return Y.reshape((c_o, h, w))xxxxxxxxxxX = torch.normal(0, 1, (3, 3, 3))K = torch.normal(0, 1, (2, 3, 1, 1))
Y1 = corr2d_multi_in_out_1x1(X, K)Y2 = corr2d_multi_in_out(X, K)assert float(torch.abs(Y1 - Y2).sum()) < 1e-66.4 池化层
双重目的:降低卷积层对位置的敏感性,同时降低对空间降采样表示的敏感性。
缓解卷积层对于未知的敏感性。
例如:如果我们拍摄黑白之间轮廓清晰的图像
X,并将整个图像向右移动一个像素,即Z[i, j] = X[i, j + 1],则新图像Z的输出可能大不相同。而在现实中,随着拍摄角度的移动,任何物体几乎不可能发生在同一像素上。即使用三脚架拍摄一个静止的物体,由于快门的移动而引起的相机振动,可能会使所有物体左右移动一个像素(除了高端相机配备了特殊功能来解决这个问题)。
最大池化层:每个窗口中最强的模式信号

平均池化层:将最大池化层中的“最大”操作替换为“平均”
实现池化层的正向传播:
xxxxxxxxxximport torchfrom torch import nnfrom d2l import torch as d2l
def pool2d(X, pool_size, mode='max'):    p_h, p_w = pool_size    Y = torch.zeros((X.shape[0] - p_h + 1, X.shape[1] - p_w + 1))    for i in range(Y.shape[0]):        for j in range(Y.shape[1]):            if mode == 'max':                Y[i, j] = X[i: i + p_h, j: j + p_w].max()            elif mode == 'avg':                Y[i, j] = X[i: i + p_h, j: j + p_w].mean()    return Y
X = torch.tensor([[0.0, 1.0, 2.0], [3.0, 4.0, 5.0], [6.0, 7.0, 8.0]])pool2d(X, (2, 2))xxxxxxxxxxtensor([[4., 5.], [7., 8.]])填充和步幅:与卷积层一样,汇聚层也可以改变输出形状。
xxxxxxxxxxX = torch.arange(16, dtype=torch.float32).reshape((1, 1, 4, 4))X默认情况下,深度学习框架中的步幅与汇聚窗口的大小相同。 因此,如果我们使用形状为(3, 3)的汇聚窗口,那么默认情况下,我们得到的步幅形状为(3, 3)。
xxxxxxxxxxpool2d = nn.MaxPool2d(3)pool2d(X)
tensor([[[[10.]]]])
填充和步幅可以手动设定。
xxxxxxxxxxpool2d = nn.MaxPool2d(3, padding=1, stride=2)pool2d(X)
tensor([[[[ 5.,  7.],          [13., 15.]]]])
当然,我们可以设定一个任意大小的矩形汇聚窗口,并分别设定填充和步幅的高度和宽度。
xxxxxxxxxx# stride=(2, 3) 表示在每次池化操作中窗口移动的步幅为 2 行 3 列。# padding=(0, 1) 表示在输入的上下两侧不进行填充,而在左右两侧各填充1个像素。pool2d = nn.MaxPool2d((2, 3), stride=(2, 3), padding=(0, 1))pool2d(X)
tensor([[[[ 5., 7.], [13., 15.]]]])多个通道的情况:
xxxxxxxxxxX = torch.cat((X, X + 1), 1)X
tensor([[[[ 0.,  1.,  2.,  3.],          [ 4.,  5.,  6.,  7.],          [ 8.,  9., 10., 11.],          [12., 13., 14., 15.]],
[[ 1., 2., 3., 4.], [ 5., 6., 7., 8.], [ 9., 10., 11., 12.], [13., 14., 15., 16.]]]])xxxxxxxxxxpool2d = nn.MaxPool2d(3, padding=1, stride=2)pool2d(X)
tensor([[[[ 5., 7.], [13., 15.]],
[[ 6., 8.], [14., 16.]]]])6.5 卷积神经网络(LeNet)
- LeNet是早期成功的神经网络
- 先使用卷积层来学习图片空间信息
- 然后使用全连接层来转换到类别空间
LeNet(LeNet-5)由两个部分组成:卷积编码器和全连接层密集块
xxxxxxxxxximport torchfrom torch import nnfrom d2l import torch as d2l
net = nn.Sequential(    nn.Conv2d(1, 6, kernel_size=5, padding=2), nn.Sigmoid(),    nn.AvgPool2d(kernel_size=2, stride=2),    nn.Conv2d(6, 16, kernel_size=5), nn.Sigmoid(),    nn.AvgPool2d(kernel_size=2, stride=2),    nn.Flatten(),    nn.Linear(16 * 5 * 5, 120), nn.Sigmoid(),    nn.Linear(120, 84), nn.Sigmoid(),    nn.Linear(84, 10))
reshape和view都是用于对张量进行重塑的操作,但它们在一些细节上有所不同:
view是 PyTorch 中一种常用的操作,它不改变数据的内存布局,而是通过改变张量的视图来重新组织张量的形状。
view需要保证张量在内存中是连续的,即必须是连续存储的张量。性能:
view通常效率较高,因为它不进行数据的复制,只是改变形状。
reshape类似于view,也能改变张量的形状。不同的是,reshape不强制要求张量是连续的。如果张量不是连续的,reshape会自动生成一个新的张量来实现所需的形状。
reshape更加灵活,因为它可以处理非连续的张量,不需要手动调用.contiguous()。
xxxxxxxxxxX = torch.rand(size=(1, 1, 28, 28), dtype=torch.float32)for layer in net: X = layer(X) print(layer.__class__.__name__,'output shape: \t',X.shape)xxxxxxxxxxConv2d output shape: torch.Size([1, 6, 28, 28])Sigmoid output shape: torch.Size([1, 6, 28, 28])AvgPool2d output shape: torch.Size([1, 6, 14, 14])Conv2d output shape: torch.Size([1, 16, 10, 10])Sigmoid output shape: torch.Size([1, 16, 10, 10])AvgPool2d output shape: torch.Size([1, 16, 5, 5])Flatten output shape: torch.Size([1, 400])Linear output shape: torch.Size([1, 120])Sigmoid output shape: torch.Size([1, 120])Linear output shape: torch.Size([1, 84])Sigmoid output shape: torch.Size([1, 84])Linear output shape: torch.Size([1, 10])现在我们已经实现了LeNet,让我们看看LeNet在Fashion-MNIST数据集上的表现。
xxxxxxxxxxbatch_size = 256train_iter, test_iter = d2l.load_data_fashion_mnist(batch_size=batch_size)定义计算精度的函数:
xxxxxxxxxxdef evaluate_accuracy_gpu(net, data_iter, device=None): #@save """使用GPU计算模型在数据集上的精度""" if isinstance(net, nn.Module): net.eval() # 设置为评估模式 if not device: device = next(iter(net.parameters())).device # 正确预测的数量,总预测的数量 metric = d2l.Accumulator(2) with torch.no_grad(): for X, y in data_iter: if isinstance(X, list): # BERT微调所需的(之后将介绍) X = [x.to(device) for x in X] else: X = X.to(device) y = y.to(device) metric.add(d2l.accuracy(net(X), y), y.numel()) return metric[0] / metric[1]训练函数:
xxxxxxxxxxdef train_ch6(net, train_iter, test_iter, num_epochs, lr, device): """用GPU训练模型""" def init_weights(m): if type(m) == nn.Linear or type(m) == nn.Conv2d: nn.init.xavier_uniform_(m.weight) net.apply(init_weights) print('training on', device) net.to(device) optimizer = torch.optim.SGD(net.parameters(), lr=lr) loss = nn.CrossEntropyLoss() animator = d2l.Animator(xlabel='epoch', xlim=[1, num_epochs], legend=['train loss', 'train acc', 'test acc']) timer, num_batches = d2l.Timer(), len(train_iter) for epoch in range(num_epochs): # 训练损失之和,训练准确率之和,样本数 metric = d2l.Accumulator(3) net.train() for i, (X, y) in enumerate(train_iter): timer.start() optimizer.zero_grad() X, y = X.to(device), y.to(device) y_hat = net(X) l = loss(y_hat, y) l.backward() optimizer.step() # 更新模型参数 with torch.no_grad(): metric.add(l * X.shape[0], d2l.accuracy(y_hat, y), X.shape[0]) timer.stop() train_l = metric[0] / metric[2] train_acc = metric[1] / metric[2] if (i + 1) % (num_batches // 5) == 0 or i == num_batches - 1: animator.add(epoch + (i + 1) / num_batches, (train_l, train_acc, None)) test_acc = evaluate_accuracy_gpu(net, test_iter) animator.add(epoch + 1, (None, None, test_acc)) print(f'loss {train_l:.3f}, train acc {train_acc:.3f}, ' f'test acc {test_acc:.3f}') print(f'{metric[2] * num_epochs / timer.sum():.1f} examples/sec ' f'on {str(device)}')训练和评估LeNet-5模型:
xxxxxxxxxxlr, num_epochs = 0.9, 10train_ch6(net, train_iter, test_iter, num_epochs, lr, d2l.try_gpu())xxxxxxxxxxloss 0.469, train acc 0.823, test acc 0.77955296.6 examples/sec on cuda:0
7 现代卷积神经网络
7.1 深度卷积神经网络(AlexNet)
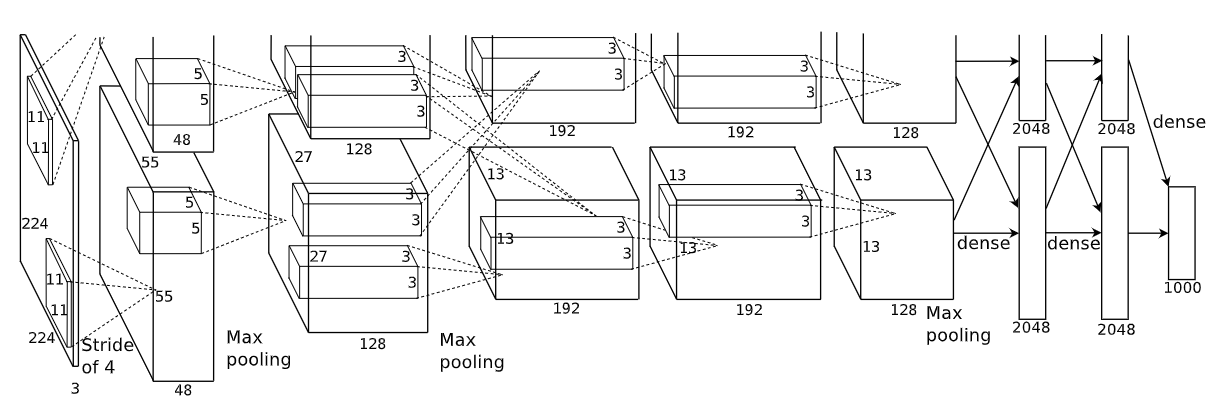
2012年,AlexNet横空出世。它首次证明了学习到的特征可以超越手工设计的特征。它一举打破了计算机视觉研究的现状。 AlexNet使用了8层卷积神经网络,并以很大的优势赢得了2012年ImageNet图像识别挑战赛。
AlexNet和LeNet的设计理念非常相似,但也存在显著差异。
- AlexNet比相对较小的LeNet5要深得多。AlexNet由八层组成:五个卷积层、两个全连接隐藏层和一个全连接输出层。
- AlexNet使用ReLU而不是sigmoid作为其激活函数。
- AlexNet还使用了dropout、MaxPooling
xxxxxxxxxximport torchfrom torch import nnfrom d2l import torch as d2l
net = nn.Sequential( # 这里使用一个11*11的更大窗口来捕捉对象。 # 同时,步幅为4,以减少输出的高度和宽度。 # 另外,输出通道的数目远大于LeNet nn.Conv2d(1, 96, kernel_size=11, stride=4, padding=1), nn.ReLU(), # 这里设置输入通道为1是因为我们选用的Fashion-Mnist来跑,ImageNet太大了 nn.MaxPool2d(kernel_size=3, stride=2), # 减小卷积窗口,使用填充为2来使得输入与输出的高和宽一致,且增大输出通道数 nn.Conv2d(96, 256, kernel_size=5, padding=2), nn.ReLU(), nn.MaxPool2d(kernel_size=3, stride=2), # 使用三个连续的卷积层和较小的卷积窗口。 # 除了最后的卷积层,输出通道的数量进一步增加。 # 在前两个卷积层之后,汇聚层不用于减少输入的高度和宽度 nn.Conv2d(256, 384, kernel_size=3, padding=1), nn.ReLU(), nn.Conv2d(384, 384, kernel_size=3, padding=1), nn.ReLU(), nn.Conv2d(384, 256, kernel_size=3, padding=1), nn.ReLU(), nn.MaxPool2d(kernel_size=3, stride=2), nn.Flatten(), # 这里,全连接层的输出数量是LeNet中的好几倍。使用dropout层来减轻过拟合 nn.Linear(6400, 4096), nn.ReLU(), nn.Dropout(p=0.5), nn.Linear(4096, 4096), nn.ReLU(), nn.Dropout(p=0.5), # 最后是输出层。由于这里使用Fashion-MNIST,所以用类别数为10,而非论文中的1000 nn.Linear(4096, 10))xxxxxxxxxxX = torch.randn(1, 1, 224, 224)for layer in net: X=layer(X) print(layer.__class__.__name__,'output shape:\t',X.shape) Conv2d output shape: torch.Size([1, 96, 54, 54])ReLU output shape: torch.Size([1, 96, 54, 54])MaxPool2d output shape: torch.Size([1, 96, 26, 26])Conv2d output shape: torch.Size([1, 256, 26, 26])ReLU output shape: torch.Size([1, 256, 26, 26])MaxPool2d output shape: torch.Size([1, 256, 12, 12])Conv2d output shape: torch.Size([1, 384, 12, 12])ReLU output shape: torch.Size([1, 384, 12, 12])Conv2d output shape: torch.Size([1, 384, 12, 12])ReLU output shape: torch.Size([1, 384, 12, 12])Conv2d output shape: torch.Size([1, 256, 12, 12])ReLU output shape: torch.Size([1, 256, 12, 12])MaxPool2d output shape: torch.Size([1, 256, 5, 5])Flatten output shape: torch.Size([1, 6400])Linear output shape: torch.Size([1, 4096])ReLU output shape: torch.Size([1, 4096])Dropout output shape: torch.Size([1, 4096])Linear output shape: torch.Size([1, 4096])ReLU output shape: torch.Size([1, 4096])Dropout output shape: torch.Size([1, 4096])Linear output shape: torch.Size([1, 10])7.2 使用块的网络(VGG)
AlexNet最大的问题其实是长得不规则,结构长得不那么清晰。
我如果想要变得更深更大,我就需要把我的框架设计的更清晰一点。
选项:
- 更多的全连接层(太贵)
- 更多的卷积层(不太好做)
- 将卷积层组合成块 ✔️
在CNN中:
深指的是更多的卷积层,可以提取更复杂的特征。
宽指的是卷积核的大小,决定了单个卷积操作能“看到”多少图像区域。
VGG块的核心是:
- 3x3 卷积(填充 1)(n层,m通道)
- 2x2最大池化层(步幅 2)
- 小卷积核的堆叠:使用多个3x3卷积核替代大卷积核,减少参数和计算量。
- 深度优于宽度:通过增加层数而非卷积核大小,提升特征提取能力。
- 一致性与简洁性:统一使用3x3卷积和2x2池化,设计简洁高效。
不同次数的重复块得到不同的架构VGG-16, VGG-19...

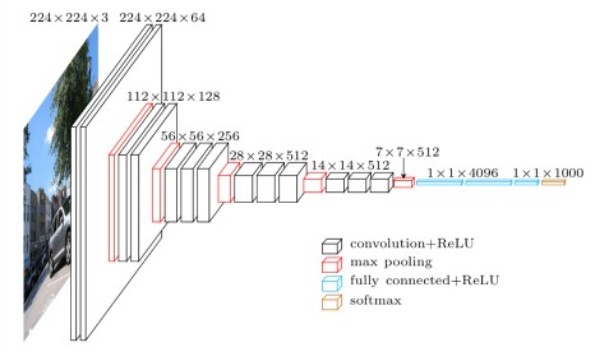
原始VGG网络有5个卷积块,其中前两个块各有一个卷积层,后三个块各包含两个卷积层。 第一个模块有64个输出通道,每个后续模块将输出通道数量翻倍,直到该数字达到512。由于该网络使用8个卷积层和3个全连接层,因此它通常被称为VGG-11。
xxxxxxxxxximport torchfrom torch import nnfrom d2l import torch as d2l
# 定义VGG块def vgg_block(num_convs, in_channels, out_channels):    layers = []    for _ in range(num_convs):  # _ 是一个约定俗成的占位符,表示该变量不会被使用        layers.append(nn.Conv2d(in_channels, out_channels,                                kernel_size=3, padding=1))        layers.append(nn.ReLU())        in_channels = out_channels    layers.append(nn.MaxPool2d(kernel_size=2,stride=2))    return nn.Sequential(*layers)   # * 是解包运算符,用于将列表或元组中的元素解开,并作为独立的参数传递给函数或方法

# 定义VGG11网络conv_arch = ((1, 64), (1, 128), (2, 256), (2, 512), (2, 512))
def vgg(conv_arch):    conv_blks = []    in_channels = 1    # 卷积层部分    for (num_convs, out_channels) in conv_arch:        conv_blks.append(vgg_block(num_convs, in_channels, out_channels))        in_channels = out_channels
    return nn.Sequential(        *conv_blks, nn.Flatten(),        # 全连接层部分        nn.Linear(out_channels * 7 * 7, 4096), nn.ReLU(), nn.Dropout(0.5),        nn.Linear(4096, 4096), nn.ReLU(), nn.Dropout(0.5),        nn.Linear(4096, 10))
net = vgg(conv_arch)
训练模型:
xxxxxxxxxxratio = 4small_conv_arch = [(pair[0], pair[1] // ratio) for pair in conv_arch]net = vgg(small_conv_arch)
lr, num_epochs, batch_size = 0.05, 10, 128train_iter, test_iter = d2l.load_data_fashion_mnist(batch_size, resize=224)d2l.train_ch6(net, train_iter, test_iter, num_epochs, lr, d2l.try_gpu())xxxxxxxxxxloss 0.178, train acc 0.935, test acc 0.9202463.7 examples/sec on cuda:07.3 网络中的网络(NiN)
虽然该网络现在很少被用到,但是它提出的思想还是比较关键的。
1.全连接层的问题
卷积层需要较少的参数
但卷积层后的第一个全连接层的参数
- LeNet 16x5x5x120 = 48k
- AlexNet 256x5x5x4096 = 26M
- VGG 512x7x7x4096 = 102M
最重要的是,它极易带来过拟合。
NiN的思想就是,我完全不要全连接层
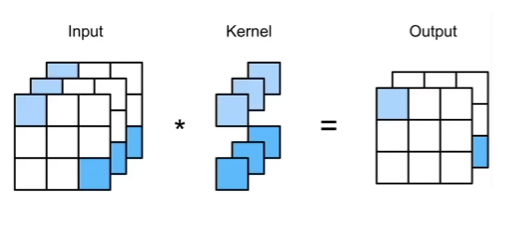
2.NiN块
一个卷积层后跟两个全连接层:
- 步幅1,无填充,输出形状跟卷积层输出一样
- 起到全连接层的作用
3.NiN架构
无全连接层
交替使用NiN块和步幅为2的最大池化层
- 逐步减小高宽和增大通道数
最后使用全局平均池化层得到输出
- 它将每个通道上的所有特征图元素的平均值计算出来,从而将一个高宽较大的特征图(例如
h×w×c,其中h为高度,w为宽度,c为通道数)压缩为一个大小为1×1×c的向量。 - 其输入通道数是类别数
- 它将每个通道上的所有特征图元素的平均值计算出来,从而将一个高宽较大的特征图(例如
4.代码实现
xxxxxxxxxximport torchfrom torch import nnfrom d2l import torch as d2l

def nin_block(in_channels, out_channels, kernel_size, strides, padding):    return nn.Sequential(        nn.Conv2d(in_channels, out_channels, kernel_size, strides, padding),        nn.ReLU(),        nn.Conv2d(out_channels, out_channels, kernel_size=1), nn.ReLU(),        nn.Conv2d(out_channels, out_channels, kernel_size=1), nn.ReLU())

net = nn.Sequential( nin_block(1, 96, kernel_size=11, strides=4, padding=0), nn.MaxPool2d(3, stride=2), nin_block(96, 256, kernel_size=5, strides=1, padding=2), nn.MaxPool2d(3, stride=2), nin_block(256, 384, kernel_size=3, strides=1, padding=1), nn.MaxPool2d(3, stride=2), nn.Dropout(0.5), # 标签类别数是10 nin_block(384, 10, kernel_size=3, strides=1, padding=1), nn.AdaptiveAvgPool2d((1, 1)), # (1,1)的意思是高宽都要变成1 # 将四维的输出转成二维的输出,其形状为(批量大小,10) nn.Flatten())xxxxxxxxxxlr, num_epochs, batch_size = 0.1, 10, 128train_iter, test_iter = d2l.load_data_fashion_mnist(batch_size, resize=224)d2l.train_ch6(net, train_iter, test_iter, num_epochs, lr, d2l.try_gpu())
loss 0.563, train acc 0.786, test acc 0.7903087.6 examples/sec on cuda:07.4 含并行连接的网络(GoogLeNet)
最好的卷积层超参数?LeNet、AlexNet、VGG、NiN用哪个?
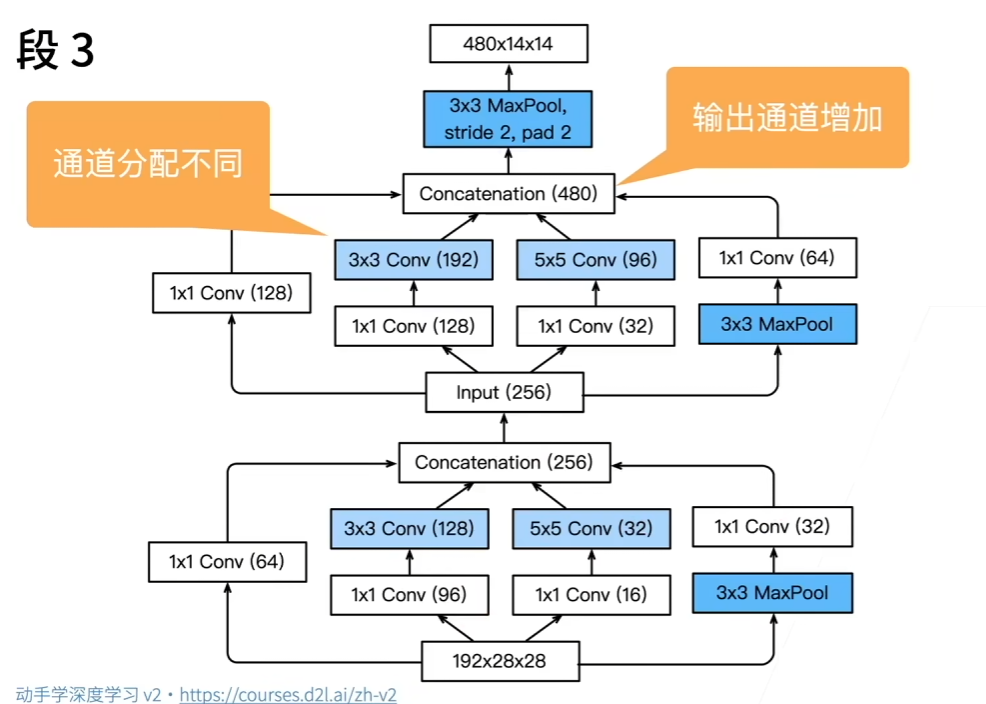
Inception块:小学生才做选择题,我全要了!
4个路径从不同层面抽取信息,然后在输出通道维合并
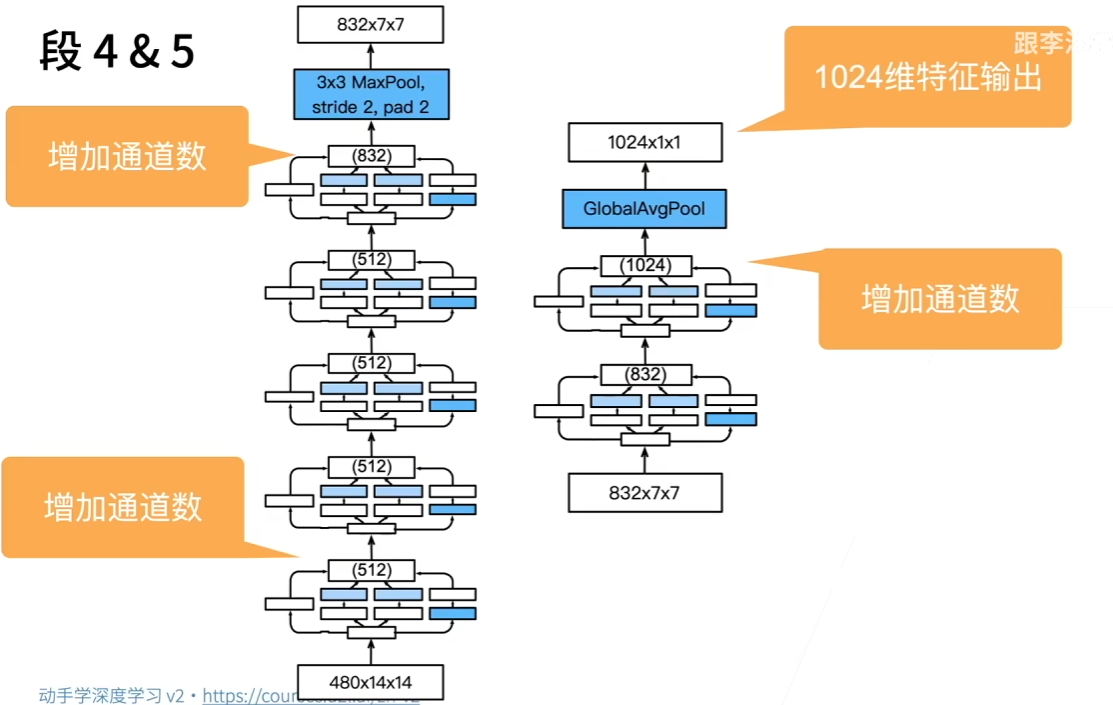
GoogLeNet一共使用9个Inception块和全局平均汇聚层的堆叠来生成其估计值。Inception块之间的最大汇聚层可降低维度。 第一个模块类似于AlexNet和LeNet,Inception块的组合从VGG继承,全局平均汇聚层避免了在最后使用全连接层。
1.段1&2
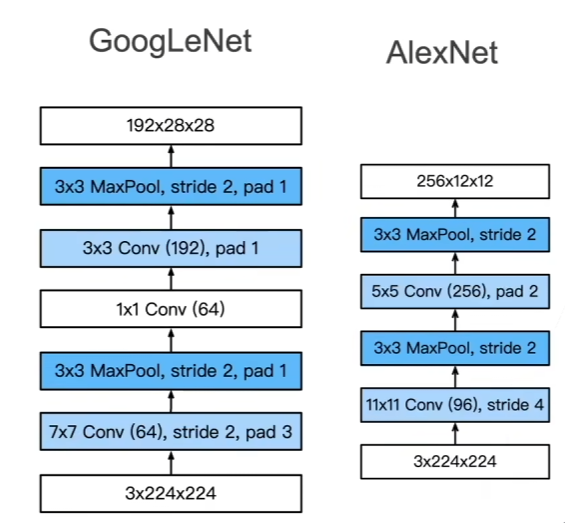
2.段2
3.段4&5
4.Inception有各种后续变种
nception-BN (v2)-使用 batch normalization (后面介绍)
nception-V3- 修改了Inception块
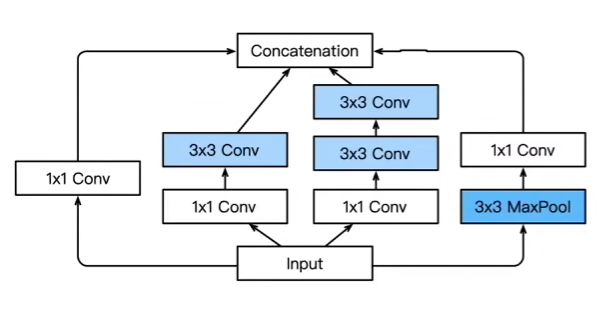


- 替换5x5 为多个 3x3 卷积层
- 替换 5x5 为 1x7 和 7x1 卷积层
- 替换 3x3 为 1x3 和 3x1 卷积层
- 更深

Inception-V4- 使用残差连接(后面介绍)
5.随便看看得了,反正就是按照结构体敲代码,都是套娃...
7.4. 含并行连结的网络(GoogLeNet) — 动手学深度学习 2.0.0 documentation (d2l.ai)
7.5 批量归一化
理论
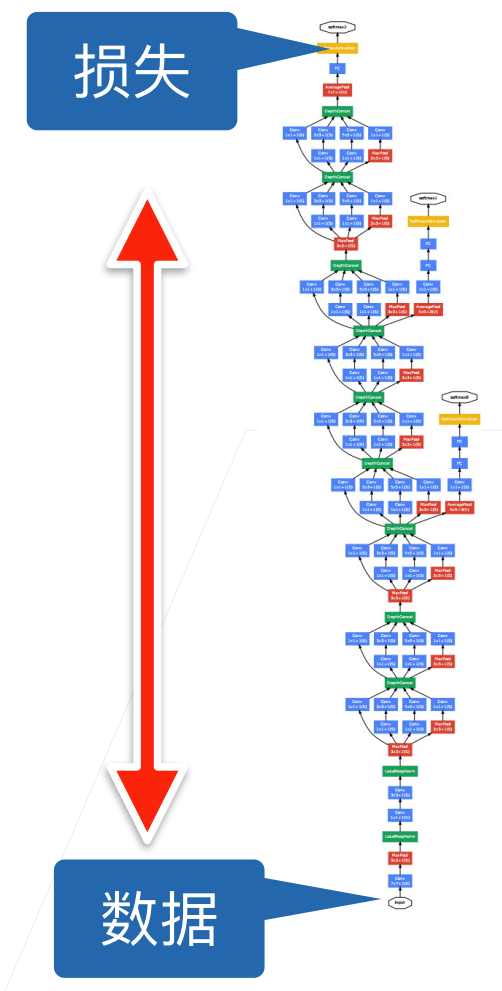
现有的问题:
损失出现在最后,后面的层训练较快
数据在最底部
- 底部的层训练较慢
- 底部层一变化,所有都得跟着变
- 最后的那些层需要重新学习多次
- 导致收敛变慢
我们可以在学习底部层的时候避免变化顶部层吗?
固定小批量里面的均值和方差:
然后再做额外的调整(可学习的参数):
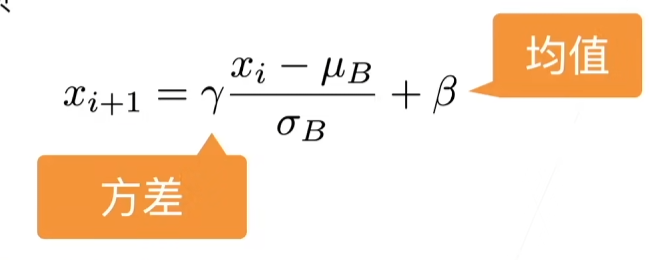
可学习的参数为
作用在
- 全连接层和卷积层输出上,激活函数前(批量归一化是一个线性变换)
- 全连接层和卷积层输入上
对全连接层,作用在特征维
对于卷积层,作用在通道维
作用位置建议看代码,更好理解一些
但实际上,沐神的理解说他其实就是一个正则化或者dropout,可以加快收敛速度,但是一般不会改变模型精度https://www.bilibili.com/video/BV1X44y1r77r?t=1063.1
代码实现
首先我们实现这一层
xxxxxxxxxximport torchfrom torch import nnfrom d2l import torch as d2l

# eps(也称为epsilon)在批量归一化中起着防止除零错误的关键作用def batch_norm(X, gamma, beta, moving_mean, moving_var, eps, momentum): # 通过is_grad_enabled来判断当前模式是训练模式还是预测模式 if not torch.is_grad_enabled(): # 如果是在预测模式下,直接使用传入的移动平均所得的均值和方差 X_hat = (X - moving_mean) / torch.sqrt(moving_var + eps) else: assert len(X.shape) in (2, 4) if len(X.shape) == 2: # 使用全连接层的情况,计算特征维上的均值和方差 mean = X.mean(dim=0) var = ((X - mean) ** 2).mean(dim=0) else: # 使用二维卷积层的情况,计算通道维上(axis=1)的均值和方差。 # 这里我们需要保持X的形状以便后面可以做广播运算 mean = X.mean(dim=(0, 2, 3), keepdim=True) var = ((X - mean) ** 2).mean(dim=(0, 2, 3), keepdim=True) # 训练模式下,用当前的均值和方差做标准化 X_hat = (X - mean) / torch.sqrt(var + eps) # 更新移动平均的均值和方差 moving_mean = momentum * moving_mean + (1.0 - momentum) * mean moving_var = momentum * moving_var + (1.0 - momentum) * var Y = gamma * X_hat + beta # 缩放和移位 return Y, moving_mean.data, moving_var.dataxxxxxxxxxxX = torch.tensor([[1,2,1,1],[2,2,2,2],[3,3,3,3]])X = X.mean(dim=0)Xtensor([2.0000, 2.3333, 2.0000, 2.0000])单个维度求均值时
xxxxxxxxxx# 创建一个shape为(2,2,3,3)的张量X = torch.arange(36).reshape(2,2,3,3)Xtensor([[[[ 0, 1, 2],[ 3, 4, 5],[ 6, 7, 8]],[[ 9, 10, 11],[12, 13, 14],[15, 16, 17]]],[[[18, 19, 20],[21, 22, 23],[24, 25, 26]],[[27, 28, 29],[30, 31, 32],[33, 34, 35]]]])X = X.float()X = X.mean(dim=(0,2,3))Xtensor([13., 22.])多个维度求均值时
这么看来,其实求哪个维度,数值就向哪个维度“聚拢”
创建一个正确的BatchNorm图层
xxxxxxxxxxclass BatchNorm(nn.Module):    # num_features:完全连接层的输出数量或卷积层的输出通道数。    # num_dims:2表示完全连接层,4表示卷积层    def __init__(self, num_features, num_dims):        super().__init__()        if num_dims == 2:            shape = (1, num_features)        else:            shape = (1, num_features, 1, 1)        # 参与求梯度和迭代的拉伸和偏移参数,分别初始化成1和0        self.gamma = nn.Parameter(torch.ones(shape))        self.beta = nn.Parameter(torch.zeros(shape))        # 非模型参数的变量初始化为0和1        self.moving_mean = torch.zeros(shape)        self.moving_var = torch.ones(shape)
def forward(self, X): # 如果X不在内存上,将moving_mean和moving_var # 复制到X所在显存上 if self.moving_mean.device != X.device: self.moving_mean = self.moving_mean.to(X.device) self.moving_var = self.moving_var.to(X.device) # 保存更新过的moving_mean和moving_var Y, self.moving_mean, self.moving_var = batch_norm( X, self.gamma, self.beta, self.moving_mean, self.moving_var, eps=1e-5, momentum=0.9) return Y应用BatchNorm于LeNet
xxxxxxxxxxnet = nn.Sequential( nn.Conv2d(1, 6, kernel_size=5), BatchNorm(6, num_dims=4), nn.Sigmoid(), nn.AvgPool2d(kernel_size=2, stride=2), nn.Conv2d(6, 16, kernel_size=5), BatchNorm(16, num_dims=4), nn.Sigmoid(), nn.AvgPool2d(kernel_size=2, stride=2), nn.Flatten(), nn.Linear(16*4*4, 120), BatchNorm(120, num_dims=2), nn.Sigmoid(), nn.Linear(120, 84), BatchNorm(84, num_dims=2), nn.Sigmoid(), nn.Linear(84, 10))在Fashion-MNIST数据集上训练网络
xxxxxxxxxxlr, num_epochs, batch_size = 1.0, 10, 256train_iter, test_iter = d2l.load_data_fashion_mnist(batch_size)d2l.train_ch6(net, train_iter, test_iter, num_epochs, lr, d2l.try_gpu())
loss 0.273, train acc 0.899, test acc 0.80732293.9 examples/sec on cuda:0看一下学出来的拉伸参数gamma与beta
xxxxxxxxxxnet[1].gamma.reshape((-1,)), net[1].beta.reshape((-1,))
(tensor([0.4863, 2.8573, 2.3190, 4.3188, 3.8588, 1.7942], device='cuda:0',        grad_fn=<ReshapeAliasBackward0>), tensor([-0.0124,  1.4839, -1.7753,  2.3564, -3.8801, -2.1589], device='cuda:0',        grad_fn=<ReshapeAliasBackward0>))
简洁实现
xxxxxxxxxxnet = nn.Sequential(    nn.Conv2d(1, 6, kernel_size=5), nn.BatchNorm2d(6), nn.Sigmoid(),    nn.AvgPool2d(kernel_size=2, stride=2),    nn.Conv2d(6, 16, kernel_size=5), nn.BatchNorm2d(16), nn.Sigmoid(),    nn.AvgPool2d(kernel_size=2, stride=2), nn.Flatten(),    nn.Linear(256, 120), nn.BatchNorm1d(120), nn.Sigmoid(),    nn.Linear(120, 84), nn.BatchNorm1d(84), nn.Sigmoid(),    nn.Linear(84, 10))
d2l.train_ch6(net, train_iter, test_iter, num_epochs, lr, d2l.try_gpu())
7.6 残差网络(ResNet)
加ge能更多的层总是改变精度吗?

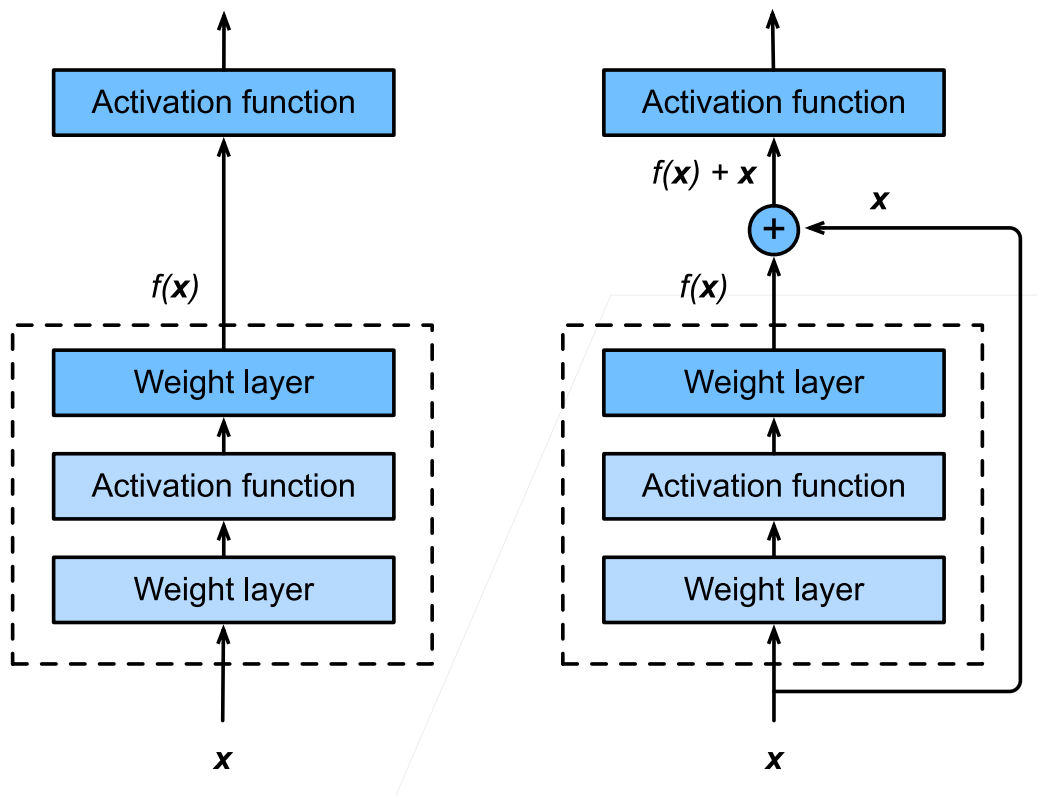
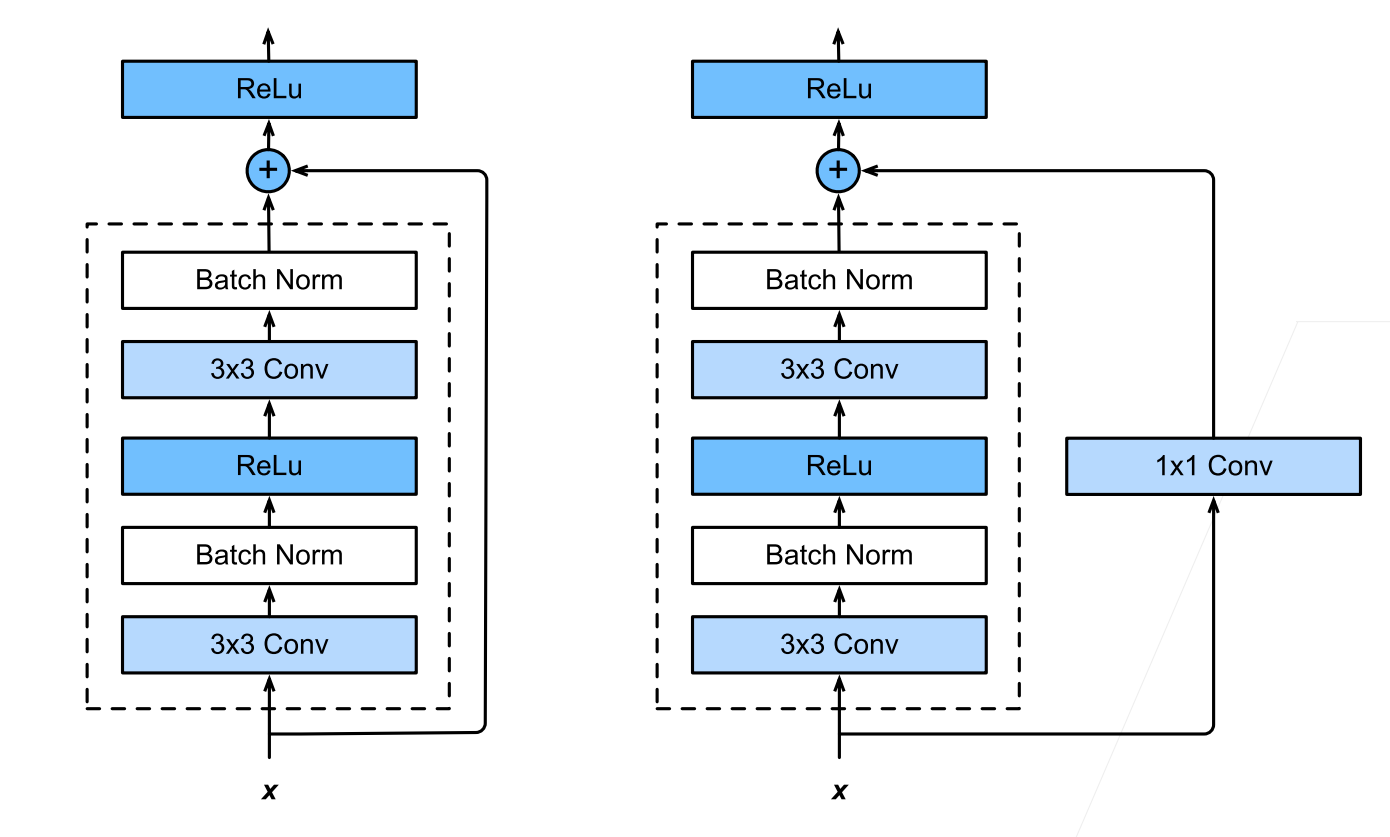
右边这张图展现了残差网络的核心思想。
1.残差块
- 串联一个层改变函数类,我们希望能扩大函数类
- 残差块加入快速通道(右边)来得到
2.ResNet细节
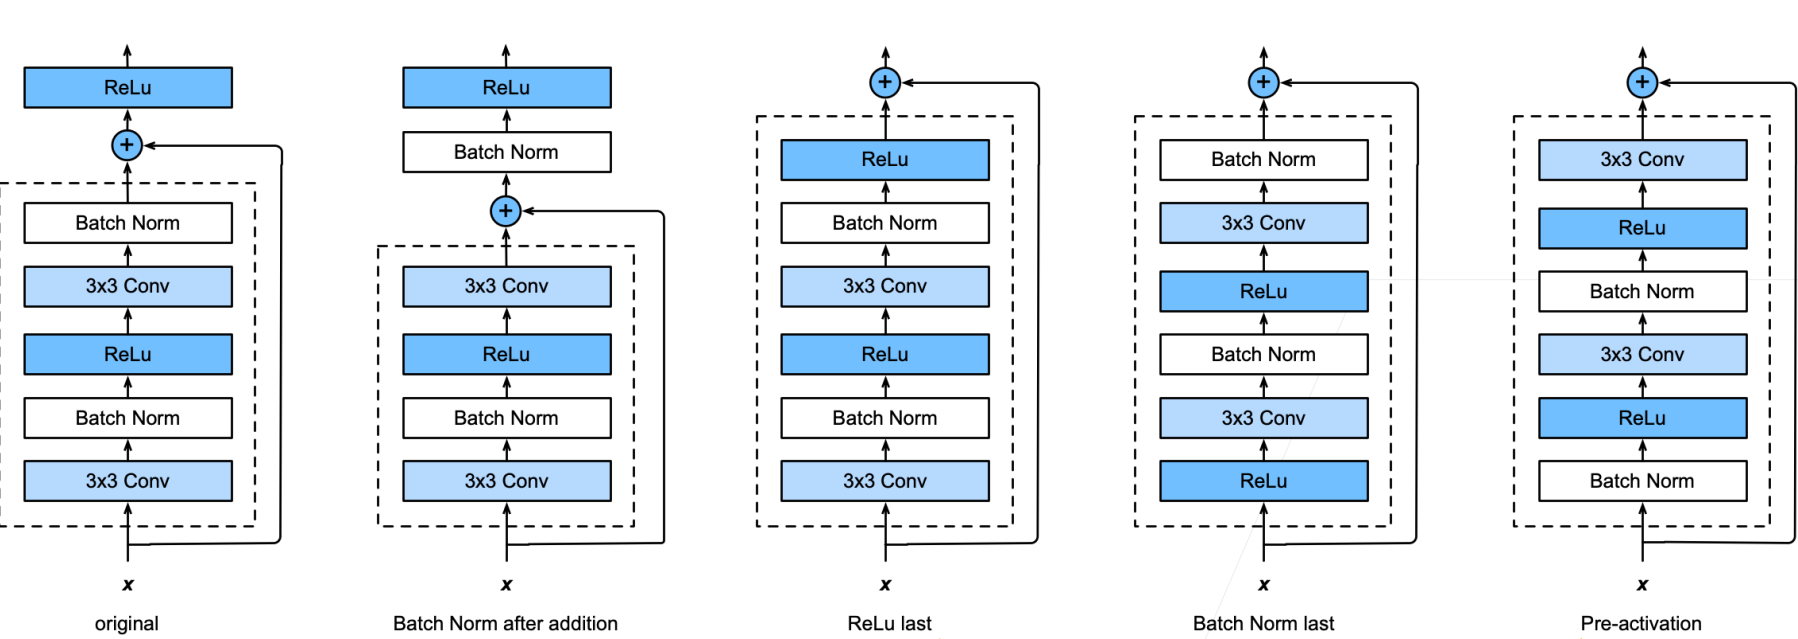
3.不同的残差块
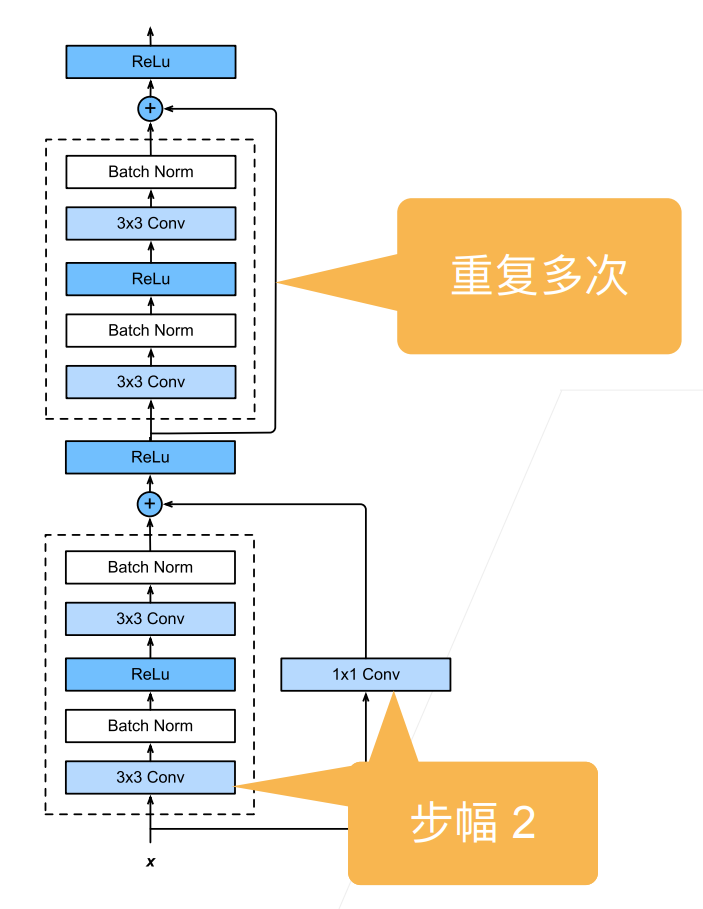
4.ResNet块
- 高宽减半ResNet块(步幅 2)
- 后接多个高宽不变ResNet块
5.ResNet架构

- 类似 VGG 和GoogleNet 的总体架构
- 但替换成了ResNet块
残差网络对随后的深层神经网络设计产生了深远影响,无论是卷积类网络还是全连接类网络。
6.代码实现
xxxxxxxxxximport torchfrom torch import nnfrom torch.nn import functional as Ffrom d2l import torch as d2l

class Residual(nn.Module):    def __init__(self, input_channels, num_channels, use_1x1conv=False, strides=1):        super().__init__()        self.conv1 = nn.Conv2d(input_channels, num_channels,                               kernel_size=3, padding=1, stride=strides)        self.conv2 = nn.Conv2d(num_channels, num_channels,                               kernel_size=3, padding=1)        if use_1x1conv:            self.conv3 = nn.Conv2d(input_channels, num_channels,                                   kernel_size=1, stride=strides)        else:            self.conv3 = None        self.bn1 = nn.BatchNorm2d(num_channels)        self.bn2 = nn.BatchNorm2d(num_channels)
    def forward(self, X):        Y = F.relu(self.bn1(self.conv1(X)))        Y = self.bn2(self.conv2(Y))        if self.conv3:            X = self.conv3(X)        Y += X        return F.relu(Y)
使用样例:
xxxxxxxxxxblk = Residual(3,3)X = torch.rand(4, 3, 6, 6)Y = blk(X)Y.shape
torch.Size([4, 3, 6, 6])xxxxxxxxxxblk = Residual(3,6, use_1x1conv=True, strides=2)blk(X).shape
torch.Size([4, 6, 3, 3])ResNet模型:
xxxxxxxxxxb1 = nn.Sequential(nn.Conv2d(1, 64, kernel_size=7, stride=2, padding=3),                   nn.BatchNorm2d(64), nn.ReLU(),                   nn.MaxPool2d(kernel_size=3, stride=2, padding=1))
def resnet_block(input_channels, num_channels, num_residuals, first_block=False):    blk = []    for i in range(num_residuals):        if i == 0 and not first_block:            blk.append(Residual(input_channels, num_channels,                                use_1x1conv=True, strides=2))        else:            blk.append(Residual(num_channels, num_channels))    return blk
b2 = nn.Sequential(*resnet_block(64, 64, 2, first_block=True))b3 = nn.Sequential(*resnet_block(64, 128, 2))b4 = nn.Sequential(*resnet_block(128, 256, 2))b5 = nn.Sequential(*resnet_block(256, 512, 2))
net = nn.Sequential(b1, b2, b3, b4, b5,                    nn.AdaptiveAvgPool2d((1,1)),                    nn.Flatten(), nn.Linear(512, 10))
上述代码实现了如下模型:
xxxxxxxxxxlr, num_epochs, batch_size = 0.05, 10, 256train_iter, test_iter = d2l.load_data_fashion_mnist(batch_size, resize=96)d2l.train_ch6(net, train_iter, test_iter, num_epochs, lr, d2l.try_gpu())
loss 0.012, train acc 0.997, test acc 0.8935032.7 examples/sec on cuda:0
8 计算性能
这一部分主要是在讲多GPU并行、分布式计算等等,所以就随便看了看,没有笔记。

9 计算机视觉
因为自己现在做的工作跟计算机视觉毫无关系吧哈哈,以后也不打算进入这一个领域,所以这一章也是随便听了听,就当小视频刷了。内容挺多,还是比较有收获的。
还记得入门机器学习的时候就是看的计算机视觉的内容,所以这部分其实还是挺扎实的昂😗
10 循环神经网络
10.1 序列模型
1.序列数据
实际中很多数据是有时序结构的
电影的评价随时间变化而变化
- 拿奖后评分上升,直到奖项被忘记
- 看了很多好电影后,人们的期望变高
- 季节性:贺岁片、暑期档
- 导演、演员的负面报道导致评分变低
音乐、语言、文本、和视频都是连续的
- 标题“狗咬人”远没有“人咬狗”那么令人惊讶
大地震发生后,很可能会有几次较小的余震
人的互动是连续的,从网上吵架可以看出
预测明天的股价要比填补昨天遗失的股价的更困难
2.统计工具
在时间t观察到x,那么得到T个不独立的随机变量
使用条件概率展开
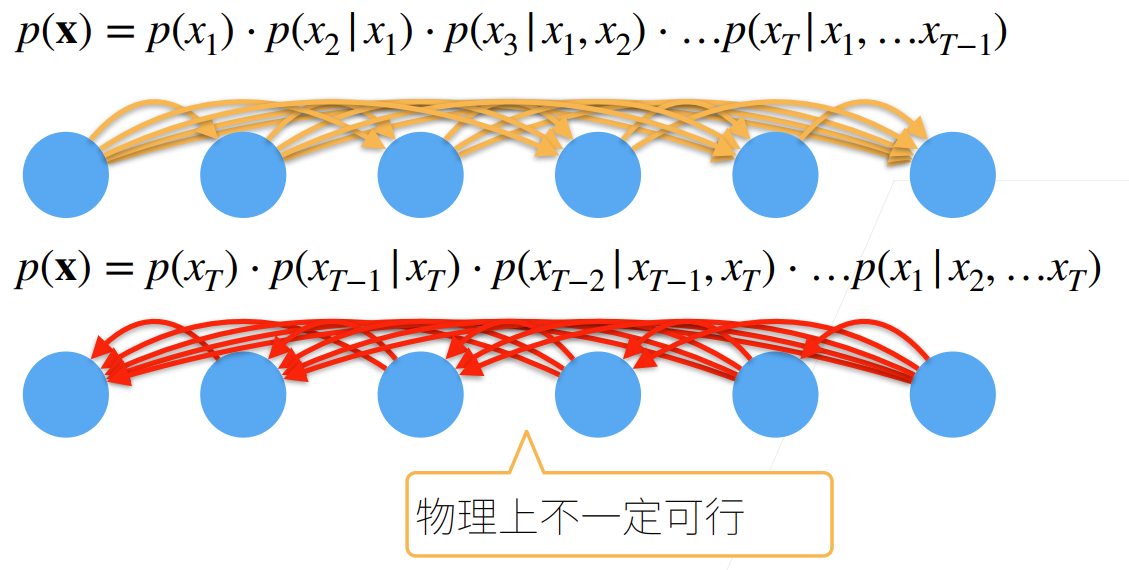
对条件概率建模
对见过的数据建模,也称自回归模型
3.建模方案1:马尔可夫假设

假设当前数据只跟

4.建模方案2:潜变量模型
引入潜变量
- 这样

这样我们就可以拆成两个模型:
- 通过
- 通过
5.马尔可夫假设代码实现
使用正弦函数和一些可加性噪声来生成序列数据,时间步为1,2,.,1000
xxxxxxxxxx%matplotlib inlineimport torchfrom torch import nnfrom d2l import torch as d2l
T = 1000  # 总共产生1000个点time = torch.arange(1, T + 1, dtype=torch.float32)x = torch.sin(0.01 * time) + torch.normal(0, 0.2, (T,))d2l.plot(time, [x], 'time', 'x', xlim=[1, 1000], figsize=(6, 3))
将数据映射为数据对
xxxxxxxxxxtau = 4features = torch.zeros((T - tau, tau))for i in range(tau):    features[:, i] = x[i: T - tau + i]labels = x[tau:].reshape((-1, 1))
batch_size, n_train = 16, 600# 只有前n_train个样本用于训练train_iter = d2l.load_array((features[:n_train], labels[:n_train]),                            batch_size, is_train=True)
定义模型:
xxxxxxxxxx# 初始化网络权重的函数def init_weights(m):    if type(m) == nn.Linear:        nn.init.xavier_uniform_(m.weight)
# 一个简单的多层感知机def get_net():    net = nn.Sequential(nn.Linear(4, 10),                        nn.ReLU(),                        nn.Linear(10, 1))    net.apply(init_weights)    return net
# 平方损失。注意:MSELoss计算平方误差时不带系数1/2loss = nn.MSELoss(reduction='none')
训练:
xxxxxxxxxxdef train(net, train_iter, loss, epochs, lr):    trainer = torch.optim.Adam(net.parameters(), lr)    for epoch in range(epochs):        for X, y in train_iter:            trainer.zero_grad()            l = loss(net(X), y)            l.sum().backward()  # 这个sum会让求出来的梯度变大,跟批量大小有关,学习率还是我们设置的那个不会变,如果直接l.backward(),那么默认为求均值,这是一种比较稳定的方式            trainer.step()        print(f'epoch {epoch + 1}, '              f'loss: {d2l.evaluate_loss(net, train_iter, loss):f}')
net = get_net()train(net, train_iter, loss, 5, 0.01)xxxxxxxxxxepoch 1, loss: 0.076846epoch 2, loss: 0.056340epoch 3, loss: 0.053779epoch 4, loss: 0.056320epoch 5, loss: 0.051650预测:
xxxxxxxxxxonestep_preds = net(features)d2l.plot([time, time[tau:]], [x.detach().numpy(), onestep_preds.detach().numpy()], 'time', 'x', legend=['data', '1-step preds'], xlim=[1, 1000], figsize=(6, 3))如果直接从600开始,往后预测400个点,新预测的点再被用于下一个点的预测:
xxxxxxxxxxmultistep_preds = torch.zeros(T)multistep_preds[: n_train + tau] = x[: n_train + tau]for i in range(n_train + tau, T):    multistep_preds[i] = net(        multistep_preds[i - tau:i].reshape((1, -1)))
d2l.plot([time, time[tau:], time[n_train + tau:]],         [x.detach().numpy(), onestep_preds.detach().numpy(),          multistep_preds[n_train + tau:].detach().numpy()], 'time',         'x', legend=['data', '1-step preds', 'multistep preds'],         xlim=[1, 1000], figsize=(6, 3))
从图上绿色的线来看,效果其实还算是很差的。原因是每次的预测都有误差,不断的累计长期就会偏离。
我们按照这个思想继续进行测试:
那么我们接下来努力的方向就算如何尽可能远的预测,捕捉更多的序列信息。
10.2 文本预处理
1.读取数据集
xxxxxxxxxximport collectionsimport refrom d2l import torch as d2l将数据集读取到由多条文本行组成的列表中
xxxxxxxxxxd2l.DATA_HUB['time_machine'] = (d2l.DATA_URL + 'timemachine.txt',                                '090b5e7e70c295757f55df93cb0a180b9691891a')
def read_time_machine():    """将时间机器数据集加载到文本行的列表中"""    with open(d2l.download('time_machine'), 'r') as f:        lines = f.readlines()    # 有损操作,只保留26个字母,其他都变成空格    return [re.sub('[^A-Za-z]+', ' ', line).strip().lower() for line in lines]
lines = read_time_machine()print(f'# 文本总行数: {len(lines)}')print(lines[0])print(lines[10])xxxxxxxxxxDownloading ../data/timemachine.txt from http://d2l-data.s3-accelerate.amazonaws.com/timemachine.txt...# 文本总行数: 3221the time machine by h g wellstwinkled and his usually pale face was flushed and animated the2.词元化
每个文本序列又被拆分成一个标记列表
按一个词一个词的算,模型其实相对简单
如果把一个串作为一个词元(token)的话,数量会相对较少,但是坏处就算还需要学怎么用字符构成一个词
xxxxxxxxxxdef tokenize(lines, token='word'):    """将文本行拆分为单词或字符词元"""    if token == 'word':        return [line.split() for line in lines]    elif token == 'char':        return [list(line) for line in lines]    else:        print('错误:未知词元类型:' + token)
tokens = tokenize(lines)for i in range(11): print(tokens[i])xxxxxxxxxx['the', 'time', 'machine', 'by', 'h', 'g', 'wells'][][][][]['i'][][]['the', 'time', 'traveller', 'for', 'so', 'it', 'will', 'be', 'convenient', 'to', 'speak', 'of', 'him']['was', 'expounding', 'a', 'recondite', 'matter', 'to', 'us', 'his', 'grey', 'eyes', 'shone', 'and']['twinkled', 'and', 'his', 'usually', 'pale', 'face', 'was', 'flushed', 'and', 'animated', 'the']构建一个字典,通常也叫做词汇表(vocabulary),用来将字符串类型的标记映射到从0开始的数字索引中
xxxxxxxxxxclass Vocab: """文本词表""" def __init__(self, tokens=None, min_freq=0, reserved_tokens=None): if tokens is None: tokens = [] if reserved_tokens is None: reserved_tokens = [] # 按出现频率排序 counter = count_corpus(tokens) self._token_freqs = sorted(counter.items(), key=lambda x: x[1], reverse=True) # 未知词元的索引为0 self.idx_to_token = ['<unk>'] + reserved_tokens self.token_to_idx = {token: idx for idx, token in enumerate(self.idx_to_token)} for token, freq in self._token_freqs: if freq < min_freq: break if token not in self.token_to_idx: self.idx_to_token.append(token) self.token_to_idx[token] = len(self.idx_to_token) - 1
def __len__(self): return len(self.idx_to_token)
def __getitem__(self, tokens): if not isinstance(tokens, (list, tuple)): return self.token_to_idx.get(tokens, self.unk) return [self.__getitem__(token) for token in tokens]
def to_tokens(self, indices): if not isinstance(indices, (list, tuple)): return self.idx_to_token[indices] return [self.idx_to_token[index] for index in indices]
def unk(self): # 未知词元的索引为0 return 0
def token_freqs(self): return self._token_freqs
def count_corpus(tokens): #@save """统计词元的频率""" # 这里的tokens是1D列表或2D列表 if len(tokens) == 0 or isinstance(tokens[0], list): # 将词元列表展平成一个列表 tokens = [token for line in tokens for token in line] return collections.Counter(tokens)xxxxxxxxxxvocab = Vocab(tokens)print(list(vocab.token_to_idx.items())[:10])
[('<unk>', 0), ('the', 1), ('i', 2), ('and', 3), ('of', 4), ('a', 5), ('to', 6), ('was', 7), ('in', 8), ('that', 9)]xxxxxxxxxxfor i in [0, 10]: print('文本:', tokens[i]) print('索引:', vocab[tokens[i]]) 文本: ['the', 'time', 'machine', 'by', 'h', 'g', 'wells']索引: [1, 19, 50, 40, 2183, 2184, 400]文本: ['twinkled', 'and', 'his', 'usually', 'pale', 'face', 'was', 'flushed', 'and', 'animated', 'the']索引: [2186, 3, 25, 1044, 362, 113, 7, 1421, 3, 1045, 1]3.整合所有功能
将所有功能打包到load_corpus_time_machine函数中
xxxxxxxxxxdef load_corpus_time_machine(max_tokens=-1):  #@save    """返回时光机器数据集的词元索引列表和词表"""    lines = read_time_machine()    tokens = tokenize(lines, 'char')    vocab = Vocab(tokens)    # 因为时光机器数据集中的每个文本行不一定是一个句子或一个段落,    # 所以将所有文本行展平到一个列表中    corpus = [vocab[token] for line in tokens for token in line]    if max_tokens > 0:        corpus = corpus[:max_tokens]    return corpus, vocab
corpus, vocab = load_corpus_time_machine()len(corpus), len(vocab)xxxxxxxxxx(170580, 28)按照词频排序的好处一是看起来直观,二是性能会好一些。
10.3 语言模型和数据集
给定文本序列
他的应用包括:
- 做预训练模型(eg BERT,GPT-3)
- 生成本文,给定前面几个词,不断的使用
- 判断多个序列中哪个更常见,e.g.“to recognize speech"vs “to wreck a nice beach“
1.使用计数来建模
假设序列长度为2,我们预测
这里
很容易拓展到长为3的情况
2.N元语法
当序列很长时,因为文本量不够大,很可能
使用马尔科夫假设可以缓解这个问题:
一元语法:
二元语法:
三元语法:
最大的好处是可以处理比较长的序列。
3.代码实现-词组统计
xxxxxxxxxximport randomimport torchfrom d2l import torch as d2l
tokens = d2l.tokenize(d2l.read_time_machine())# 因为每个文本行不一定是一个句子或一个段落,因此我们把所有文本行拼接到一起corpus = [token for line in tokens for token in line]vocab = d2l.Vocab(corpus)vocab.token_freqs[:10]xxxxxxxxxx[('the', 2261), ('i', 1267), ('and', 1245), ('of', 1155), ('a', 816), ('to', 695), ('was', 552), ('in', 541), ('that', 443), ('my', 440)]
[token for line in tokens for token in line]是一个列表推导式中的双循环,它的作用相当于:xxxxxxxxxxresult = []for line in tokens:for token in line:result.append(token)逆天python语法
xxxxxxxxxxfreqs = [freq for token, freq in vocab.token_freqs]d2l.plot(freqs, xlabel='token: x', ylabel='frequency: n(x)', xscale='log', yscale='log')我们现在看一下二元语法的表现:
xxxxxxxxxxbigram_tokens = [pair for pair in zip(corpus[:-1], corpus[1:])] # 这个语法还是比较巧的bigram_vocab = d2l.Vocab(bigram_tokens)bigram_vocab.token_freqs[:10]xxxxxxxxxx[(('of', 'the'), 309), (('in', 'the'), 169), (('i', 'had'), 130), (('i', 'was'), 112), (('and', 'the'), 109), (('the', 'time'), 102), (('it', 'was'), 99), (('to', 'the'), 85), (('as', 'i'), 78), (('of', 'a'), 73)]最后,我们直观地对比三种模型中的词元频率:一元语法、二元语法和三元语法。
4.代码实现-读取长序列数据
方法一:随机采样
随机地生成一个小批量数据的特征和标签以供读取。在随机采样中,每个样本都是在原始的长序列上任意捕获的子序列。
有一个选取的小窍门:https://www.bilibili.com/video/BV1ZX4y1F7K3?t=961.9&p=2
xxxxxxxxxxdef seq_data_iter_random(corpus, batch_size, num_steps):  #@save    """使用随机抽样生成一个小批量子序列"""    # 从随机偏移量开始对序列进行分区,随机范围包括num_steps-1    corpus = corpus[random.randint(0, num_steps - 1):]    # 减去1,是因为我们需要考虑标签    num_subseqs = (len(corpus) - 1) // num_steps    # 长度为num_steps的子序列的起始索引    initial_indices = list(range(0, num_subseqs * num_steps, num_steps))    # 在随机抽样的迭代过程中,    # 来自两个相邻的、随机的、小批量中的子序列不一定在原始序列上相邻    random.shuffle(initial_indices)
    def data(pos):        # 返回从pos位置开始的长度为num_steps的序列        return corpus[pos: pos + num_steps]
num_batches = num_subseqs // batch_size for i in range(0, batch_size * num_batches, batch_size): # 在这里,initial_indices包含子序列的随机起始索引 initial_indices_per_batch = initial_indices[i: i + batch_size] X = [data(j) for j in initial_indices_per_batch] Y = [data(j + 1) for j in initial_indices_per_batch] yield torch.tensor(X), torch.tensor(Y)xxxxxxxxxxmy_seq = list(range(35))for X, Y in seq_data_iter_random(my_seq, batch_size=2, num_steps=5): print('X: ', X, '\nY:', Y)xxxxxxxxxxX: tensor([[13, 14, 15, 16, 17], [28, 29, 30, 31, 32]])Y: tensor([[14, 15, 16, 17, 18], [29, 30, 31, 32, 33]])X: tensor([[ 3, 4, 5, 6, 7], [18, 19, 20, 21, 22]])Y: tensor([[ 4, 5, 6, 7, 8], [19, 20, 21, 22, 23]])X: tensor([[ 8, 9, 10, 11, 12], [23, 24, 25, 26, 27]])Y: tensor([[ 9, 10, 11, 12, 13], [24, 25, 26, 27, 28]])方法二:顺序分区
xxxxxxxxxxdef seq_data_iter_sequential(corpus, batch_size, num_steps): #@save """使用顺序分区生成一个小批量子序列""" # 从随机偏移量开始划分序列 offset = random.randint(0, num_steps) num_tokens = ((len(corpus) - offset - 1) // batch_size) * batch_size Xs = torch.tensor(corpus[offset: offset + num_tokens]) Ys = torch.tensor(corpus[offset + 1: offset + 1 + num_tokens]) Xs, Ys = Xs.reshape(batch_size, -1), Ys.reshape(batch_size, -1) num_batches = Xs.shape[1] // num_steps for i in range(0, num_steps * num_batches, num_steps): X = Xs[:, i: i + num_steps] Y = Ys[:, i: i + num_steps] yield X, Yxxxxxxxxxxfor X, Y in seq_data_iter_sequential(my_seq, batch_size=2, num_steps=5): print('X: ', X, '\nY:', Y)xxxxxxxxxxX: tensor([[ 0, 1, 2, 3, 4], [17, 18, 19, 20, 21]])Y: tensor([[ 1, 2, 3, 4, 5], [18, 19, 20, 21, 22]])X: tensor([[ 5, 6, 7, 8, 9], [22, 23, 24, 25, 26]])Y: tensor([[ 6, 7, 8, 9, 10], [23, 24, 25, 26, 27]])X: tensor([[10, 11, 12, 13, 14], [27, 28, 29, 30, 31]])Y: tensor([[11, 12, 13, 14, 15], [28, 29, 30, 31, 32]])上述两种方法整合为类:
xxxxxxxxxxclass SeqDataLoader:  #@save    """加载序列数据的迭代器"""    def __init__(self, batch_size, num_steps, use_random_iter, max_tokens):        if use_random_iter:            self.data_iter_fn = d2l.seq_data_iter_random        else:            self.data_iter_fn = d2l.seq_data_iter_sequential        self.corpus, self.vocab = d2l.load_corpus_time_machine(max_tokens)        self.batch_size, self.num_steps = batch_size, num_steps
def __iter__(self): return self.data_iter_fn(self.corpus, self.batch_size, self.num_steps)xxxxxxxxxxdef load_data_time_machine(batch_size, num_steps, #@save use_random_iter=False, max_tokens=10000): """返回时光机器数据集的迭代器和词表""" data_iter = SeqDataLoader( batch_size, num_steps, use_random_iter, max_tokens) return data_iter, data_iter.vocab10.4 循环神经网络RNN
循环神经网络跟递归神经网络有区别,注意区分
潜变量自回归模型
使用潜变量

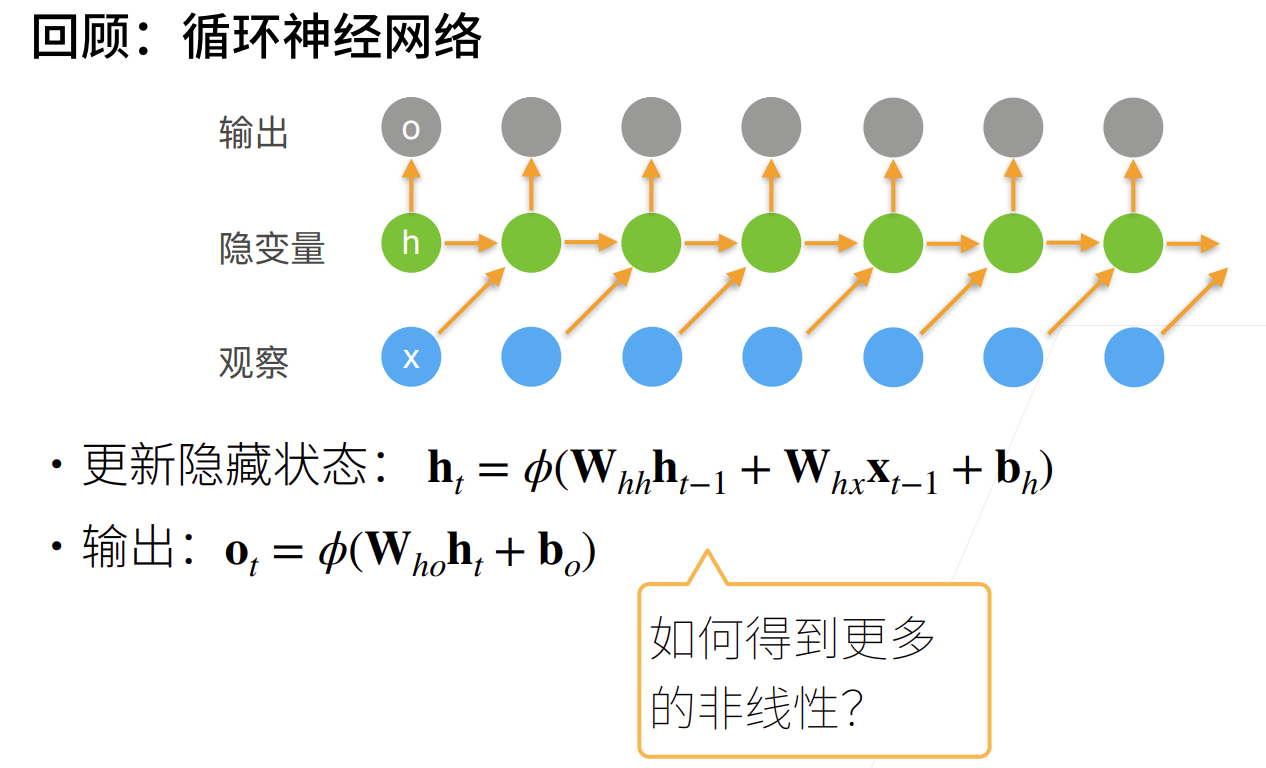
循环神经网络


注意隐变量跟浅变量的区别,可以自行查一下
使用循环神经网络的语言模型
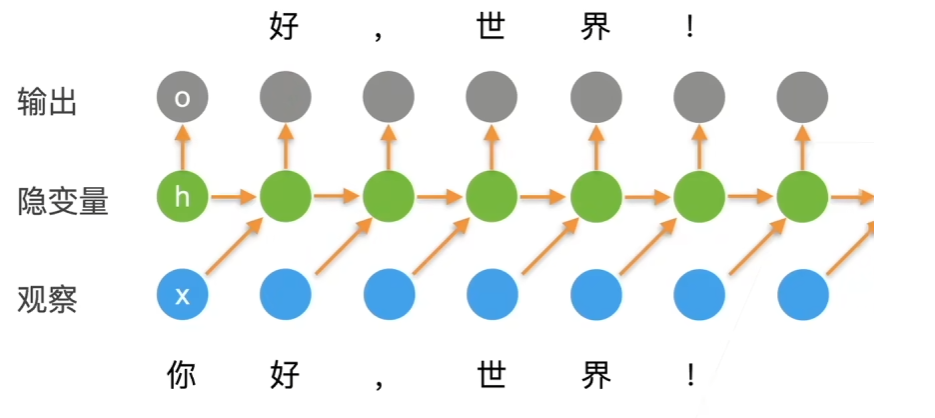
计算损失的时候是通过比较
困惑度(perplexity)
衡量一个语言模型的好坏可以用平均交叉熵
历史原因NLP使用困惑度exp(π)来衡量,是平均每次可能选项
- 表示完美,无穷大是最差情况
梯度裁剪
迭代中计算这T个时间步上的梯度,在反向传播过程中产生长度为 O(T)的矩阵乘法链,导致数值不稳定
梯度裁剪能有效预防梯度爆炸
关于RNN的反向传播梯度分析:RNN/LSTM BPTT详细推导以及梯度消失问题分析 - 知乎 (zhihu.com)
如果梯度长度超过
g表示所有的梯度串在一起
更多的应用RNNs
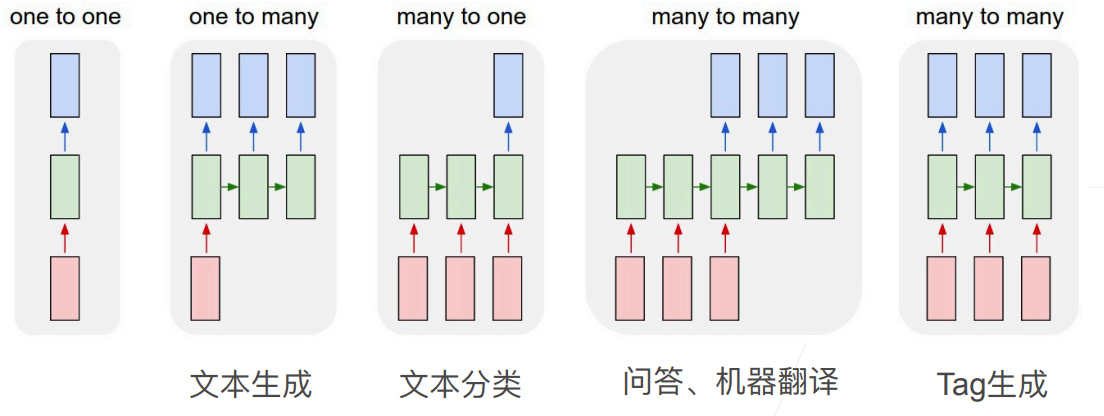
10.5 RNN代码实现
从零开始实现
内容比较多,打个预防针,真给哥们儿看老实了
在基础RNN模型中,所有时间步的隐藏层都共用同一组参数矩阵
W_xh,W_hh,b_h,W_hq, 和b_q。这是RNN的特点之一,称为参数共享。在循环神经网络中,隐藏层的权重矩阵和偏置在每个时间步都是相同的。这种参数共享允许RNN在不同时间步使用相同的规则来处理输入和隐藏状态,从而使得网络能够处理不同长度的序列。
下面这张图可以很好的解答关于我对于参数的困惑:
1.读取数据集
xxxxxxxxxx%matplotlib inlineimport mathimport torchfrom torch import nnfrom torch.nn import functional as Ffrom d2l import torch as d2l
batch_size, num_steps = 32, 35train_iter, vocab = d2l.load_data_time_machine(batch_size, num_steps)# 批量大小以及序列长度(T),返回两个东西,一个是迭代器,一个是字典(可以根据index转成对应的词)2.独热编码
xxxxxxxxxxF.one_hot(torch.tensor([0, 2]), len(vocab))xxxxxxxxxxtensor([[1, 0, 0, 0, 0, 0, 0, 0, 0, 0, 0, 0, 0, 0, 0, 0, 0, 0, 0, 0, 0, 0, 0, 0, 0, 0, 0, 0], [0, 0, 1, 0, 0, 0, 0, 0, 0, 0, 0, 0, 0, 0, 0, 0, 0, 0, 0, 0, 0, 0, 0, 0, 0, 0, 0, 0]])小批量数据形状是(批量大小32,时间步数35)
xxxxxxxxxxX = torch.arange(10).reshape((2, 5))F.one_hot(X.T, 28).shapexxxxxxxxxxtorch.Size([5, 2, 28])3.初始化RNN模型参数
xxxxxxxxxxdef get_params(vocab_size, num_hiddens, device):    num_inputs = num_outputs = vocab_size
    def normal(shape):        return torch.randn(size=shape, device=device) * 0.01
# 隐藏层参数 W_xh = normal((num_inputs, num_hiddens)) W_hh = normal((num_hiddens, num_hiddens)) # 相比mlp其实也就多了这一行 b_h = torch.zeros(num_hiddens, device=device) # 输出层参数 W_hq = normal((num_hiddens, num_outputs)) b_q = torch.zeros(num_outputs, device=device) # 附加梯度 params = [W_xh, W_hh, b_h, W_hq, b_q] for param in params: param.requires_grad_(True) return params一个init_rnn_state 函数在初始化时返回隐藏状态
xxxxxxxxxxdef init_rnn_state(batch_size, num_hiddens, device): return (torch.zeros((batch_size, num_hiddens), device=device), )4.做计算的函数
下面的rnn函数定义了如何在一个时间步内计算隐藏状态和输出
xxxxxxxxxxdef rnn(inputs, state, params): # inputs的形状:(时间步数量,批量大小,词表大小) # state是隐藏层状态,params是可学习参数 W_xh, W_hh, b_h, W_hq, b_q = params H, = state outputs = [] # X的形状:(批量大小,词表大小) for X in inputs: H = torch.tanh(torch.mm(X, W_xh) + torch.mm(H, W_hh) + b_h) Y = torch.mm(H, W_hq) + b_q outputs.append(Y) return torch.cat(outputs, dim=0), (H,)5.创建一个类来包装这些函数
xxxxxxxxxxclass RNNModelScratch:    """从零开始实现的循环神经网络模型"""    def __init__(self, vocab_size, num_hiddens, device,                 get_params, init_state, forward_fn):        self.vocab_size, self.num_hiddens = vocab_size, num_hiddens        self.params = get_params(vocab_size, num_hiddens, device)        self.init_state, self.forward_fn = init_state, forward_fn
    def __call__(self, X, state):        X = F.one_hot(X.T, self.vocab_size).type(torch.float32)        return self.forward_fn(X, state, self.params)
    def begin_state(self, batch_size, device):        return self.init_state(batch_size, self.num_hiddens, device)
检查输出是否具有正确的形状:
xxxxxxxxxxnum_hiddens = 512net = RNNModelScratch(len(vocab), num_hiddens, d2l.try_gpu(), get_params, init_rnn_state, rnn)state = net.begin_state(X.shape[0], d2l.try_gpu())Y, new_state = net(X.to(d2l.try_gpu()), state)Y.shape, len(new_state), new_state[0].shapexxxxxxxxxx(torch.Size([10, 28]), 1, torch.Size([2, 512]))我们可以看到输出形状是(时间步数×批量大小,词表大小), 而隐状态形状保持不变,即(批量大小,隐藏单元数)。
6.预测函数
xxxxxxxxxxdef predict_ch8(prefix, num_preds, net, vocab, device): """在prefix后面生成新字符""" state = net.begin_state(batch_size=1, device=device) outputs = [vocab[prefix[0]]] get_input = lambda: torch.tensor([outputs[-1]], device=device).reshape((1, 1)) for y in prefix[1:]: # 预热期 _, state = net(get_input(), state) outputs.append(vocab[y]) for _ in range(num_preds): # 预测num_preds步 y, state = net(get_input(), state) outputs.append(int(y.argmax(dim=1).reshape(1))) return ''.join([vocab.idx_to_token[i] for i in outputs])xxxxxxxxxxpredict_ch8('time traveller ', 10, net, vocab, d2l.try_gpu())xxxxxxxxxx'time traveller aaaaaaaaaa'7.梯度裁剪
xxxxxxxxxxdef grad_clipping(net, theta): """裁剪梯度""" if isinstance(net, nn.Module): params = [p for p in net.parameters() if p.requires_grad] else: params = net.params norm = torch.sqrt(sum(torch.sum((p.grad ** 2)) for p in params)) if norm > theta: for param in params: param.grad[:] *= theta / norm8.训练
xxxxxxxxxxdef train_epoch_ch8(net, train_iter, loss, updater, device, use_random_iter): """训练网络一个迭代周期(定义见第8章)""" state, timer = None, d2l.Timer() metric = d2l.Accumulator(2) # 训练损失之和,词元数量 for X, Y in train_iter: if state is None or use_random_iter: # 在第一次迭代或使用随机抽样时初始化state state = net.begin_state(batch_size=X.shape[0], device=device) else: if isinstance(net, nn.Module) and not isinstance(state, tuple): # state对于nn.GRU是个张量 state.detach_() else: # state对于nn.LSTM或对于我们从零开始实现的模型是个张量 for s in state: s.detach_() y = Y.T.reshape(-1) X, y = X.to(device), y.to(device) y_hat, state = net(X, state) l = loss(y_hat, y.long()).mean() if isinstance(updater, torch.optim.Optimizer): updater.zero_grad() l.backward() grad_clipping(net, 1) updater.step() else: l.backward() grad_clipping(net, 1) # 因为已经调用了mean函数 updater(batch_size=1) metric.add(l * y.numel(), y.numel()) return math.exp(metric[0] / metric[1]), metric[1] / timer.stop()开始训练:
xxxxxxxxxxdef train_ch8(net, train_iter, vocab, lr, num_epochs, device, use_random_iter=False): """训练模型(定义见第8章)""" loss = nn.CrossEntropyLoss() animator = d2l.Animator(xlabel='epoch', ylabel='perplexity', legend=['train'], xlim=[10, num_epochs]) # 初始化 if isinstance(net, nn.Module): updater = torch.optim.SGD(net.parameters(), lr) else: updater = lambda batch_size: d2l.sgd(net.params, lr, batch_size) predict = lambda prefix: predict_ch8(prefix, 50, net, vocab, device) # 训练和预测 for epoch in range(num_epochs): ppl, speed = train_epoch_ch8( net, train_iter, loss, updater, device, use_random_iter) if (epoch + 1) % 10 == 0: print(predict('time traveller')) animator.add(epoch + 1, [ppl]) print(f'困惑度 {ppl:.1f}, {speed:.1f} 词元/秒 {str(device)}') print(predict('time traveller')) print(predict('traveller'))xxxxxxxxxxnum_epochs, lr = 500, 1train_ch8(net, train_iter, vocab, lr, num_epochs, d2l.try_gpu())
困惑度 1.0, 67212.6 词元/秒 cuda:0time traveller for so it will be convenient to speak of himwas etravelleryou can show black is white by argument said filby看一下随机抽样方法的结果:
xxxxxxxxxxnet = RNNModelScratch(len(vocab), num_hiddens, d2l.try_gpu(), get_params,                      init_rnn_state, rnn)train_ch8(net, train_iter, vocab, lr, num_epochs, d2l.try_gpu(),          use_random_iter=True)
困惑度 1.5, 65222.3 词元/秒 cuda:0time traveller held in his hand was a glitteringmetallic framewotraveller but now you begin to seethe object of my investig
简洁实现
谢谢你,pytorch🫶
pytorch内部只实现了隐藏层的更新与计算,输出那一步需要自己加linear
1.导入数据
xxxxxxxxxximport torchfrom torch import nnfrom torch.nn import functional as Ffrom d2l import torch as d2l
batch_size, num_steps = 32, 35train_iter, vocab = d2l.load_data_time_machine(batch_size, num_steps)2.定义RNN层,一层中所使用的隐藏层数定义见3
xxxxxxxxxxnum_hiddens = 256rnn_layer = nn.RNN(len(vocab), num_hiddens)3.使用张量来初始化隐藏状态
它的形状是(隐藏层数,批量大小,隐藏单元数)
xxxxxxxxxxstate = torch.zeros((1, batch_size, num_hiddens))state.shapexxxxxxxxxxtorch.Size([1, 32, 256])4.通过一个隐藏状态和一个输入,我们就可以用更新后的隐藏状态计算输出
xxxxxxxxxxX = torch.rand(size=(num_steps, batch_size, len(vocab)))Y, state_new = rnn_layer(X, state)Y.shape, state_new.shapexxxxxxxxxx(torch.Size([35, 32, 256]), torch.Size([1, 32, 256]))Y记录了每一个时间步中每一个批次的隐藏层状态,跟前面自己实现的略有不同。
5.定义RNN模型
xxxxxxxxxxclass RNNModel(nn.Module):    """循环神经网络模型"""    def __init__(self, rnn_layer, vocab_size, **kwargs):        super(RNNModel, self).__init__(**kwargs)        self.rnn = rnn_layer        self.vocab_size = vocab_size        self.num_hiddens = self.rnn.hidden_size        # 如果RNN是双向的(之后将介绍),num_directions应该是2,否则应该是1        if not self.rnn.bidirectional:            self.num_directions = 1            # ⭐需要构建自己的输出层            self.linear = nn.Linear(self.num_hiddens, self.vocab_size)        else:            self.num_directions = 2            self.linear = nn.Linear(self.num_hiddens * 2, self.vocab_size)
    def forward(self, inputs, state):        X = F.one_hot(inputs.T.long(), self.vocab_size)        X = X.to(torch.float32)        Y, state = self.rnn(X, state)        # 全连接层首先将Y的形状改为(时间步数*批量大小,隐藏单元数)        # 它的输出形状是(时间步数*批量大小,词表大小)。        output = self.linear(Y.reshape((-1, Y.shape[-1])))        return output, state
def begin_state(self, device, batch_size=1): if not isinstance(self.rnn, nn.LSTM): # nn.GRU以张量作为隐状态 return torch.zeros((self.num_directions * self.rnn.num_layers, batch_size, self.num_hiddens), device=device) else: # nn.LSTM以元组作为隐状态 return (torch.zeros(( self.num_directions * self.rnn.num_layers, batch_size, self.num_hiddens), device=device), torch.zeros(( self.num_directions * self.rnn.num_layers, batch_size, self.num_hiddens), device=device))6.基于一个具有随机权重的模型进行预测
xxxxxxxxxxdevice = d2l.try_gpu()net = RNNModel(rnn_layer, vocab_size=len(vocab))net = net.to(device)d2l.predict_ch8('time traveller', 10, net, vocab, device)xxxxxxxxxx'time travellerbbabbkabyg'7.训练
xxxxxxxxxxnum_epochs, lr = 500, 1d2l.train_ch8(net, train_iter, vocab, lr, num_epochs, device)
perplexity 1.3, 404413.8 tokens/sec on cuda:0time travellerit would be remarkably convenient for the historiatravellery of il the hise fupt might and st was it loflers
由于深度学习框架的高级API对代码进行了更多的优化, 该模型在较短的时间内达到了较低的困惑度。
我们之前自己实现的时候有好多小矩阵乘法,框架会做优化整合成大矩阵乘法,所以总的看来比自己实现快了三倍左右。
11 现代循环神经网络
11.1 控制循环单元(GRU)
效果上跟LSTM差不多,但是稍微简单一点,实际中这两个用哪个都差不多
在RNN中,我们处理不了太长的序列,因为我们把整个序列信息全部放在隐藏状态中,他其实放不了太多东西。
不是每个观察值都同等重要

想要记住相关的观察需要:
- 能关注的机制(更新门)
- 能遗忘的机制(重置门)
1.门
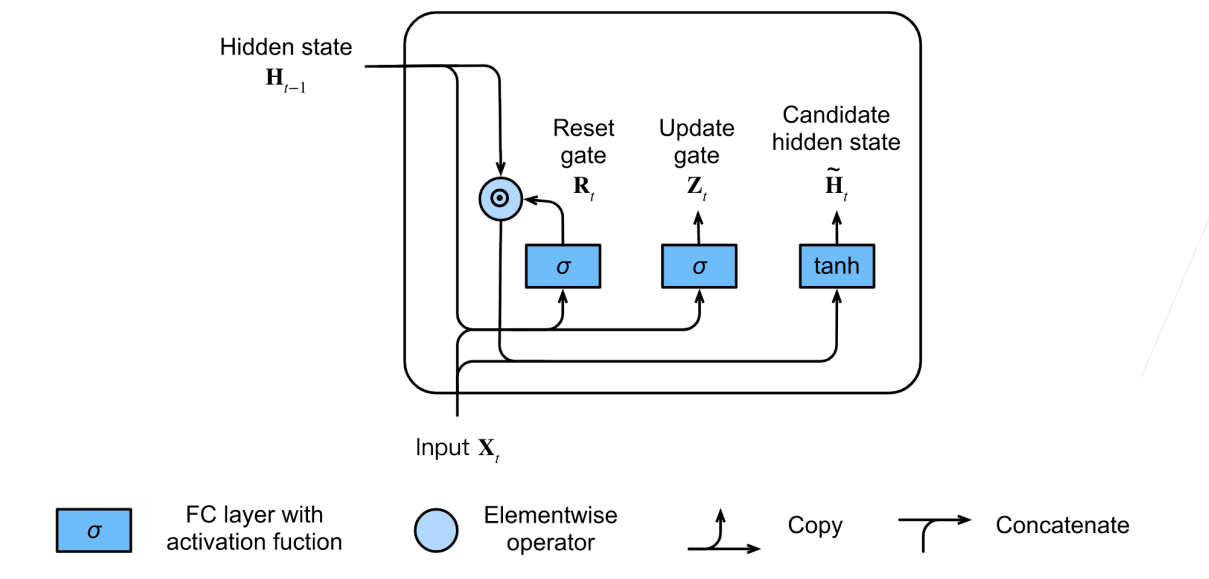
可以把门看成一个跟隐藏状态一样长度的向量,他们的计算方式也是相似的。
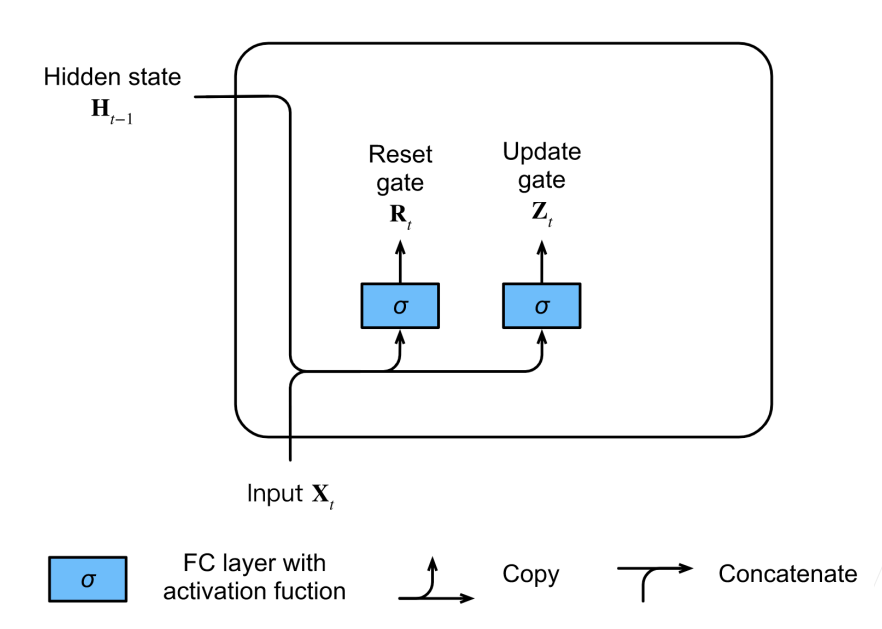
2.候选隐状态
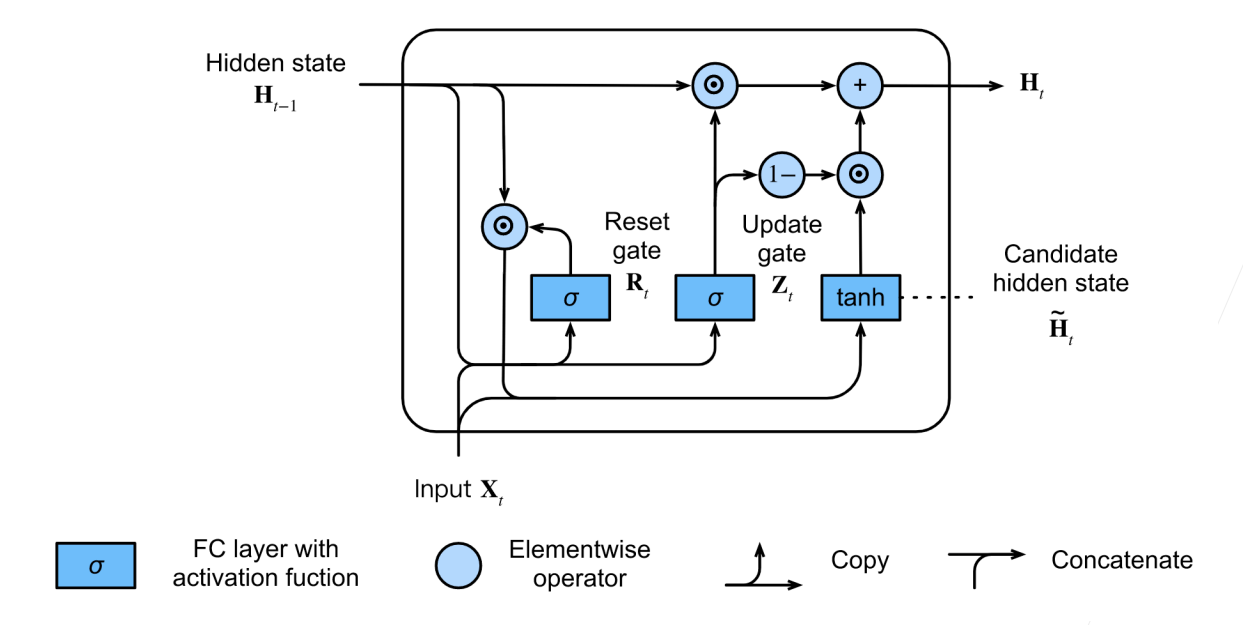
3.隐状态
4.代码实现-从零开始
读取数据集
xxxxxxxxxximport torchfrom torch import nnfrom d2l import torch as d2l
batch_size, num_steps = 32, 35train_iter, vocab = d2l.load_data_time_machine(batch_size, num_steps)
初始化模型参数
xxxxxxxxxxdef get_params(vocab_size, num_hiddens, device):    num_inputs = num_outputs = vocab_size
    def normal(shape):        return torch.randn(size=shape, device=device)*0.01
    def three():        return (normal((num_inputs, num_hiddens)),                normal((num_hiddens, num_hiddens)),                torch.zeros(num_hiddens, device=device))
    W_xz, W_hz, b_z = three()  # 更新门参数    W_xr, W_hr, b_r = three()  # 重置门参数    W_xh, W_hh, b_h = three()  # 候选隐状态参数    # 输出层参数    W_hq = normal((num_hiddens, num_outputs))    b_q = torch.zeros(num_outputs, device=device)    # 附加梯度    params = [W_xz, W_hz, b_z, W_xr, W_hr, b_r, W_xh, W_hh, b_h, W_hq, b_q]    for param in params:        param.requires_grad_(True)    return params
定义隐藏状态的初始化函数
xxxxxxxxxxdef init_gru_state(batch_size, num_hiddens, device): return (torch.zeros((batch_size, num_hiddens), device=device), )定义门控循环单元模型
xxxxxxxxxxdef gru(inputs, state, params): W_xz, W_hz, b_z, W_xr, W_hr, b_r, W_xh, W_hh, b_h, W_hq, b_q = params H, = state outputs = [] for X in inputs: Z = torch.sigmoid((X @ W_xz) + (H @ W_hz) + b_z) R = torch.sigmoid((X @ W_xr) + (H @ W_hr) + b_r) H_tilda = torch.tanh((X @ W_xh) + ((R * H) @ W_hh) + b_h) H = Z * H + (1 - Z) * H_tilda Y = H @ W_hq + b_q outputs.append(Y) return torch.cat(outputs, dim=0), (H,)训练与预测
xxxxxxxxxxvocab_size, num_hiddens, device = len(vocab), 256, d2l.try_gpu()num_epochs, lr = 500, 1model = d2l.RNNModelScratch(len(vocab), num_hiddens, device, get_params,                            init_gru_state, gru)d2l.train_ch8(model, train_iter, vocab, lr, num_epochs, device)
perplexity 1.1, 19911.5 tokens/sec on cuda:0time traveller firenis i heidfile sook at i jomer and sugard aretravelleryou can show black is white by argument said filby5.代码实现-简洁实现
xxxxxxxxxxnum_inputs = vocab_sizegru_layer = nn.GRU(num_inputs, num_hiddens)model = d2l.RNNModel(gru_layer, len(vocab))model = model.to(device)d2l.train_ch8(model, train_iter, vocab, lr, num_epochs, device)xxxxxxxxxxperplexity 1.0, 109423.8 tokens/sec on cuda:0time travelleryou can show black is white by argument said filbytraveller with a slight accession ofcheerfulness really thi11.2 长短期记忆网络(LSTM)
开个小差,刷完网课就立刻刷到了这个视频,他是真懂啊 热播剧《好事成双》,张小斐说LSTM比transformer效果好?
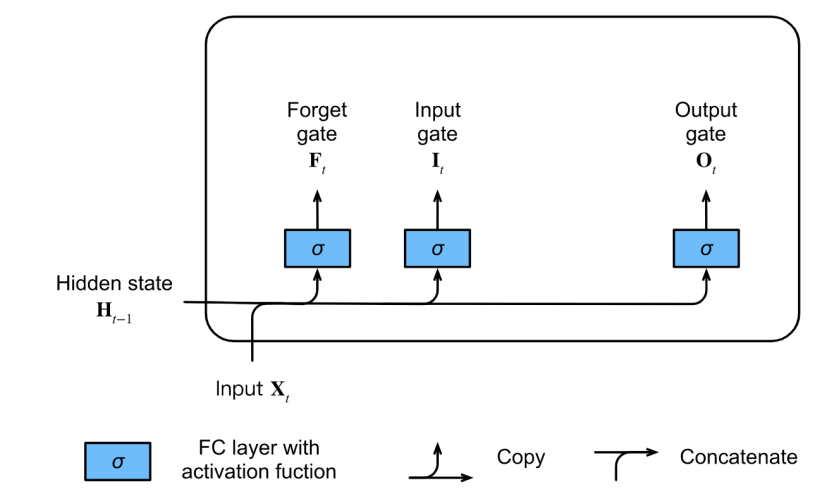
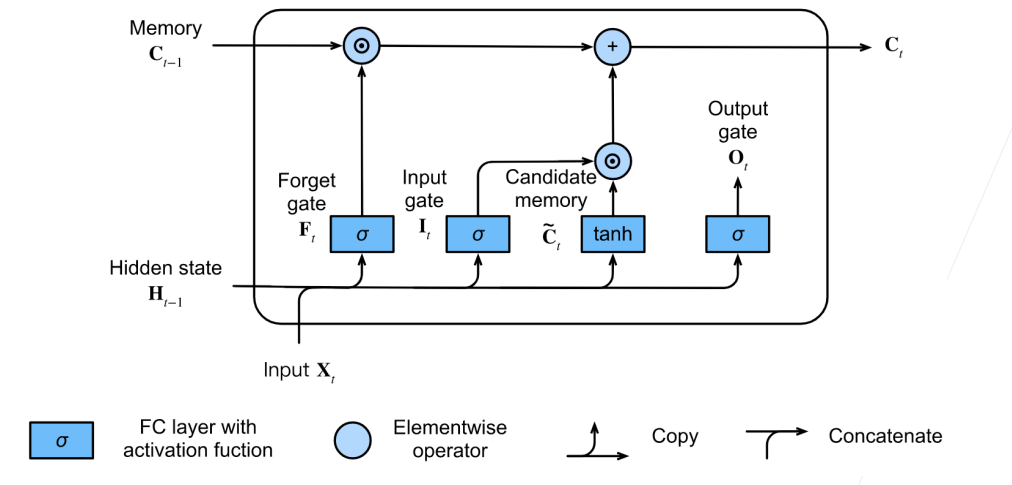
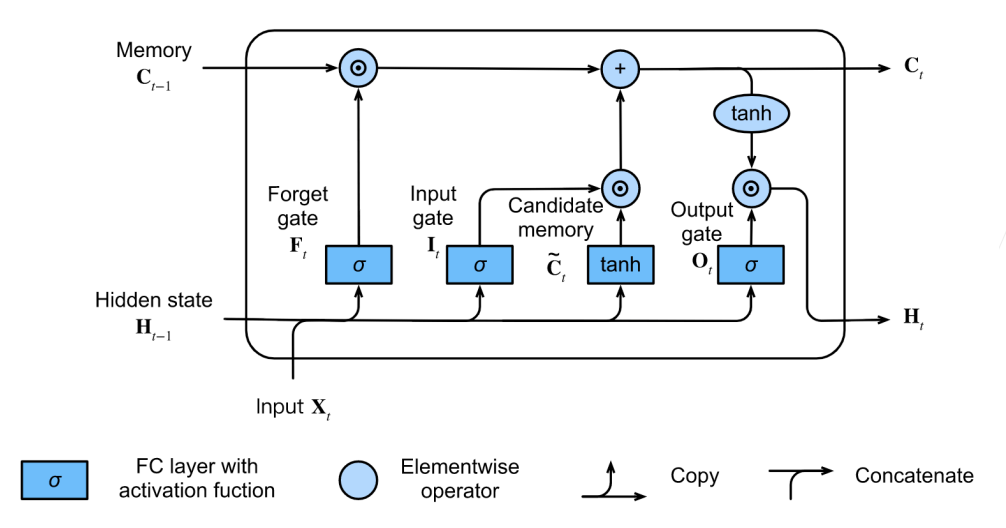
- 忘记门:将值朝0减少
- 输入门:决定不是忽略掉输入数据
- 输出门:决定是不是使用隐状态
1.门
2.候选记忆单元

3.记忆单元
4.隐状态
5.代码实现-从零开始
其实本质没区别,这里就快速写一下吧
xxxxxxxxxximport torchfrom torch import nnfrom d2l import torch as d2l
batch_size, num_steps = 32, 35train_iter, vocab = d2l.load_data_time_machine(batch_size, num_steps)
def get_lstm_params(vocab_size, num_hiddens, device):    num_inputs = num_outputs = vocab_size
    def normal(shape):        return torch.randn(size=shape, device=device)*0.01
    def three():        return (normal((num_inputs, num_hiddens)),                normal((num_hiddens, num_hiddens)),                torch.zeros(num_hiddens, device=device))
    W_xi, W_hi, b_i = three()  # 输入门参数    W_xf, W_hf, b_f = three()  # 遗忘门参数    W_xo, W_ho, b_o = three()  # 输出门参数    W_xc, W_hc, b_c = three()  # 候选记忆元参数     # 输出层参数    W_hq = normal((num_hiddens, num_outputs))    b_q = torch.zeros(num_outputs, device=device)    # 附加梯度    params = [W_xi, W_hi, b_i, W_xf, W_hf, b_f, W_xo, W_ho, b_o, W_xc, W_hc,              b_c, W_hq, b_q]    for param in params:        param.requires_grad_(True)    return params
def init_lstm_state(batch_size, num_hiddens, device):    return (torch.zeros((batch_size, num_hiddens), device=device),            torch.zeros((batch_size, num_hiddens), device=device))
def lstm(inputs, state, params):    [W_xi, W_hi, b_i, W_xf, W_hf, b_f, W_xo, W_ho, b_o, W_xc, W_hc, b_c,     W_hq, b_q] = params    (H, C) = state    outputs = []    for X in inputs:        I = torch.sigmoid((X @ W_xi) + (H @ W_hi) + b_i)        F = torch.sigmoid((X @ W_xf) + (H @ W_hf) + b_f)        O = torch.sigmoid((X @ W_xo) + (H @ W_ho) + b_o)        C_tilda = torch.tanh((X @ W_xc) + (H @ W_hc) + b_c)        C = F * C + I * C_tilda        H = O * torch.tanh(C)        Y = (H @ W_hq) + b_q        outputs.append(Y)    return torch.cat(outputs, dim=0), (H, C)
vocab_size, num_hiddens, device = len(vocab), 256, d2l.try_gpu()num_epochs, lr = 500, 1model = d2l.RNNModelScratch(len(vocab), num_hiddens, device, get_lstm_params, init_lstm_state, lstm)d2l.train_ch8(model, train_iter, vocab, lr, num_epochs, device)xxxxxxxxxxperplexity 1.3, 17736.0 tokens/sec on cuda:0time traveller for so it will leong go it we melenot ir cove i straveller care be can so i ngrecpely as along the time dime6.代码实现-简洁实现
xxxxxxxxxxnum_inputs = vocab_sizelstm_layer = nn.LSTM(num_inputs, num_hiddens)model = d2l.RNNModel(lstm_layer, len(vocab))model = model.to(device)d2l.train_ch8(model, train_iter, vocab, lr, num_epochs, device)xxxxxxxxxxperplexity 1.1, 234815.0 tokens/sec on cuda:0time traveller for so it will be convenient to speak of himwas etravelleryou can show black is white by argument said filby11.3 深度循环神经网络
理论
序列变长不是深度,RNN解决了梯度问题后,开始往深发展
现在我要更深

公式也比较简单:
代码实现
从零开始也太无聊了,直接写简洁实现吧
xxxxxxxxxximport torchfrom torch import nnfrom d2l import torch as d2l
batch_size, num_steps = 32, 35train_iter, vocab = d2l.load_data_time_machine(batch_size, num_steps)xxxxxxxxxxvocab_size, num_hiddens, num_layers = len(vocab), 256, 2num_inputs = vocab_sizedevice = d2l.try_gpu()lstm_layer = nn.LSTM(num_inputs, num_hiddens, num_layers)model = d2l.RNNModel(lstm_layer, len(vocab))model = model.to(device)xxxxxxxxxxnum_epochs, lr = 500, 2d2l.train_ch8(model, train_iter, vocab, lr*1.0, num_epochs, device)
perplexity 1.0, 186005.7 tokens/sec on cuda:0time traveller for so it will be convenient to speak of himwas etravelleryou can show black is white by argument said filby可以看到收敛更快,更加过拟合了,一般来说就算小网络也要两层,计算速度也会下降一点
11.4 双向循环神经网络
理论
未来很重要

- 取决于过去和未来的上下文,可以填很不一样的值
- 目前为止RNN只看过去
- 在填空的时候,我们也可以看未来
双向神经网络:两个隐藏层,一个前向,以后后向,合并两个隐状态得到输出。

实现起来很简单,只需要把原本的RNN正反执行两遍,然后把所有输出(隐状态H)拼接起来就可以。
训练的时候简单,但是推理的时候怎么推?
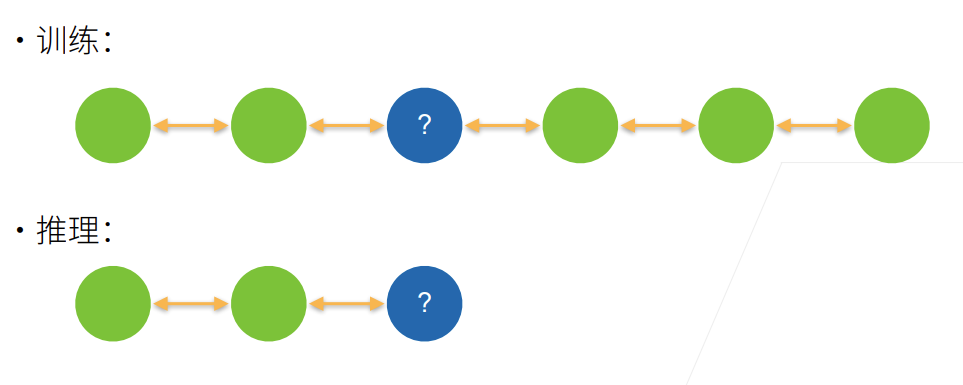
双向RNN,非常不适合做推理。几乎是不可以预测未来的词。
他的主要作用是对一个句子做特征提取,给我的句子我可以双向的去看它。语音识别类似的也可以使用,我可以等你把句子说完再做处理。
代码实现
也是比较简洁的实现一下
下面的是一个错误的案例,使用双向LSTM来预测语言模型
xxxxxxxxxximport torchfrom torch import nnfrom d2l import torch as d2l
# 加载数据batch_size, num_steps, device = 32, 35, d2l.try_gpu()train_iter, vocab = d2l.load_data_time_machine(batch_size, num_steps)# 通过设置“bidirective=True”来定义双向LSTM模型vocab_size, num_hiddens, num_layers = len(vocab), 256, 2num_inputs = vocab_sizelstm_layer = nn.LSTM(num_inputs, num_hiddens, num_layers, bidirectional=True)model = d2l.RNNModel(lstm_layer, len(vocab))model = model.to(device)# 训练模型num_epochs, lr = 500, 1d2l.train_ch8(model, train_iter, vocab, lr, num_epochs, device)
结果:
xxxxxxxxxxperplexity 1.1, 131129.2 tokens/sec on cuda:0time travellerererererererererererererererererererererererererertravellerererererererererererererererererererererererererer可以看到收敛的很快,但是结果非常不靠谱。
双向RNN,在正向跟反向之间没有任何的权重联系,仅仅是分两次跑,然后结果concat在一起
11.5 机器翻译与数据集
xxxxxxxxxximport osimport torchfrom d2l import torch as d2l1.下载和预处理数据集
xxxxxxxxxxd2l.DATA_HUB['fra-eng'] = (d2l.DATA_URL + 'fra-eng.zip',                           '94646ad1522d915e7b0f9296181140edcf86a4f5')
def read_data_nmt():    """载入“英语-法语”数据集"""    data_dir = d2l.download_extract('fra-eng')    with open(os.path.join(data_dir, 'fra.txt'), 'r',             encoding='utf-8') as f:        return f.read()
raw_text = read_data_nmt()print(raw_text[:75])xxxxxxxxxxDownloading ../data/fra-eng.zip from http://d2l-data.s3-accelerate.amazonaws.com/fra-eng.zip...Go. Va !Hi. Salut !Run! Cours !Run! Courez !Who? Qui ?Wow! Ça alors !我们要把标点符号也翻出来
2.几个预处理步骤
xxxxxxxxxxdef preprocess_nmt(text):    """预处理“英语-法语”数据集"""        # 避免标点符号直接紧贴单词    def no_space(char, prev_char):        return char in set(',.!?') and prev_char != ' '
    # 使用空格替换不间断空格    # 使用小写字母替换大写字母    text = text.replace('\u202f', ' ').replace('\xa0', ' ').lower()    # 在单词和标点符号之间插入空格    out = [' ' + char if i > 0 and no_space(char, text[i - 1]) else char           for i, char in enumerate(text)]    return ''.join(out)
text = preprocess_nmt(raw_text)print(text[:80])xxxxxxxxxxgo . va !hi . salut !run ! cours !run ! courez !who ? qui ?wow ! ça alors !3.变成token(词元化)
xxxxxxxxxx#@savedef tokenize_nmt(text, num_examples=None):    """词元化“英语-法语”数据数据集"""    source, target = [], []    for i, line in enumerate(text.split('\n')):        if num_examples and i > num_examples:            break        parts = line.split('\t')        if len(parts) == 2:            source.append(parts[0].split(' '))            target.append(parts[1].split(' '))    return source, target
source, target = tokenize_nmt(text)source[:6], target[:6]xxxxxxxxxx([['go', '.'], ['hi', '.'], ['run', '!'], ['run', '!'], ['who', '?'], ['wow', '!']], [['va', '!'], ['salut', '!'], ['cours', '!'], ['courez', '!'], ['qui', '?'], ['ça', 'alors', '!']])这个数据集相对比较简单,所以我们按词来分就可以了
4.绘制每个文本序列所包含的标记数量的直方图
xxxxxxxxxx#@savedef show_list_len_pair_hist(legend, xlabel, ylabel, xlist, ylist):    """绘制列表长度对的直方图"""    d2l.set_figsize()    _, _, patches = d2l.plt.hist(        [[len(l) for l in xlist], [len(l) for l in ylist]])    d2l.plt.xlabel(xlabel)    d2l.plt.ylabel(ylabel)    for patch in patches[1].patches:        patch.set_hatch('/')    d2l.plt.legend(legend)
show_list_len_pair_hist(['source', 'target'], '# tokens per sequence', 'count', source, target);5.建立词汇表
xxxxxxxxxxsrc_vocab = d2l.Vocab(source, min_freq=2, reserved_tokens=['<pad>', '<bos>', '<eos>'])len(src_vocab)xxxxxxxxxx10012pad表示填充,bos(begin of sentence)表示句子开始,eos表示句子结束

6.序列样本都有一个固定的长度截断或填充文本序列
我们这里固定一个长度num_steps,如果超过就切掉,不够就填充。
xxxxxxxxxxdef truncate_pad(line, num_steps, padding_token):    """截断或填充文本序列"""    if len(line) > num_steps:        return line[:num_steps]  # 截断    return line + [padding_token] * (num_steps - len(line))  # 填充
truncate_pad(src_vocab[source[0]], 10, src_vocab['<pad>'])xxxxxxxxxx[47, 4, 1, 1, 1, 1, 1, 1, 1, 1]7.转换成小批量数据集用于训练
xxxxxxxxxxdef build_array_nmt(lines, vocab, num_steps): """将机器翻译的文本序列转换成小批量""" lines = [vocab[l] for l in lines] # 加一个eos告诉模型句子结束了 lines = [l + [vocab['<eos>']] for l in lines] array = torch.tensor([truncate_pad( l, num_steps, vocab['<pad>']) for l in lines]) valid_len = (array != vocab['<pad>']).type(torch.int32).sum(1) return array, valid_len # 告诉模型句子的实际长度8.整合
xxxxxxxxxxdef load_data_nmt(batch_size, num_steps, num_examples=600): """返回翻译数据集的迭代器和词表""" text = preprocess_nmt(read_data_nmt()) source, target = tokenize_nmt(text, num_examples) src_vocab = d2l.Vocab(source, min_freq=2, reserved_tokens=['<pad>', '<bos>', '<eos>']) tgt_vocab = d2l.Vocab(target, min_freq=2, reserved_tokens=['<pad>', '<bos>', '<eos>']) src_array, src_valid_len = build_array_nmt(source, src_vocab, num_steps) tgt_array, tgt_valid_len = build_array_nmt(target, tgt_vocab, num_steps) data_arrays = (src_array, src_valid_len, tgt_array, tgt_valid_len) data_iter = d2l.load_array(data_arrays, batch_size) return data_iter, src_vocab, tgt_vocab这里英语与法语都各自做了一个vocab,对于这个简单的数据集已经够了
现在流行的做法是同意构建一个巨大的词汇表vocab
xxxxxxxxxxtrain_iter, src_vocab, tgt_vocab = load_data_nmt(batch_size=2, num_steps=8)for X, X_valid_len, Y, Y_valid_len in train_iter: print('X:', X.type(torch.int32)) print('X的有效长度:', X_valid_len) print('Y:', Y.type(torch.int32)) print('Y的有效长度:', Y_valid_len) breakxxxxxxxxxxX: tensor([[ 7, 43, 4, 3, 1, 1, 1, 1], [44, 23, 4, 3, 1, 1, 1, 1]], dtype=torch.int32)X的有效长度: tensor([4, 4])Y: tensor([[ 6, 7, 40, 4, 3, 1, 1, 1], [ 0, 5, 3, 1, 1, 1, 1, 1]], dtype=torch.int32)Y的有效长度: tensor([5, 3])11.6 编码器-解码器架构
对近几年对于模型的抽象影响比较深刻
1.重新考察CNN
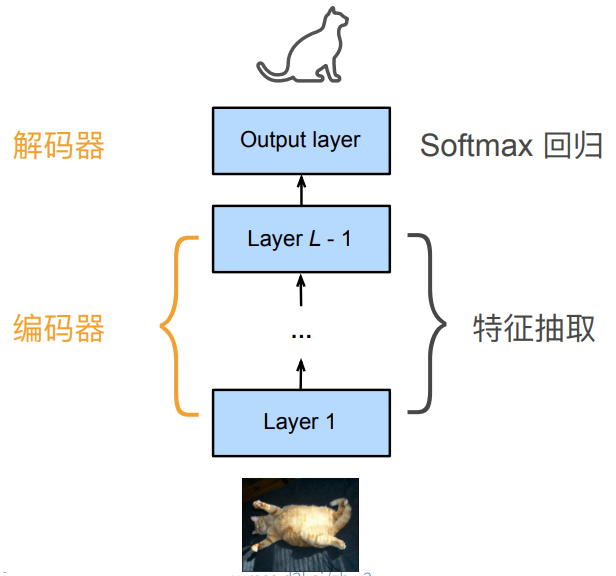
编码器:将输入编码成中间表达形式(特征)
解码器:将中间表示解码成输出
2.重新考察RNN
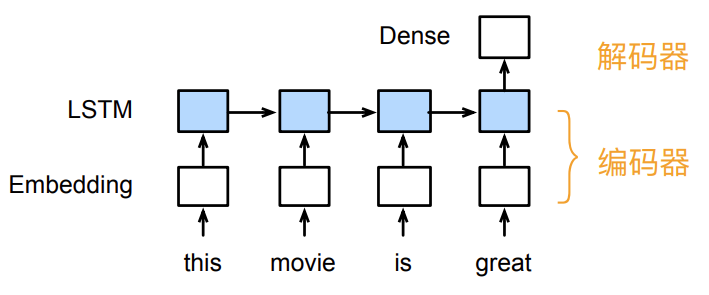
编码器:将文本表示成向量
解码器:向量表示成输出
3.编码器-解码器架构
一个模型被分为两块:
- 编码器处理输出
- 解码器生成输出

4.代码(不完整)示例
后面我们做nlp的时候会具体展现,这里只是给一个固定的框架
编码器
xxxxxxxxxxfrom torch import nn
class Encoder(nn.Module):    """编码器-解码器架构的基本编码器接口"""    def __init__(self, **kwargs):        super(Encoder, self).__init__(**kwargs)
    def forward(self, X, *args):        raise NotImplementedError
raise是一个用于手动引发异常的关键字
解码器
xxxxxxxxxxclass Decoder(nn.Module):    """编码器-解码器架构的基本解码器接口"""    def __init__(self, **kwargs):        super(Decoder, self).__init__(**kwargs)
    def init_state(self, enc_outputs, *args):        raise NotImplementedError
    def forward(self, X, state):        raise NotImplementedError
合并编码器和解码器
xxxxxxxxxxclass EncoderDecoder(nn.Module):    """编码器-解码器架构的基类"""    def __init__(self, encoder, decoder, **kwargs):        super(EncoderDecoder, self).__init__(**kwargs)        self.encoder = encoder        self.decoder = decoder
    def forward(self, enc_X, dec_X, *args):        enc_outputs = self.encoder(enc_X, *args)        dec_state = self.decoder.init_state(enc_outputs, *args)        return self.decoder(dec_X, dec_state)
11.7 序列到序列学习(seq2seq)
概念
1.机器翻译
- 给定一个源语言的句子,自动翻译成目标语言
- 这两个句子可以有不同的长度

2.Seq2seq

编码器是一个RNN,读取输入句子
可以是双向的
双向循环神经网络(Bi-RNN)编码器最终给出的信息,是正向RNN从句子开头到结尾处理得到的最后一个隐藏状态(H),以及反向RNN从句子结尾到开头处理得到的第一个隐藏状态(H)的拼接(concat)。
解码器使用另一个RNN来输出
3.编码器-解码器细节
编码器是没有输出的RNN
编码器最后时间步的隐状态用作解码器的初始隐状态
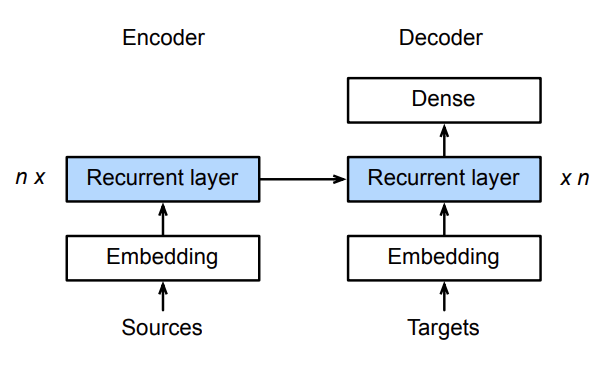
具体有很多实现方式
4.训练
训练时解码器使用目标句子作为输入
理解不了图看视频:https://www.bilibili.com/video/BV16g411L7FG?t=434.1


5.衡量生成序列的好坏的BLEU
- 标签序列A B C D E F和预测序列A B B C D,有
BLEU定义:
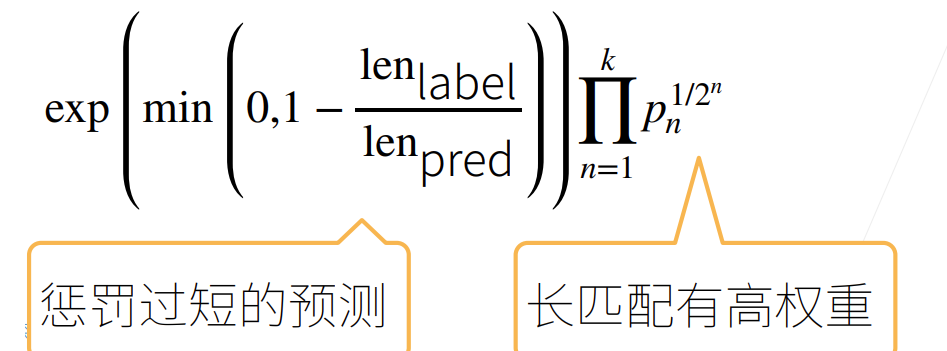
代码实现
xxxxxxxxxximport collectionsimport mathimport torchfrom torch import nnfrom d2l import torch as d2l1.实现循环神经网络编码器
xxxxxxxxxxclass Seq2SeqEncoder(d2l.Encoder):    """用于序列到序列学习的循环神经网络编码器"""    def __init__(self, vocab_size, embed_size, num_hiddens, num_layers,                 dropout=0, **kwargs):        super(Seq2SeqEncoder, self).__init__(**kwargs)        # 嵌入层        self.embedding = nn.Embedding(vocab_size, embed_size)        self.rnn = nn.GRU(embed_size, num_hiddens, num_layers, dropout=dropout)
    def forward(self, X, *args):        # 输出'X'的形状:(batch_size,num_steps,embed_size)        X = self.embedding(X)        # 在循环神经网络模型中,第一个轴对应于时间步            X = X.permute(1, 0, 2)        # 如果未提及状态,则默认为0        output, state = self.rnn(X)        # output的形状:(num_steps,batch_size,num_hiddens)        # state的形状:(num_layers,batch_size,num_hiddens)        return output, state
output是所有时间步的最后一层RNN的隐状态输出,state是最后一个时刻的所有层的隐状态
2.实例化上述编码器
xxxxxxxxxxencoder = Seq2SeqEncoder(vocab_size=10, embed_size=8, num_hiddens=16, num_layers=2)encoder.eval()X = torch.zeros((4, 7), dtype=torch.long)output, state = encoder(X)output.shapexxxxxxxxxxtorch.Size([7, 4, 16])xxxxxxxxxxstate.shape
torch.Size([2, 4, 16])3.解码器
xxxxxxxxxxclass Seq2SeqDecoder(d2l.Decoder):    """用于序列到序列学习的循环神经网络解码器"""    def __init__(self, vocab_size, embed_size, num_hiddens, num_layers,                 dropout=0, **kwargs):        super(Seq2SeqDecoder, self).__init__(**kwargs)        self.embedding = nn.Embedding(vocab_size, embed_size)        self.rnn = nn.GRU(embed_size + num_hiddens, num_hiddens, num_layers,                          dropout=dropout)        self.dense = nn.Linear(num_hiddens, vocab_size)
    def init_state(self, enc_outputs, *args):        return enc_outputs[1]
    def forward(self, X, state):        # 输出'X'的形状:(batch_size,num_steps,embed_size)        X = self.embedding(X).permute(1, 0, 2)        # 广播context,使其具有与X相同的num_steps        context = state[-1].repeat(X.shape[0], 1, 1)        X_and_context = torch.cat((X, context), 2)        output, state = self.rnn(X_and_context, state)        output = self.dense(output).permute(1, 0, 2)        # output的形状:(batch_size,num_steps,vocab_size)        # state的形状:(num_layers,batch_size,num_hiddens)        return output, state
permute用来改变张量的维度顺序
4.实例化解码器
xxxxxxxxxxdecoder = Seq2SeqDecoder(vocab_size=10, embed_size=8, num_hiddens=16, num_layers=2)decoder.eval()state = decoder.init_state(encoder(X))output, state = decoder(X, state)output.shape, state.shapexxxxxxxxxx(torch.Size([4, 7, 10]), torch.Size([2, 4, 16]))5.⭐损失函数
重点看一下,新知识
在每个时间步,解码器预测了输出词元的概率分布。 类似于语言模型,可以使用softmax来获得分布, 并通过计算交叉熵损失函数来进行优化。 回想一下之前【点击跳转】, 特定的填充词元被添加到序列的末尾, 因此不同长度的序列可以以相同形状的小批量加载。 但是,我们应该将填充词元的预测排除在损失函数的计算之外。
为此,我们可以使用下面的sequence_mask函数 通过零值化屏蔽不相关的项, 以便后面任何不相关预测的计算都是与零的乘积,结果都等于零。 例如,如果两个序列的有效长度(不包括填充词元)分别为1和2, 则第一个序列的第一项和第二个序列的前两项之后的剩余项将被清除为零。
mask在处理变长东西中是一个很常见的操作
xxxxxxxxxxdef sequence_mask(X, valid_len, value=0):    """在序列中屏蔽不相关的项"""    maxlen = X.size(1)    mask = torch.arange((maxlen), dtype=torch.float32,                        device=X.device)[None, :] < valid_len[:, None]    X[~mask] = value    return X
X = torch.tensor([[1, 2, 3], [4, 5, 6]])sequence_mask(X, torch.tensor([1, 2]))xxxxxxxxxxtensor([[1, 0, 0], [4, 5, 0]])我们还可以使用此函数屏蔽最后几个轴上的所有项。如果愿意,也可以使用指定的非零值来替换这些项。
xxxxxxxxxxX = torch.ones(2, 3, 4)sequence_mask(X, torch.tensor([1, 2]), value=-1)
tensor([[[ 1.,  1.,  1.,  1.],         [-1., -1., -1., -1.],         [-1., -1., -1., -1.]],
        [[ 1.,  1.,  1.,  1.],         [ 1.,  1.,  1.,  1.],         [-1., -1., -1., -1.]]])
通过扩展softmax交叉熵损失函数来遮蔽不相关的预测
xxxxxxxxxxclass MaskedSoftmaxCELoss(nn.CrossEntropyLoss): """带遮蔽的softmax交叉熵损失函数""" # pred的形状:(batch_size,num_steps,vocab_size) # label的形状:(batch_size,num_steps) # valid_len的形状:(batch_size,) def forward(self, pred, label, valid_len): weights = torch.ones_like(label) weights = sequence_mask(weights, valid_len) self.reduction='none' unweighted_loss = super.forward(pred.permute(0, 2, 1), label) weighted_loss = (unweighted_loss * weights).mean(dim=1) # 这里mean,掩码已经把对应地方的损失变为0了,但是算总损失mean均值的时候这些地方还是要算分母的 return weighted_lossxxxxxxxxxxloss = MaskedSoftmaxCELoss()loss(torch.ones(3, 4, 10), torch.ones((3, 4), dtype=torch.long), torch.tensor([4, 2, 0]))
tensor([2.3026, 1.1513, 0.0000])
torch.ones记录的是真是标签的label但是每一个值的嵌入为10维,为什么直接用一位就可以表示标签?
在交叉熵损失中,标签只需要提供类别索引,因为交叉熵计算的是模型预测概率和真实类别之间的差异。模型输出的是每个类别的概率分布(如 10 维向量),而标签只需要指明当前样本属于哪个类别(如索引
1、2等)。交叉熵根据该索引提取预测的概率并计算损失,不需要提供嵌入向量。
6.训练
xxxxxxxxxxdef train_seq2seq(net, data_iter, lr, num_epochs, tgt_vocab, device):    """训练序列到序列模型"""    def xavier_init_weights(m):        if type(m) == nn.Linear:            nn.init.xavier_uniform_(m.weight)        if type(m) == nn.GRU:            for param in m._flat_weights_names:                if "weight" in param:                    nn.init.xavier_uniform_(m._parameters[param])
net.apply(xavier_init_weights) net.to(device) optimizer = torch.optim.Adam(net.parameters(), lr=lr) loss = MaskedSoftmaxCELoss() net.train() animator = d2l.Animator(xlabel='epoch', ylabel='loss', xlim=[10, num_epochs]) for epoch in range(num_epochs): timer = d2l.Timer() metric = d2l.Accumulator(2) # 训练损失总和,词元数量 for batch in data_iter: optimizer.zero_grad() X, X_valid_len, Y, Y_valid_len = [x.to(device) for x in batch] bos = torch.tensor([tgt_vocab['<bos>']] * Y.shape[0], device=device).reshape(-1, 1) dec_input = torch.cat([bos, Y[:, :-1]], 1) # 强制教学 Y_hat, _ = net(X, dec_input, X_valid_len) l = loss(Y_hat, Y, Y_valid_len) l.sum().backward() # 损失函数的标量进行“反向传播” d2l.grad_clipping(net, 1) num_tokens = Y_valid_len.sum() optimizer.step() with torch.no_grad(): metric.add(l.sum(), num_tokens) if (epoch + 1) % 10 == 0: animator.add(epoch + 1, (metric[0] / metric[1],)) print(f'loss {metric[0] / metric[1]:.3f}, {metric[1] / timer.stop():.1f} ' f'tokens/sec on {str(device)}')xxxxxxxxxxembed_size, num_hiddens, num_layers, dropout = 32, 32, 2, 0.1batch_size, num_steps = 64, 10lr, num_epochs, device = 0.005, 300, d2l.try_gpu()
train_iter, src_vocab, tgt_vocab = d2l.load_data_nmt(batch_size, num_steps)encoder = Seq2SeqEncoder(len(src_vocab), embed_size, num_hiddens, num_layers, dropout)decoder = Seq2SeqDecoder(len(tgt_vocab), embed_size, num_hiddens, num_layers, dropout)net = d2l.EncoderDecoder(encoder, decoder)train_seq2seq(net, train_iter, lr, num_epochs, tgt_vocab, device)xxxxxxxxxxloss 0.019, 12745.1 tokens/sec on cuda:07.预测
xxxxxxxxxxdef predict_seq2seq(net, src_sentence, src_vocab, tgt_vocab, num_steps, device, save_attention_weights=False): """序列到序列模型的预测""" # 在预测时将net设置为评估模式 net.eval() src_tokens = src_vocab[src_sentence.lower().split(' ')] + [ src_vocab['<eos>']] enc_valid_len = torch.tensor([len(src_tokens)], device=device) src_tokens = d2l.truncate_pad(src_tokens, num_steps, src_vocab['<pad>']) # 添加批量轴 enc_X = torch.unsqueeze( torch.tensor(src_tokens, dtype=torch.long, device=device), dim=0) enc_outputs = net.encoder(enc_X, enc_valid_len) dec_state = net.decoder.init_state(enc_outputs, enc_valid_len) # 添加批量轴 dec_X = torch.unsqueeze(torch.tensor( [tgt_vocab['<bos>']], dtype=torch.long, device=device), dim=0) output_seq, attention_weight_seq = [], [] for _ in range(num_steps): Y, dec_state = net.decoder(dec_X, dec_state) # 我们使用具有预测最高可能性的词元,作为解码器在下一时间步的输入 dec_X = Y.argmax(dim=2) pred = dec_X.squeeze(dim=0).type(torch.int32).item() # 保存注意力权重(稍后讨论) if save_attention_weights: attention_weight_seq.append(net.decoder.attention_weights) # 一旦序列结束词元被预测,输出序列的生成就完成了 if pred == tgt_vocab['<eos>']: break output_seq.append(pred) return ' '.join(tgt_vocab.to_tokens(output_seq)), attention_weight_seq越来越复杂了,说实话到这里基本上代码也只是理解大致意思了仅仅,佩服首次实现这些代码的人,希望几年以后我也可以轻松写出这些机器学习的代码。
num_steps 在这个函数中决定了生成的句子的最大长度。
8.BLUE代码的实现
xxxxxxxxxxdef bleu(pred_seq, label_seq, k): #@save """计算BLEU""" pred_tokens, label_tokens = pred_seq.split(' '), label_seq.split(' ') len_pred, len_label = len(pred_tokens), len(label_tokens) score = math.exp(min(0, 1 - len_label / len_pred)) for n in range(1, k + 1): num_matches, label_subs = 0, collections.defaultdict(int) for i in range(len_label - n + 1): label_subs[' '.join(label_tokens[i: i + n])] += 1 for i in range(len_pred - n + 1): if label_subs[' '.join(pred_tokens[i: i + n])] > 0: num_matches += 1 label_subs[' '.join(pred_tokens[i: i + n])] -= 1 score *= math.pow(num_matches / (len_pred - n + 1), math.pow(0.5, n)) return scorexxxxxxxxxxengs = ['go .', "i lost .", 'he\'s calm .', 'i\'m home .']fras = ['va !', 'j\'ai perdu .', 'il est calme .', 'je suis chez moi .']for eng, fra in zip(engs, fras): translation, attention_weight_seq = predict_seq2seq( net, eng, src_vocab, tgt_vocab, num_steps, device) print(f'{eng} => {translation}, bleu {bleu(translation, fra, k=2):.3f}')xxxxxxxxxx最终结果:go . => va !, bleu 1.000i lost . => j'ai perdu ., bleu 1.000he's calm . => il est riche ., bleu 0.658i'm home . => je suis en retard ?, bleu 0.44711.8 束搜索
贪心搜索
在seq2seq中我们使用了贪心搜索来预测序列
- 将当前时刻预测概率最大的词输出
但贪心很可能不是最优的:
- 贪心: 0.5x0.4x0.4x0.6=0.048
- 很好的选项:0.5x0.3×0.6x0.6=0.054

穷举搜索
最优算法:对所有可能的序列,计算它的概率,然后选取最好的那个
如果输出字典大小为
- 计算上不可行
束搜索
保存最好的
在每个时刻,对每个候选新加一项(
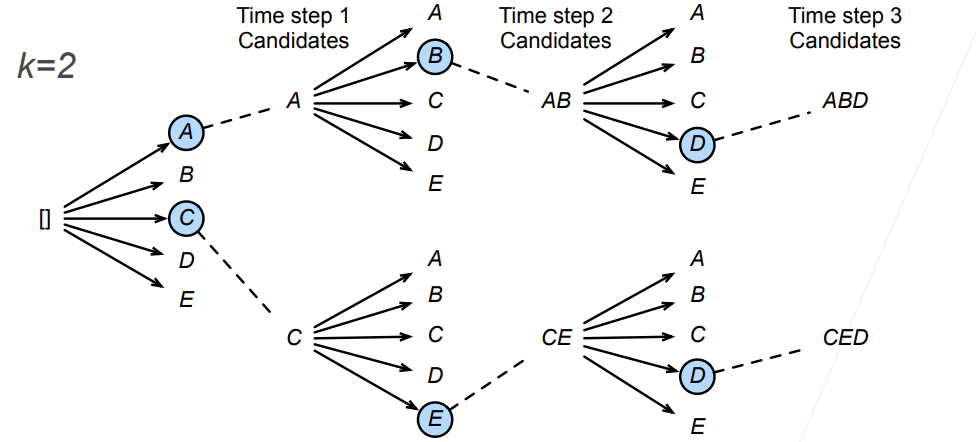
我愿称之为贪心-脚踏两只船版
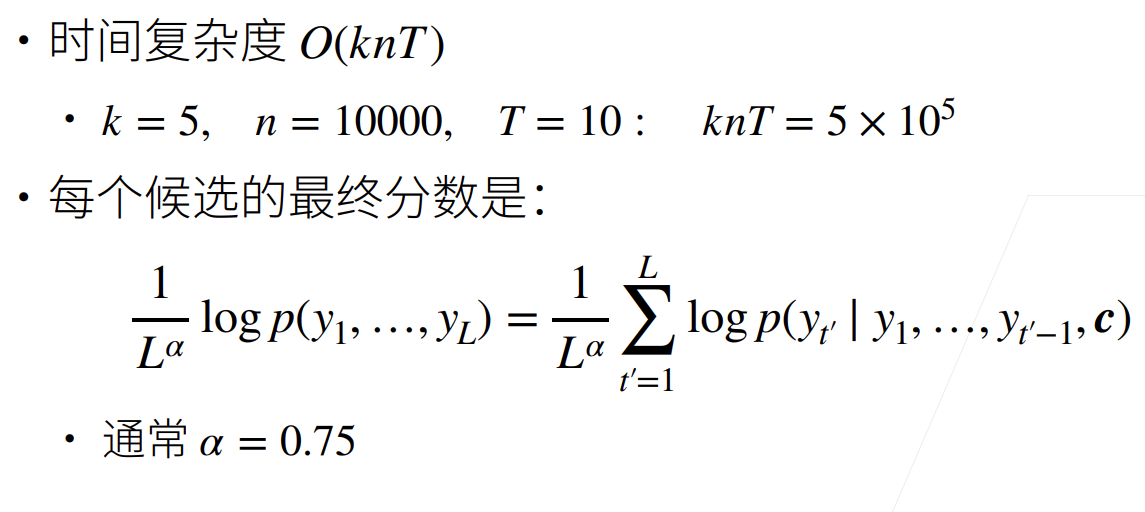
12 注意力机制
12.1 注意力机制
这一节的内容与我们之后要讲的其实关系不大,只是起一个引导作用,来说明注意力这个思想其实也不是新提出来的
心理学
- 动物需要在复杂环境下有效关注值得注意的点
- 心理学框架:人类根据随意线索和不随意线索选择注意点
不随意线索:由于突出性的非自主性提示(红杯子),注意力不自主地指向了咖啡杯,这是“无意识”线索
随意线索:当人想读书时,依赖于任务的意志提示(想读一本书),注意力被自主引导到书上,这是“有意识”线索
注意力机制
卷积、全连接、池化层都只考虑不随意线索
注意力机制则显示的考虑随意线索:
- 随意线索被称之为查询(query)
- 每个输入是一个值(value)和不随意线索(key)的对
- 通过注意力池化层来有偏向性的选择选择某些输入
非参注意力池化层
给定数据
x是key,y对应value
平均池化是最简单的方案:
更好的方案是60年代提出来的Nadaraya-Watson核回归
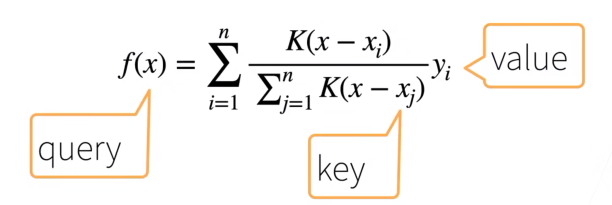
Nadaraya-Watson核回归
使用高斯核
那么
softmax,这下看懂了
到这里,我们发现没有产生什么可以学的参数,那么⬇️
参数化的注意力机制
在之前基础上引入可以学习的
注意,
在这里是一个一维的标量
可以一般的写作
这里
代码实现
这里就是简单过一下
1.最简单的平均聚合
xxxxxxxxxximport torchfrom torch import nnfrom d2l import torch as d2l生成一些随机数据
xxxxxxxxxxn_train = 50  # 训练样本数x_train, _ = torch.sort(torch.rand(n_train) * 5)   # 排序后的训练样本
def f(x):    return 2 * torch.sin(x) + x**0.8
y_train = f(x_train) + torch.normal(0.0, 0.5, (n_train,)) # 训练样本的输出x_test = torch.arange(0, 5, 0.1) # 测试样本y_truth = f(x_test) # 测试样本的真实输出n_test = len(x_test) # 测试样本数n_testxxxxxxxxxx50简单画一下这个函数图
xxxxxxxxxxdef plot_kernel_reg(y_hat):    d2l.plot(x_test, [y_truth, y_hat], 'x', 'y', legend=['Truth', 'Pred'],             xlim=[0, 5], ylim=[-1, 5])    d2l.plt.plot(x_train, y_train, 'o', alpha=0.5);
y_hat = torch.repeat_interleave(y_train.mean(), n_test) # 只做一个均值,最简单的query查找返回plot_kernel_reg(y_hat)2.非参数注意力汇聚
这个代码其实很好理解,可以仔细看一看
只要给足够多的数据,函数时可以拟合出来的,但是现实中不会有那么多的数据
xxxxxxxxxx# X_repeat的形状:(n_test,n_train),# 每一行都包含着相同的测试输入(例如:同样的查询)X_repeat = x_test.repeat_interleave(n_train).reshape((-1, n_train))# x_train包含着键。attention_weights的形状:(n_test,n_train),# 每一行都包含着要在给定的每个查询的值(y_train)之间分配的注意力权重attention_weights = nn.functional.softmax(-(X_repeat - x_train)**2 / 2, dim=1)# y_hat的每个元素都是值的加权平均值,其中的权重是注意力权重y_hat = torch.matmul(attention_weights, y_train)plot_kernel_reg(y_hat)现在来观察注意力的权重。 这里测试数据的输入相当于查询,而训练数据的输入相当于键。 因为两个输入都是经过排序的,因此由观察可知“查询-键”对越接近, 注意力汇聚的注意力权重就越高。
xxxxxxxxxxd2l.show_heatmaps(attention_weights.unsqueeze(0).unsqueeze(0), xlabel='Sorted training inputs', ylabel='Sorted testing inputs')3.带参数的注意力汇聚
带batch的矩阵乘法:
带参数注意力汇聚假定两个张量的形状分别是
xxxxxxxxxxX = torch.ones((2, 1, 4))Y = torch.ones((2, 4, 6))torch.bmm(X, Y).shapexxxxxxxxxxtorch.Size([2, 1, 6])第0批次与第0批次做乘法,1与1做乘法。
在注意力机制的背景中,我们可以使用小批量矩阵乘法来计算小批量数据中的加权平均值。
xxxxxxxxxxweights = torch.ones((2, 10)) * 0.1values = torch.arange(20.0).reshape((2, 10))torch.bmm(weights.unsqueeze(1), values.unsqueeze(-1))xxxxxxxxxxtensor([[[ 4.5000]],[[14.5000]]])这段代码很巧妙啊,点赞👍
定义模型:
xxxxxxxxxxclass NWKernelRegression(nn.Module):    def __init__(self, **kwargs):        super().__init__(**kwargs)        self.w = nn.Parameter(torch.rand((1,), requires_grad=True))
    def forward(self, queries, keys, values):        # queries和attention_weights的形状为(查询个数,“键-值”对个数)        queries = queries.repeat_interleave(keys.shape[1]).reshape((-1, keys.shape[1]))        self.attention_weights = nn.functional.softmax(            -((queries - keys) * self.w)**2 / 2, dim=1)        # values的形状为(查询个数,“键-值”对个数)        return torch.bmm(self.attention_weights.unsqueeze(1),                         values.unsqueeze(-1)).reshape(-1)
训练:
xxxxxxxxxx# X_tile的形状:(n_train,n_train),每一行都包含着相同的训练输入X_tile = x_train.repeat((n_train, 1))# Y_tile的形状:(n_train,n_train),每一行都包含着相同的训练输出Y_tile = y_train.repeat((n_train, 1))# keys的形状:('n_train','n_train'-1)keys = X_tile[(1 - torch.eye(n_train)).type(torch.bool)].reshape((n_train, -1))# values的形状:('n_train','n_train'-1)values = Y_tile[(1 - torch.eye(n_train)).type(torch.bool)].reshape((n_train, -1))
net = NWKernelRegression()loss = nn.MSELoss(reduction='none')trainer = torch.optim.SGD(net.parameters(), lr=0.5)animator = d2l.Animator(xlabel='epoch', ylabel='loss', xlim=[1, 5])
for epoch in range(5): trainer.zero_grad() l = loss(net(x_train, keys, values), y_train) l.sum().backward() trainer.step() print(f'epoch {epoch + 1}, loss {float(l.sum()):.6f}') animator.add(epoch + 1, float(l.sum()))xxxxxxxxxx# keys的形状:(n_test,n_train),每一行包含着相同的训练输入(例如,相同的键)keys = x_train.repeat((n_test, 1))# value的形状:(n_test,n_train)values = y_train.repeat((n_test, 1))y_hat = net(x_test, keys, values).unsqueeze(1).detach()plot_kernel_reg(y_hat)为什么新的模型更不平滑了呢? 下面看一下输出结果的绘制图: 与非参数的注意力汇聚模型相比, 带参数的模型加入可学习的参数后, 曲线在注意力权重较大的区域变得更不平滑。权重更集中了
xxxxxxxxxxd2l.show_heatmaps(net.attention_weights.unsqueeze(0).unsqueeze(0), xlabel='Sorted training inputs', ylabel='Sorted testing inputs')12.2 注意力分数
注意力分数

下面这张图画的非常好,与之前不同的是,输入可能不是一个值而是变成了一个向量:
拓展到高维度
假设query
注意力池化层:

所以现在关键就是a这个注意力评分函数怎么设计:
Additive Attention
“可加性的注意力”,之类的加包含了加减的意思
可学参数:
等价于将 key 和 quary 合并起来后放入到一个隐藏大小为
Scaled Dot-Product Attention
缩放点积注意力机制
如果 query 和 key 都是同样的长度,
除以 d 是为了归一化,对长度变化没那么敏感。
向量化版本:
- 注意力分数:
- 注意力池化:
以上这是注意力中两种常见的分数及算方法。
代码实现-掩蔽softmax操作
xxxxxxxxxximport mathimport torchfrom torch import nnfrom d2l import torch as d2l遮蔽softmax操作:
这里不能像之前一样设成0了,做指数就会有问题
xxxxxxxxxxdef masked_softmax(X, valid_lens): """通过在最后一个轴上掩蔽元素来执行softmax操作""" # X:3D张量,valid_lens:1D或2D张量 if valid_lens is None: return nn.functional.softmax(X, dim=-1) else: shape = X.shape if valid_lens.dim() == 1: valid_lens = torch.repeat_interleave(valid_lens, shape[1]) else: valid_lens = valid_lens.reshape(-1) # 最后一轴上被掩蔽的元素使用一个非常大的负值替换,从而其softmax输出为0 X = d2l.sequence_mask(X.reshape(-1, shape[-1]), valid_lens, value=-1e6) return nn.functional.softmax(X.reshape(shape), dim=-1)演示此函数是如何工作的
xxxxxxxxxxmasked_softmax(torch.rand(2, 2, 4), torch.tensor([2, 3]))
tensor([[[0.5980, 0.4020, 0.0000, 0.0000],         [0.5548, 0.4452, 0.0000, 0.0000]],
[[0.3716, 0.3926, 0.2358, 0.0000], [0.3455, 0.3337, 0.3208, 0.0000]]])xxxxxxxxxxmasked_softmax(torch.rand(2, 2, 4), torch.tensor([[1, 3], [2, 4]]))
tensor([[[1.0000, 0.0000, 0.0000, 0.0000], [0.4125, 0.3273, 0.2602, 0.0000]],
[[0.5254, 0.4746, 0.0000, 0.0000], [0.3117, 0.2130, 0.1801, 0.2952]]])代码实现-加性注意力
forward函数有些难懂,用了广播机制,建议多看看
到底是什么样的神人能写出这样的代码,我这辈子也达不到这样的高度
xxxxxxxxxxclass AdditiveAttention(nn.Module):    """加性注意力"""    def __init__(self, key_size, query_size, num_hiddens, dropout, **kwargs):        super(AdditiveAttention, self).__init__(**kwargs)        self.W_k = nn.Linear(key_size, num_hiddens, bias=False)        self.W_q = nn.Linear(query_size, num_hiddens, bias=False)        self.w_v = nn.Linear(num_hiddens, 1, bias=False)        self.dropout = nn.Dropout(dropout)
def forward(self, queries, keys, values, valid_lens): # valid_lens 表示对于每一个query,我应该考虑多少对key-value pair queries, keys = self.W_q(queries), self.W_k(keys) # 在维度扩展后, # queries的形状:(batch_size,查询的个数,1,num_hidden) # key的形状:(batch_size,1,“键-值”对的个数,num_hiddens) # 使用广播方式进行求和 # 🫰最后得到的features的形状是:(batch_size, 查询的个数, “键-值”对的个数, num_hiddens) features = queries.unsqueeze(2) + keys.unsqueeze(1) features = torch.tanh(features) # self.w_v仅有一个输出,因此从形状中移除最后那个维度。 # scores的形状:(batch_size,查询的个数,“键-值”对的个数) scores = self.w_v(features).squeeze(-1) self.attention_weights = masked_softmax(scores, valid_lens) # values的形状:(batch_size,“键-值”对的个数,值的维度) return torch.bmm(self.dropout(self.attention_weights), values)用一个小例子来演示上面的AdditiveAttention类, 其中查询、键和值的形状为(批量大小,步数或词元序列长度,特征大小), 实际输出为
xxxxxxxxxxqueries, keys = torch.normal(0, 1, (2, 1, 20)), torch.ones((2, 10, 2))# values的小批量,两个值矩阵是相同的values = torch.arange(40, dtype=torch.float32).reshape(1, 10, 4).repeat(    2, 1, 1)valid_lens = torch.tensor([2, 6])
attention = AdditiveAttention(key_size=2, query_size=20, num_hiddens=8, dropout=0.1)attention.eval()attention(queries, keys, values, valid_lens)xxxxxxxxxxtensor([[[ 2.0000, 3.0000, 4.0000, 5.0000]], [[10.0000, 11.0000, 12.0000, 13.0000]]], grad_fn=<BmmBackward0>)尽管加性注意力包含了可学习的参数,但由于本例子中每个键都是相同的, 所以注意力权重是均匀的,由指定的有效长度决定。
xxxxxxxxxxd2l.show_heatmaps(attention.attention_weights.reshape((1, 1, 2, 10)), xlabel='Keys', ylabel='Queries')代码实现-缩放点积注意力
xxxxxxxxxxclass DotProductAttention(nn.Module):    """缩放点积注意力"""    def __init__(self, dropout, **kwargs):        super(DotProductAttention, self).__init__(**kwargs)        self.dropout = nn.Dropout(dropout)
    # queries的形状:(batch_size,查询的个数,d)    # keys的形状:(batch_size,“键-值”对的个数,d)    # values的形状:(batch_size,“键-值”对的个数,值的维度)    # valid_lens的形状:(batch_size,)或者(batch_size,查询的个数)    def forward(self, queries, keys, values, valid_lens=None):        d = queries.shape[-1]        # 设置transpose_b=True为了交换keys的最后两个维度        scores = torch.bmm(queries, keys.transpose(1,2)) / math.sqrt(d)        self.attention_weights = masked_softmax(scores, valid_lens)        return torch.bmm(self.dropout(self.attention_weights), values)
可以看到它的好处是不需要学习任何参数,实现简单。
xxxxxxxxxxqueries = torch.normal(0, 1, (2, 1, 2))attention = DotProductAttention(dropout=0.5)attention.eval()attention(queries, keys, values, valid_lens)
tensor([[[ 2.0000, 3.0000, 4.0000, 5.0000]], [[10.0000, 11.0000, 12.0000, 13.0000]]])xxxxxxxxxxd2l.show_heatmaps(attention.attention_weights.reshape((1, 1, 2, 10)), xlabel='Keys', ylabel='Queries')加下来我们就需要学习怎样将attention的概念应用到我们的网络中,讲key、value、query对应到原网络的概念中。
12.3 使用注意力机制的seq2seq
动机
机器翻译中,每个生成的词可能相关于源句子中不同的词,即翻译任务有一定的对应关系

- seq2seq只能通过一个隐藏层来概括信息,不能编码器中的内容与解码器中的内容相互联系,因此不能对此直接建模。
加入注意力
编码器对应每次词的输出作为 key 和 value (它们是等价的)
解码器 RNN 对上一个词的输出是 query
注意力的输出和下一个词的词嵌入合并进入
这里面说的都是隐层,不是最后传入MLP得到的那个输出,自己理解一下
代码实现-Bahdanau 注意力
叫这个名字是因为这个人是一作
xxxxxxxxxximport torchfrom torch import nnfrom d2l import torch as d2l1.带有注意力机制的解码器基本接口
xxxxxxxxxxclass AttentionDecoder(d2l.Decoder): """带有注意力机制解码器的基本接口""" def __init__(self, **kwargs): super(AttentionDecoder, self).__init__(**kwargs)
def attention_weights(self): raise NotImplementedError2.核心实现,带有Bahdanau注意力的循环神经网络解码器
attention只作用在Decoder上,Encoder是不变的
xxxxxxxxxxclass Seq2SeqAttentionDecoder(AttentionDecoder): def __init__(self, vocab_size, embed_size, num_hiddens, num_layers, dropout=0, **kwargs): super(Seq2SeqAttentionDecoder, self).__init__(**kwargs) # 一个小插曲这里super可以在python3直接写super().__init__() self.attention = d2l.AdditiveAttention( num_hiddens, num_hiddens, num_hiddens, dropout) # 这里用加型注意力,是因为有参数可以学,效果一般会好一些 self.embedding = nn.Embedding(vocab_size, embed_size) self.rnn = nn.GRU( embed_size + num_hiddens, num_hiddens, num_layers, dropout=dropout) self.dense = nn.Linear(num_hiddens, vocab_size)
def init_state(self, enc_outputs, enc_valid_lens, *args): # outputs的形状为(batch_size,num_steps,num_hiddens). # hidden_state的形状为(num_layers,batch_size,num_hiddens) outputs, hidden_state = enc_outputs return (outputs.permute(1, 0, 2), hidden_state, enc_valid_lens)
def forward(self, X, state): # enc_outputs的形状为(batch_size,num_steps,num_hiddens). # hidden_state的形状为(num_layers,batch_size, # num_hiddens) enc_outputs, hidden_state, enc_valid_lens = state # 输出X的形状为(num_steps,batch_size,embed_size) X = self.embedding(X).permute(1, 0, 2) outputs, self._attention_weights = [], [] # 这里不像RNN全部扔进去就好了,这里要一个一个来 for x in X: # query的形状为(batch_size,1,num_hiddens) query = torch.unsqueeze(hidden_state[-1], dim=1) # context的形状为(batch_size,1,num_hiddens) # ⭐关键代码 context = self.attention( query, enc_outputs, enc_outputs, enc_valid_lens) # 在特征维度上连结 x = torch.cat((context, torch.unsqueeze(x, dim=1)), dim=-1) # 将x变形为(1,batch_size,embed_size+num_hiddens) out, hidden_state = self.rnn(x.permute(1, 0, 2), hidden_state) outputs.append(out) self._attention_weights.append(self.attention.attention_weights) # 全连接层变换后,outputs的形状为 # (num_steps,batch_size,vocab_size) outputs = self.dense(torch.cat(outputs, dim=0)) return outputs.permute(1, 0, 2), [enc_outputs, hidden_state, enc_valid_lens]
# 主要是画图用的 def attention_weights(self): return self._attention_weightsenc_valid_lens 在这个 Seq2SeqAttentionDecoder 中的作用是记录编码器输出的有效长度,用来标记原句子的长度。
3.测试Bahdanau注意力解码器
xxxxxxxxxxencoder = d2l.Seq2SeqEncoder(vocab_size=10, embed_size=8, num_hiddens=16, num_layers=2)encoder.eval()decoder = Seq2SeqAttentionDecoder(vocab_size=10, embed_size=8, num_hiddens=16, num_layers=2)decoder.eval()X = torch.zeros((4, 7), dtype=torch.long) # (batch_size,num_steps)state = decoder.init_state(encoder(X), None)output, state = decoder(X, state)output.shape, len(state), state[0].shape, len(state[1]), state[1][0].shapexxxxxxxxxx(torch.Size([4, 7, 10]), 3, torch.Size([4, 7, 16]), 2, torch.Size([4, 16]))4.训练
xxxxxxxxxxembed_size, num_hiddens, num_layers, dropout = 32, 32, 2, 0.1batch_size, num_steps = 64, 10lr, num_epochs, device = 0.005, 250, d2l.try_gpu()
train_iter, src_vocab, tgt_vocab = d2l.load_data_nmt(batch_size, num_steps)encoder = d2l.Seq2SeqEncoder( len(src_vocab), embed_size, num_hiddens, num_layers, dropout)decoder = Seq2SeqAttentionDecoder( len(tgt_vocab), embed_size, num_hiddens, num_layers, dropout)net = d2l.EncoderDecoder(encoder, decoder)d2l.train_seq2seq(net, train_iter, lr, num_epochs, tgt_vocab, device)xxxxxxxxxxloss 0.021, 4948.7 tokens/sec on cuda:0 # 可以看到慢了很多5.将几个英语句子翻译成法语
xxxxxxxxxxengs = ['go .', "i lost .", 'he\'s calm .', 'i\'m home .']fras = ['va !', 'j\'ai perdu .', 'il est calme .', 'je suis chez moi .']for eng, fra in zip(engs, fras): translation, dec_attention_weight_seq = d2l.predict_seq2seq( net, eng, src_vocab, tgt_vocab, num_steps, device, True) print(f'{eng} => {translation}, ', f'bleu {d2l.bleu(translation, fra, k=2):.3f}')xxxxxxxxxxgo . => va !, bleu 1.000i lost . => j'ai perdu ., bleu 1.000he's calm . => il est paresseux ., bleu 0.658i'm home . => je suis chez moi ., bleu 1.0006.可视化注意力权重
xxxxxxxxxxattention_weights = torch.cat([step[0][0][0] for step in dec_attention_weight_seq], 0).reshape((1, 1, -1, num_steps))
# 加上一个包含序列结束词元d2l.show_heatmaps(    attention_weights[:, :, :, :len(engs[-1].split()) + 1].cpu(),    xlabel='Key positions', ylabel='Query positions')
常见QA
attention在搜索的时候是在当前句子搜索,还是所有的文本搜索?
答:当前句子。
q是decoder的输出,那第一次q是怎么得来的?
答:从代码上分析,第一次的q是Encoder最后一个隐层。
一般都是在decoder加入注意力吗,不可以在encoder加入吗?
答:有的,Bert就算Encoder中加入的,这里只是以Bahdanau为例。
12.4 自注意力和位置编码
在深度学习中,经常使用卷积神经网络(CNN)或循环神经网络(RNN)对序列进行编码。 想象一下,有了注意力机制之后,我们将词元序列输入注意力池化中, 以便同一组词元同时充当查询、键和值。 具体来说,每个查询都会关注所有的键-值对并生成一个注意力输出。 由于查询、键和值来自同一组输入,因此被称为 自注意力(self-attention)。
本节将使用自注意力进行序列编码,以及如何使用序列的顺序作为补充信息。
自注意力
给定序列
自注意力池化层将
有点像RNN昂

在处理序列方面,与CNN、RNN对比:

| CNN(k为窗口大小) | RNN | 自注意力 | |
|---|---|---|---|
| 计算复杂度 | O(knd^2) | O(nd^2) | O(n^2d) |
| 并行度 | O(n) | O(1) | O(n),并行度verygood |
| 最长路径(视野) | O(n/k) | O(n) | O(1) |
自注意力特别适合处理长文本,首先并行度高,其次可以看到近乎无限远。所以GPT等等都用了自注意力。
位置编码
跟CNN/RNN不同,自注意力并没有记录位置信息
位置编码将位置信息注入到输入里:
- 假设长度为 n 的序列是
对

⭐学到这里我其实一直有两个疑问:
为什么向量为什么可以相加呢?相加后向量的大小和方向就变了,语义不就变了吗?
我找到了一个不错的解答:https://www.zhihu.com/question/374835153
为什么要使用这个位置编码,有什么好处?
绝对位置信息
计算机使用的二进制编码:
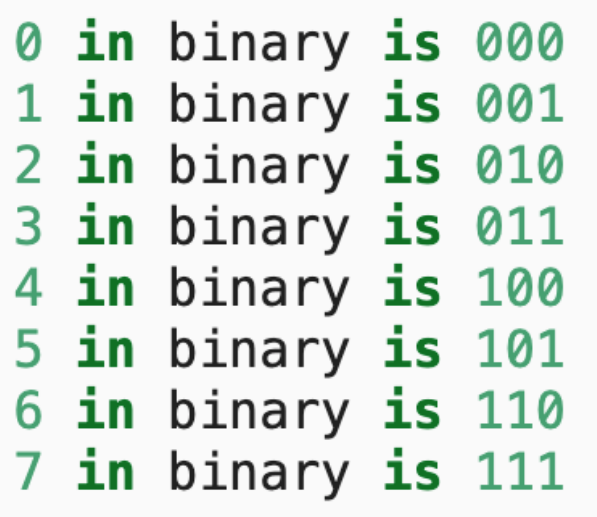
位置编码矩阵:
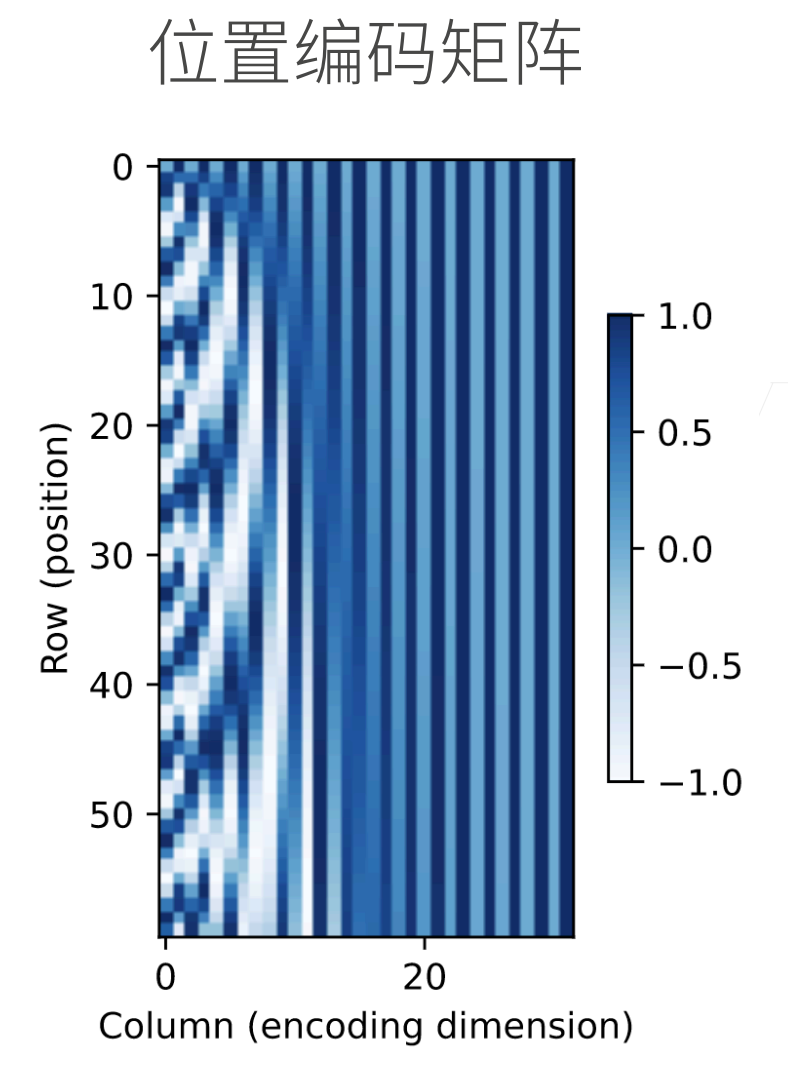
看到上面这个图,我觉的对这个奇怪的位置矩阵已经是非常形象了!
相对位置信息
位置于
记

这也是使用位置编码矩阵的原因之一:https://www.bilibili.com/video/BV19o4y1m7mo?t=1522.4
绝对位置总是有问题的,相对位置才有用。可以做到不管两个向量在序列中的哪个位置,都可以通过线性变换来快速转换。
代码实现
这里就非常简单的过一下,省略了一些。
这里的位置编码还是不需要学习的,Bert中我们将介绍可学习的位置编码。
位置编码
xxxxxxxxxxclass PositionalEncoding(nn.Module):    """位置编码"""    def __init__(self, num_hiddens, dropout, max_len=1000):        super(PositionalEncoding, self).__init__()        self.dropout = nn.Dropout(dropout)        # 创建一个足够长的P,这也是我们的主要工作        self.P = torch.zeros((1, max_len, num_hiddens))        X = torch.arange(max_len, dtype=torch.float32).reshape(            -1, 1) / torch.pow(10000, torch.arange(            0, num_hiddens, 2, dtype=torch.float32) / num_hiddens)        self.P[:, :, 0::2] = torch.sin(X)        self.P[:, :, 1::2] = torch.cos(X)
    def forward(self, X):        X = X + self.P[:, :X.shape[1], :].to(X.device)        return self.dropout(X)
简单用GPT写了一下自注意力的代码,挺简单的一看就懂

xxxxxxxxxximport torchfrom torch import nn
class SimpleSelfAttention(nn.Module):    def __init__(self, embed_size):        """        简单的自注意力机制层,不使用额外的线性层        :param embed_size: 输入嵌入的维度大小        """        super(SimpleSelfAttention, self).__init__()        self.embed_size = embed_size        # 使用softmax来计算注意力权重        self.softmax = nn.Softmax(dim=-1)
    def forward(self, x):        """        自注意力机制的前向传播        :param x: 输入张量,形状为 (batch_size, seq_length, embed_size)        :return: 输出张量,形状为 (batch_size, seq_length, embed_size)        """        # 直接将输入 x 作为查询 (Q)、键 (K) 和 值 (V)        Q = x  # 形状为 (batch_size, seq_length, embed_size)        K = x  # 形状为 (batch_size, seq_length, embed_size)        V = x  # 形状为 (batch_size, seq_length, embed_size)
        # 计算注意力分数,使用缩放点积注意力        scores = torch.matmul(Q, K.transpose(-2, -1)) / torch.sqrt(torch.tensor(self.embed_size, dtype=torch.float32))        # 通过 softmax 计算注意力权重        attention_weights = self.softmax(scores)  # 形状为 (batch_size, seq_length, seq_length)
        # 使用注意力权重对值 (V) 进行加权平均        out = torch.matmul(attention_weights, V)  # 形状为 (batch_size, seq_length, embed_size)
        return out, attention_weights  # 返回加权后的输出和注意力权重
得到的自注意力输出是直接替换掉原本的模型输入还是与模型输入加和/拼接在一起?
自注意力输出可以:
- 直接替换模型输入:自注意力输出完全取代原始输入,作为下一层的输入。
- 与模型输入加和:使用残差连接,将自注意力输出与原始输入相加,保留原始信息,同时增强特征表示。
- 与模型输入拼接:将自注意力输出与原始输入在特征维度上拼接,保留更多信息。
最常见的是残差连接,特别是在 Transformer 模型中。
12.5 Transformer
Transformer架构
- 基于编码器-解码器架构来处理序列对。
- 跟使用注意力的seq2seq不同,Transformer是纯基于注意力。
可以说它是一个纯基于注意力的,或者说是自注意力的架构。
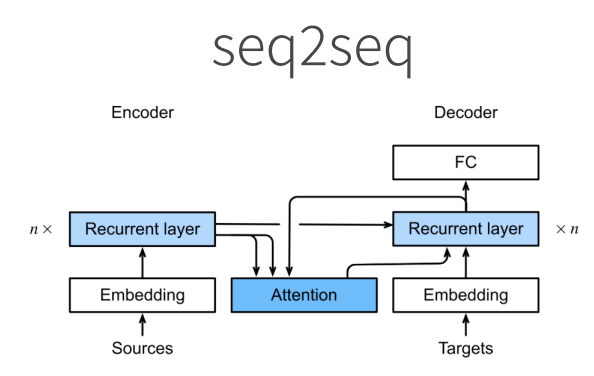
上面的是使用注意力机制的seq2seq,下面的是Transformer
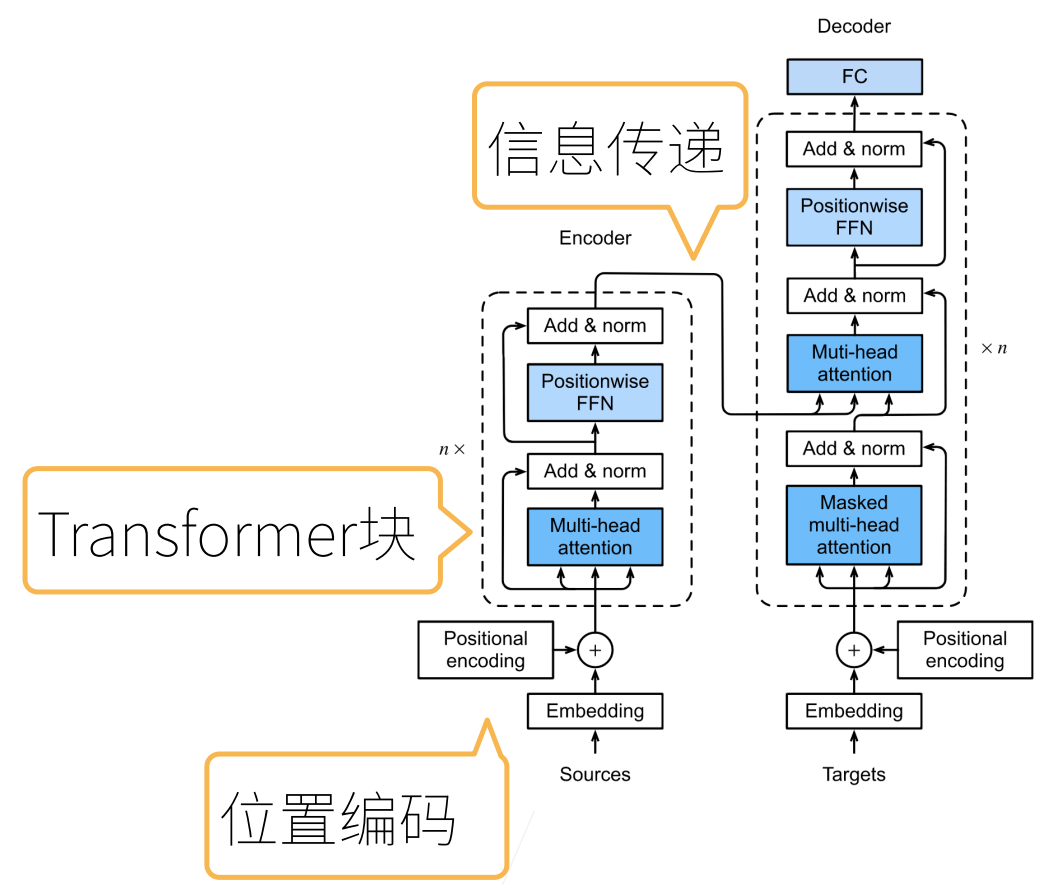
多头注意力
Transformer中的是多头自注意力机制

对同—key,value,query,希望抽取不同的信息
- 例如短距离关系和长距离关系
多头注意力使用
- 合并各个头(head)输出得到最终输出
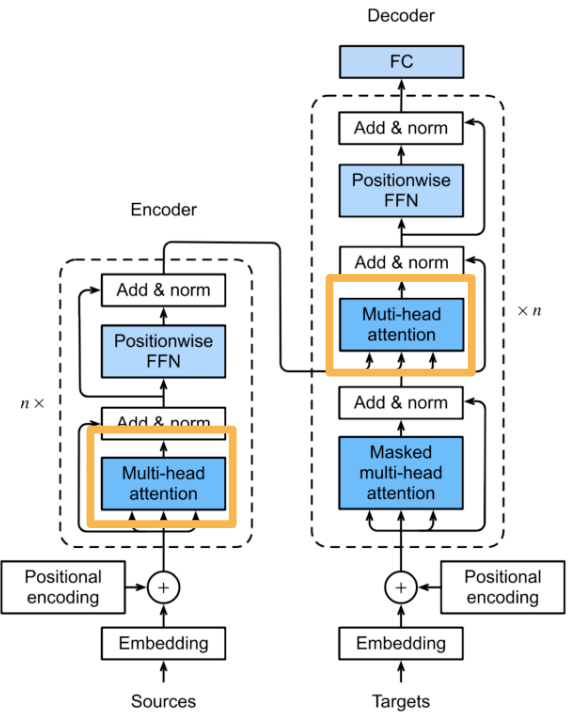
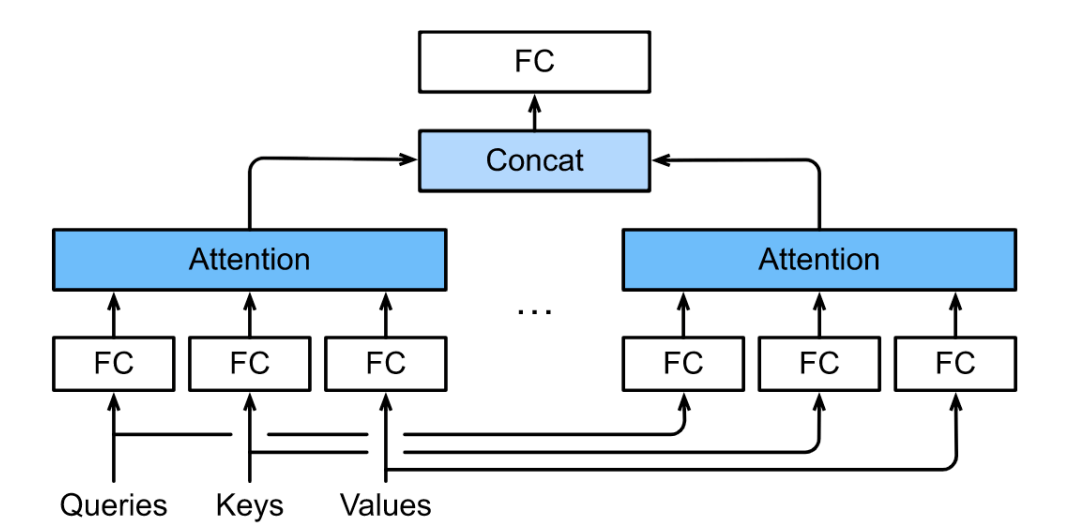
头
头
输出的 可学习参数
多头注意力的输出:
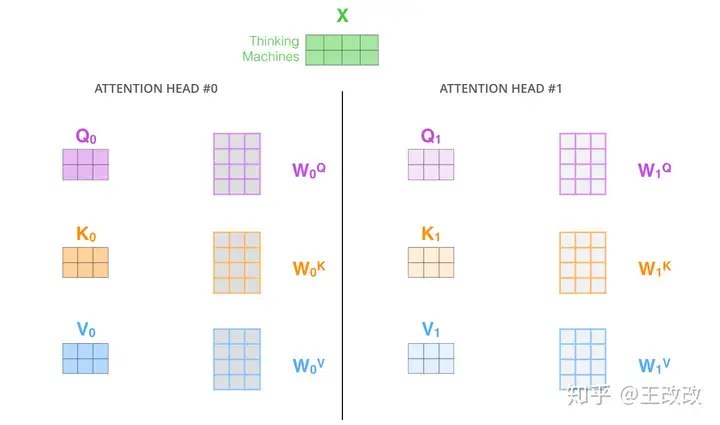
那多头以后怎么处理最后的向量?
其实很简单,只需要三步:
- 将 8 个向量 concat 起来得到长长的参数矩阵
- 将该矩阵与一个参数矩阵 𝑊0 进行相乘,该参数矩阵的长是一个 𝑍 向量的长度,宽是 8 个 𝑍 向量 cat 后的长度
- 相乘的结果的形状就是一个 𝑍 向量的形状
这样我们通过一个参数矩阵完成了对 8 个向量的特征提取。
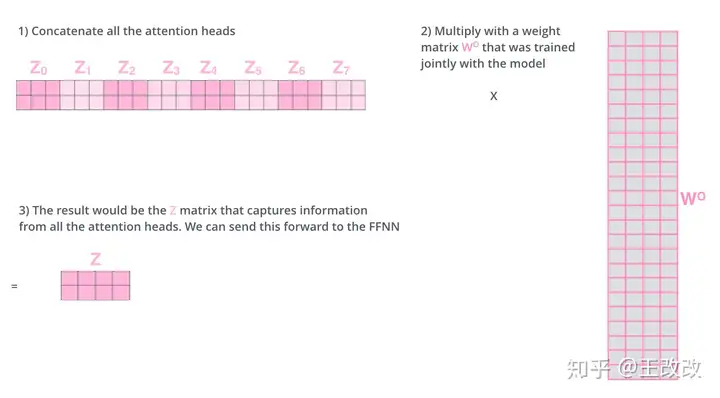
下图就是 multi-headed attention 的全部流程:
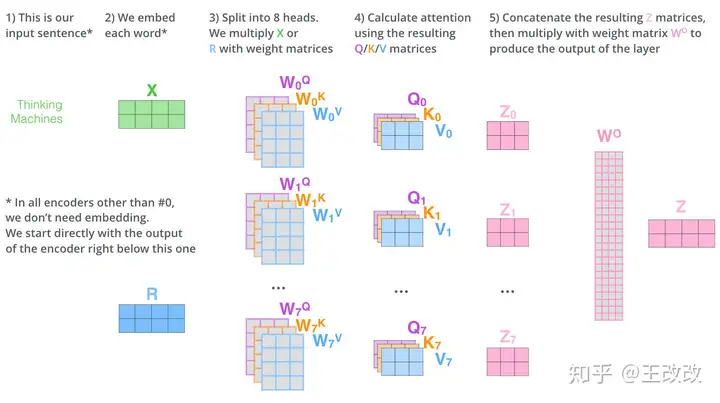
有掩码的多头注意力
其实也是多头自注意力机制
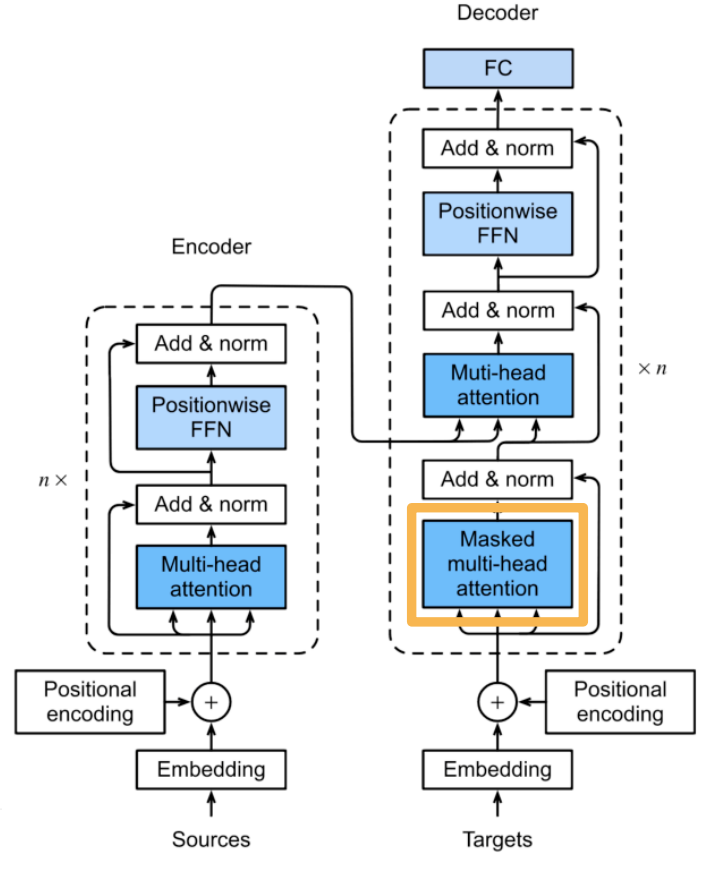
解码器对序列中一个元素输出时,不应该考虑该元素之后的元素
可以通过掩码来实现
- 也就是计算
基于位置的前馈网络

- 将输入形状由
- 作用两个全连接层
- 输出形状由
- 等价于两层核窗口为 1 的一维卷积层
其实我一直不是很理解为什么 1*1 卷积等价于一个全连接,下面我画了张图,有助于理解:
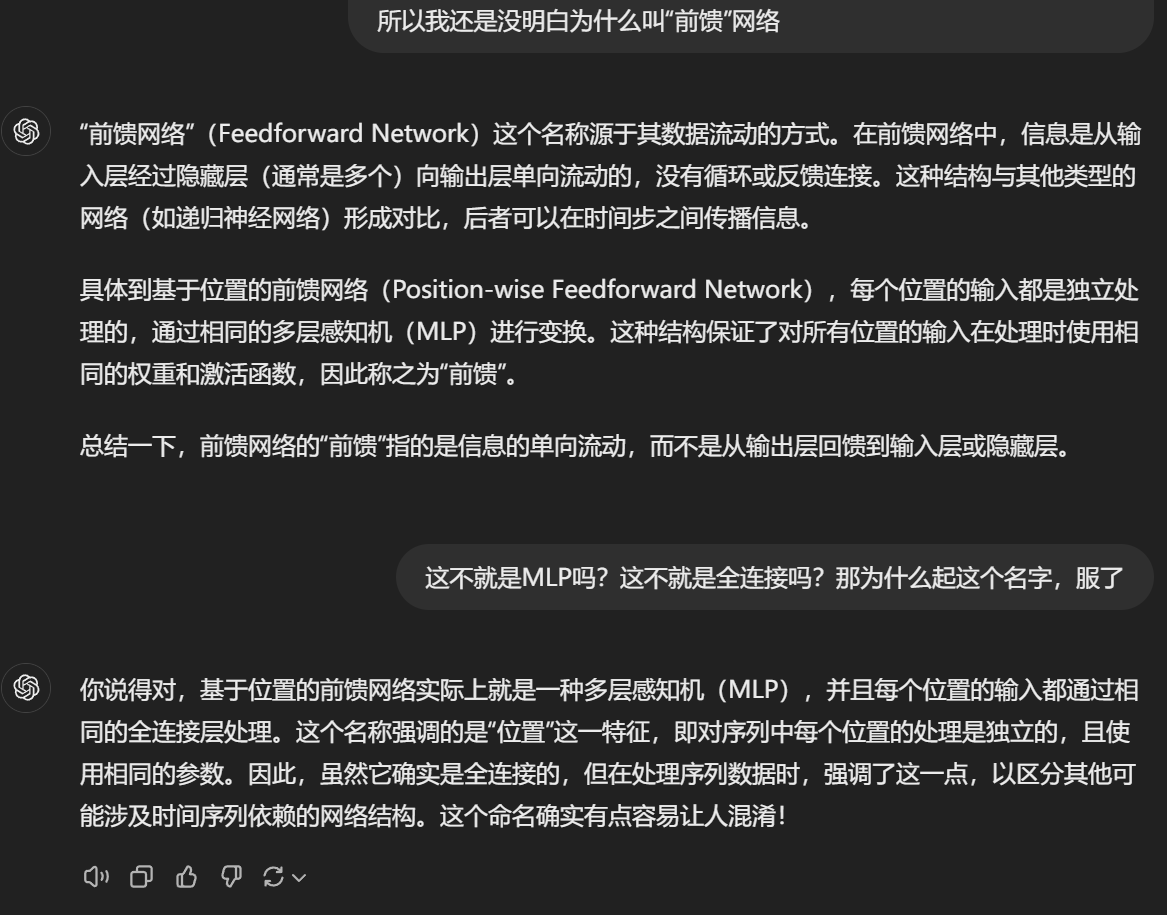
层归一化
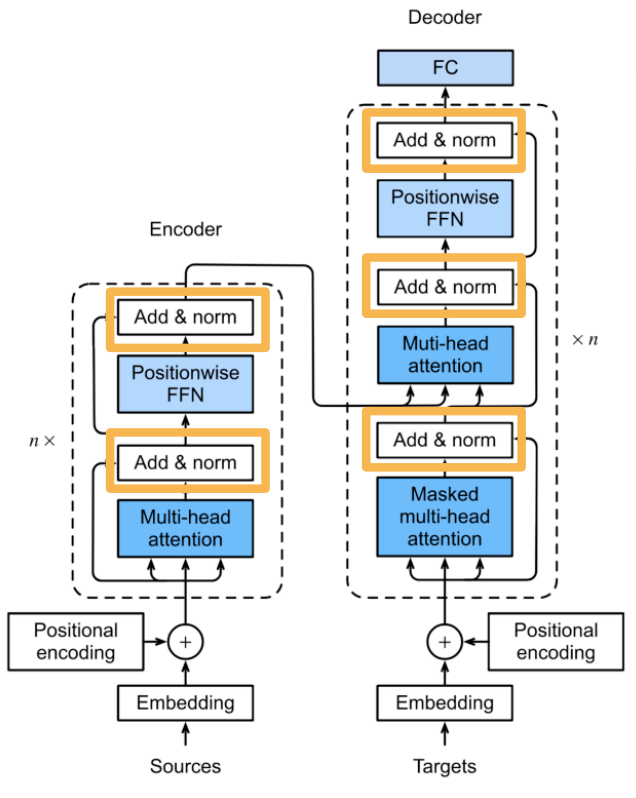
批量归一化(BatchNormalization 见7.5)对每个特征/通道里元素进行归一化
- 不适合序列长度会变的NLP应用,会导致不稳定
层归一化对每个样本里的元素进行归一化,d 表示隐层维度(一个字/词的向量表示),b 表示 batch_size
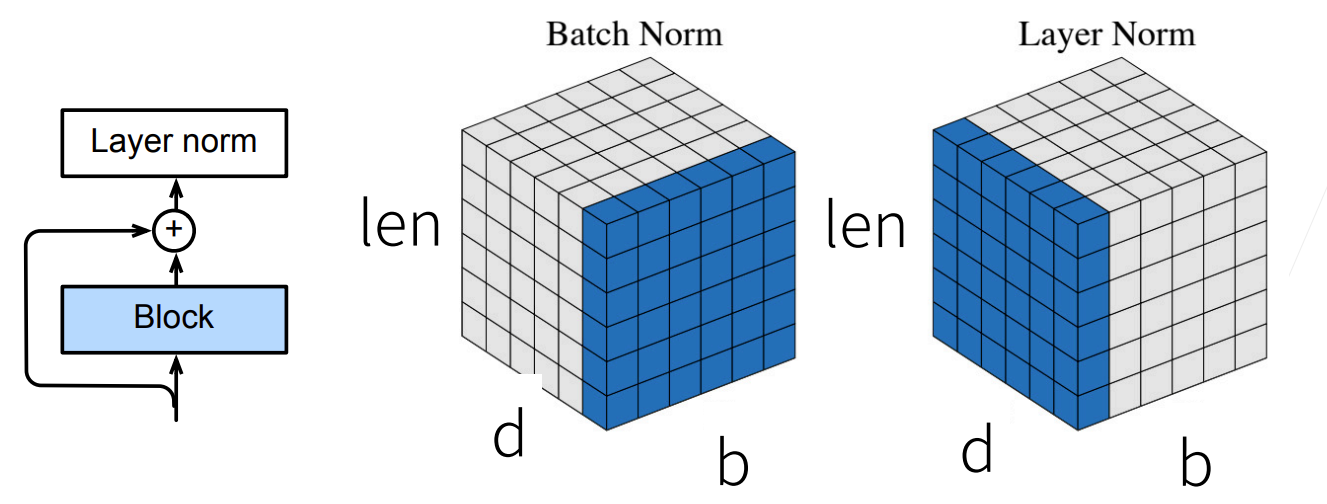
信息传递
这里是一个正常的注意力机制,不是自注意力了
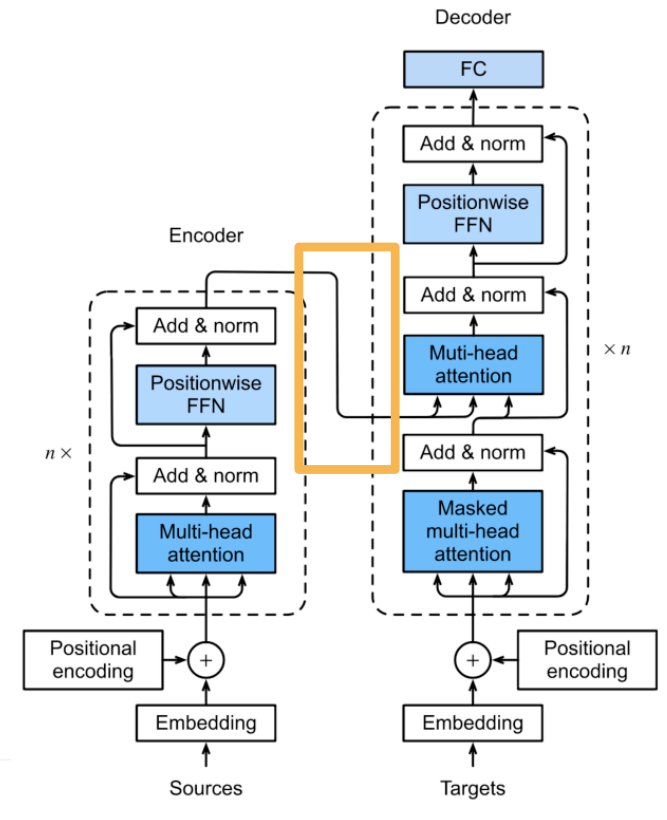
编码器中的输出
将其作为解码中第
- 它的 query 来自目标序列
意味着编码器和解码器中块的个数和输出维度都是一样的
这个我第一次学的时候有一些误解,认为n次编码块会把每一次的都给对应的解码块,例如:
EncoderBlock[1]->DecoderBlock[1]EncoderBlock[2]->DecoderBlock[2]- ......
EncoderBlock[n]->DecoderBlock[n]上述理解是错的!
实际内部的图是这样的:
预测
预测第
解码器中输入前
- 在自注意力中,前

这部分预测写的稍微有点问题,建议直接看代码理解
代码实现-多头注意力
xxxxxxxxxximport mathimport torchfrom torch import nnfrom d2l import torch as d2l1.主要代码,选择缩放点积注意力作为每一个注意力头
这里挺巧妙的,多头按理来说需要很多个q、k、v,但是这里通过
transpose_qkv取了个巧,体现了我们之前多次说到的将小矩阵运算转换为大矩阵运算的提速思想。
xxxxxxxxxxclass MultiHeadAttention(nn.Module):    """多头注意力"""    def __init__(self, key_size, query_size, value_size, num_hiddens,                 num_heads, dropout, bias=False, **kwargs):        super(MultiHeadAttention, self).__init__(**kwargs)        self.num_heads = num_heads        # ⭐这里的这个 num_hiddens 是最后所有头的结果加起来的那个大的维度        self.attention = d2l.DotProductAttention(dropout)        self.W_q = nn.Linear(query_size, num_hiddens, bias=bias)        self.W_k = nn.Linear(key_size, num_hiddens, bias=bias)        self.W_v = nn.Linear(value_size, num_hiddens, bias=bias)        self.W_o = nn.Linear(num_hiddens, num_hiddens, bias=bias)
    def forward(self, queries, keys, values, valid_lens):        # queries,keys,values的形状: (batch_size,查询或者“键-值”对的个数,num_hiddens)        # valid_lens 的形状: (batch_size,)或(batch_size,查询的个数)        # 经过变换后,输出的 queries,keys,values 的形状:        # (batch_size*num_heads,查询或者“键-值”对的个数,num_hiddens/num_heads)        queries = transpose_qkv(self.W_q(queries), self.num_heads)        keys = transpose_qkv(self.W_k(keys), self.num_heads)        values = transpose_qkv(self.W_v(values), self.num_heads)
        if valid_lens is not None:            # 在轴0,将第一项(标量或者矢量)复制num_heads次,            # 然后如此复制第二项,然后诸如此类。            valid_lens = torch.repeat_interleave(valid_lens, repeats=self.num_heads, dim=0)
        # output的形状:(batch_size*num_heads,查询的个数,num_hiddens/num_heads)        output = self.attention(queries, keys, values, valid_lens)
# output_concat的形状:(batch_size,查询的个数,num_hiddens) output_concat = transpose_output(output, self.num_heads) return self.W_o(output_concat)2.使多个头并行计算
xxxxxxxxxxdef transpose_qkv(X, num_heads):    """为了多注意力头的并行计算而变换形状"""    # 输入X的形状:(batch_size,查询或者“键-值”对的个数,num_hiddens)    # 输出X的形状:(batch_size,查询或者“键-值”对的个数,num_heads,num_hiddens/num_heads)    X = X.reshape(X.shape[0], X.shape[1], num_heads, -1)
    # 输出X的形状:(batch_size,num_heads,查询或者“键-值”对的个数, num_hiddens/num_heads)    X = X.permute(0, 2, 1, 3)
    # 最终输出的形状:(batch_size*num_heads, 查询或者“键-值”对的个数, num_hiddens/num_heads)    return X.reshape(-1, X.shape[2], X.shape[3])

def transpose_output(X, num_heads): """逆转transpose_qkv函数的操作""" X = X.reshape(-1, num_heads, X.shape[1], X.shape[2]) X = X.permute(0, 2, 1, 3) return X.reshape(X.shape[0], X.shape[1], -1)3.测试
xxxxxxxxxxnum_hiddens, num_heads = 100, 5attention = MultiHeadAttention(num_hiddens, num_hiddens, num_hiddens, num_hiddens, num_heads, 0.5)attention.eval()xxxxxxxxxxMultiHeadAttention( (attention): DotProductAttention( (dropout): Dropout(p=0.5, inplace=False) ) (W_q): Linear(in_features=100, out_features=100, bias=False) (W_k): Linear(in_features=100, out_features=100, bias=False) (W_v): Linear(in_features=100, out_features=100, bias=False) (W_o): Linear(in_features=100, out_features=100, bias=False))xxxxxxxxxxbatch_size, num_queries = 2, 4num_kvpairs, valid_lens = 6, torch.tensor([3, 2])X = torch.ones((batch_size, num_queries, num_hiddens))Y = torch.ones((batch_size, num_kvpairs, num_hiddens))attention(X, Y, Y, valid_lens).shapexxxxxxxxxxtorch.Size([2, 4, 100])4.下面这张图概括了数据在这一模块的流动变化:
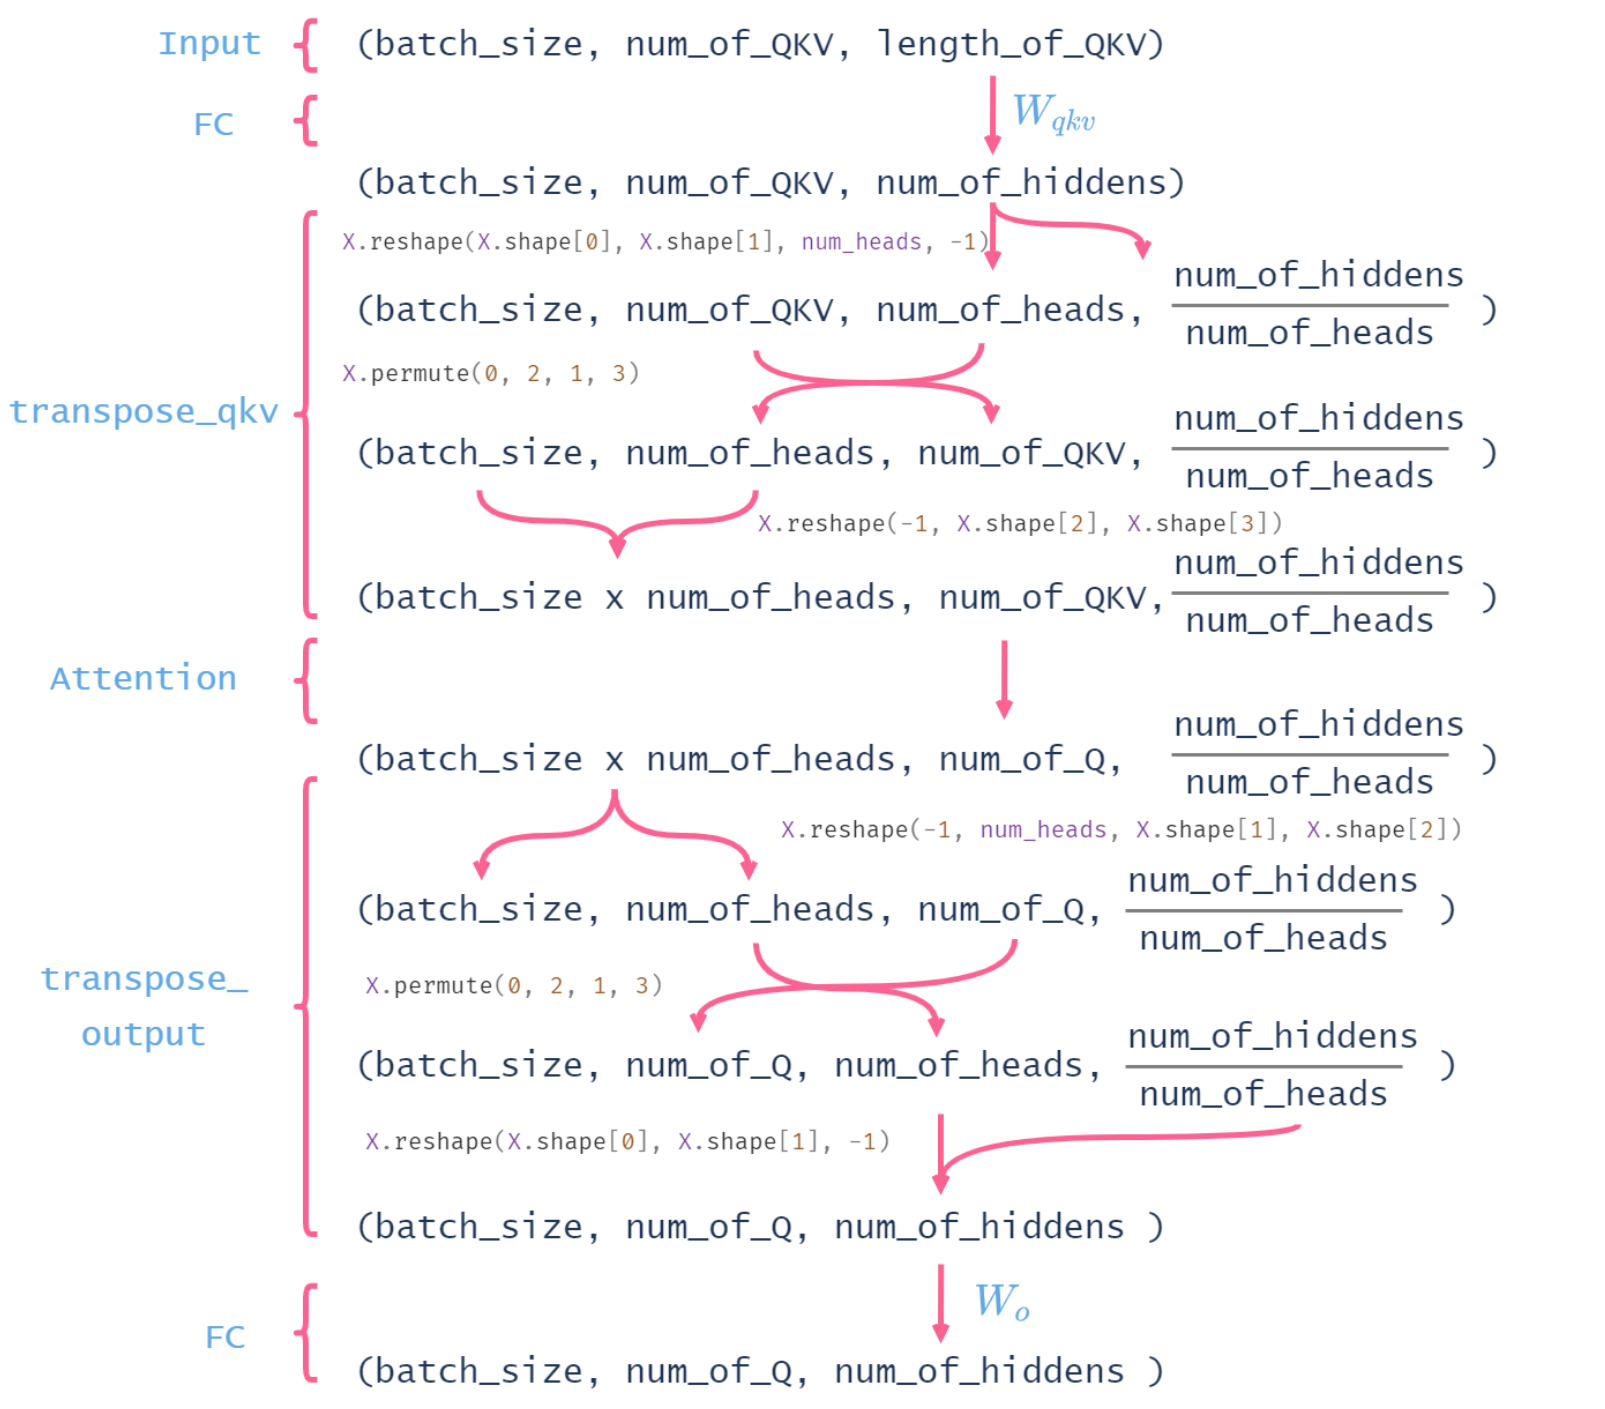
代码实现-Transformer
xxxxxxxxxximport mathimport pandas as pdimport torchfrom torch import nnfrom d2l import torch as d2l1.基于位置的前馈网络
xxxxxxxxxxclass PositionWiseFFN(nn.Module):    """基于位置的前馈网络"""    def __init__(self, ffn_num_input, ffn_num_hiddens, ffn_num_outputs,                 **kwargs):        super(PositionWiseFFN, self).__init__(**kwargs)        self.dense1 = nn.Linear(ffn_num_input, ffn_num_hiddens)        self.relu = nn.ReLU()        self.dense2 = nn.Linear(ffn_num_hiddens, ffn_num_outputs)
def forward(self, X): return self.dense2(self.relu(self.dense1(X))) # 在dense1中,pytorch默认的对于超过二维的处理就是,前面的所有都算成第一维,然后最后一维算成第二维xxxxxxxxxxffn = PositionWiseFFN(4, 4, 8)ffn.eval()ffn(torch.ones((2, 3, 4)))[0]xxxxxxxxxxtensor([[-0.8290, 1.0067, 0.3619, 0.3594, -0.5328, 0.2712, 0.7394, 0.0747], [-0.8290, 1.0067, 0.3619, 0.3594, -0.5328, 0.2712, 0.7394, 0.0747], [-0.8290, 1.0067, 0.3619, 0.3594, -0.5328, 0.2712, 0.7394, 0.0747]], grad_fn=<SelectBackward0>)2.对比不同维度的层归一化和批量归一化的效果
xxxxxxxxxxln = nn.LayerNorm(2)bn = nn.BatchNorm1d(2)X = torch.tensor([[1, 2], [2, 3]], dtype=torch.float32)# 在训练模式下计算X的均值和方差print('layer norm:', ln(X), '\nbatch norm:', bn(X))xxxxxxxxxxlayer norm: tensor([[-1.0000, 1.0000], [-1.0000, 1.0000]], grad_fn=<NativeLayerNormBackward0>)batch norm: tensor([[-1.0000, -1.0000], [ 1.0000, 1.0000]], grad_fn=<NativeBatchNormBackward0>)使用残差连接和归一化
xxxxxxxxxxclass AddNorm(nn.Module):    """残差连接后进行层规范化"""    def __init__(self, normalized_shape, dropout, **kwargs):        super(AddNorm, self).__init__(**kwargs)        self.dropout = nn.Dropout(dropout)        self.ln = nn.LayerNorm(normalized_shape)
    def forward(self, X, Y):        return self.ln(self.dropout(Y) + X)
残差连接要求两个输入的形状相同,以便加法操作后输出张量的形状相同。
xxxxxxxxxxadd_norm = AddNorm([3, 4], 0.5)add_norm.eval()add_norm(torch.ones((2, 3, 4)), torch.ones((2, 3, 4))).shapexxxxxxxxxxtorch.Size([2, 3, 4])3.实现编码器的一个层(Transformer EncoderBlock)
xxxxxxxxxxclass EncoderBlock(nn.Module):    """Transformer编码器块"""    def __init__(self, key_size, query_size, value_size, num_hiddens,                 norm_shape, ffn_num_input, ffn_num_hiddens, num_heads,                 dropout, use_bias=False, **kwargs):        super(EncoderBlock, self).__init__(**kwargs)        self.attention = d2l.MultiHeadAttention(key_size, query_size, value_size, num_hiddens, num_heads, dropout, use_bias)        self.addnorm1 = AddNorm(norm_shape, dropout)        self.ffn = PositionWiseFFN(ffn_num_input, ffn_num_hiddens, num_hiddens)        self.addnorm2 = AddNorm(norm_shape, dropout)
    def forward(self, X, valid_lens):        Y = self.addnorm1(X, self.attention(X, X, X, valid_lens))        return self.addnorm2(Y, self.ffn(Y))
正如从代码中所看到的,Transformer编码器中的任何层都不会改变其输入的形状。
看上去很复杂,实际上还行,这个参数一般就是下面这样设置了。
xxxxxxxxxxX = torch.ones((2, 100, 24))valid_lens = torch.tensor([3, 2])encoder_blk = EncoderBlock(24, 24, 24, 24, [100, 24], 24, 48, 8, 0.5)encoder_blk.eval()encoder_blk(X, valid_lens).shapexxxxxxxxxxtorch.Size([2, 100, 24])4.Transformer编码器
xxxxxxxxxxclass TransformerEncoder(d2l.Encoder):    """Transformer编码器"""    def __init__(self, vocab_size, key_size, query_size, value_size,                 num_hiddens, norm_shape, ffn_num_input, ffn_num_hiddens,                 num_heads, num_layers, dropout, use_bias=False, **kwargs):        super(TransformerEncoder, self).__init__(**kwargs)        self.num_hiddens = num_hiddens        self.embedding = nn.Embedding(vocab_size, num_hiddens)        self.pos_encoding = d2l.PositionalEncoding(num_hiddens, dropout)        self.blks = nn.Sequential()        for i in range(num_layers):            self.blks.add_module("block"+str(i),                EncoderBlock(key_size, query_size, value_size, num_hiddens,                             norm_shape, ffn_num_input, ffn_num_hiddens,                             num_heads, dropout, use_bias))
    def forward(self, X, valid_lens, *args):        # 因为位置编码值在-1和1之间,        # 因此嵌入值乘以嵌入维度的平方根进行缩放,        # 然后再与位置编码相加,所以其实就算一种归一化,让embedding的值别太小        X = self.pos_encoding(self.embedding(X) * math.sqrt(self.num_hiddens))        self.attention_weights = [None] * len(self.blks)        for i, blk in enumerate(self.blks):            X = blk(X, valid_lens)            # 下面这个存起来是用来画图用的            self.attention_weights[i] = blk.attention.attention.attention_weights        return X
blk.attention:
blk是EncoderBlock,它包含一个多头注意力模块(MultiHeadAttention)。blk.attention指的是EncoderBlock中的MultiHeadAttention实例。
blk.attention.attention:
- 在
MultiHeadAttention中,self.attention是DotProductAttention实例,它用于计算点积注意力的实际操作。
blk.attention.attention.attention_weights:
- 在
DotProductAttention中,attention_weights记录了在点积注意力机制中,查询(queries)与键(keys)之间的相似度分数(权重),用于最终对值(values)进行加权求和。
下面我们指定了超参数来创建一个两层的Transformer编码器。 Transformer编码器输出的形状是(批量大小,时间步数目,num_hiddens)。
xxxxxxxxxxencoder = TransformerEncoder(200, 24, 24, 24, 24, [100, 24], 24, 48, 8, 2, 0.5)encoder.eval()encoder(torch.ones((2, 100), dtype=torch.long), valid_lens).shapexxxxxxxxxxtorch.Size([2, 100, 24])5.实现解码器的一个层(Transformer DecoderBlock)
xxxxxxxxxxclass DecoderBlock(nn.Module):    """解码器中第i个块"""    def __init__(self, key_size, query_size, value_size, num_hiddens,                 norm_shape, ffn_num_input, ffn_num_hiddens, num_heads,                 dropout, i, **kwargs):        super(DecoderBlock, self).__init__(**kwargs)        self.i = i        self.attention1 = d2l.MultiHeadAttention(key_size, query_size, value_size, num_hiddens, num_heads, dropout)        self.addnorm1 = AddNorm(norm_shape, dropout)        self.attention2 = d2l.MultiHeadAttention(key_size, query_size, value_size, num_hiddens, num_heads, dropout)        self.addnorm2 = AddNorm(norm_shape, dropout)        self.ffn = PositionWiseFFN(ffn_num_input, ffn_num_hiddens, num_hiddens)        self.addnorm3 = AddNorm(norm_shape, dropout)
    def forward(self, X, state):        enc_outputs, enc_valid_lens = state[0], state[1]        # 训练阶段,输出序列的所有词元都在同一时间处理,因此state[2][self.i]初始化为None。        # 预测阶段,输出序列是通过词元一个接着一个解码的,因此state[2][self.i]包含着直到当前时间步第i个块解码的输出表示        # 上面这两句注释写的没问题,好好琢磨        if state[2][self.i] is None:            key_values = X        else:            key_values = torch.cat((state[2][self.i], X), axis=1)        state[2][self.i] = key_values        if self.training:            batch_size, num_steps, _ = X.shape            # dec_valid_lens的开头:(batch_size,num_steps),其中每一行是[1,2,...,num_steps]            dec_valid_lens = torch.arange(1, num_steps + 1, device=X.device).repeat(batch_size, 1)        else:            dec_valid_lens = None
        # 自注意力        X2 = self.attention1(X, key_values, key_values, dec_valid_lens)        Y = self.addnorm1(X, X2)        # 编码器-解码器注意力。        # enc_outputs的开头:(batch_size,num_steps,num_hiddens)        Y2 = self.attention2(Y, enc_outputs, enc_outputs, enc_valid_lens)        Z = self.addnorm2(Y, Y2)        return self.addnorm3(Z, self.ffn(Z)), state
编码器和解码器的特征维度都是 num_hiddens
xxxxxxxxxxdecoder_blk = DecoderBlock(24, 24, 24, 24, [100, 24], 24, 48, 8, 0.5, 0)decoder_blk.eval()X = torch.ones((2, 100, 24))state = [encoder_blk(X, valid_lens), valid_lens, [None]]decoder_blk(X, state)[0].shapexxxxxxxxxxtorch.Size([2, 100, 24])6.Transformer解码器
xxxxxxxxxxclass TransformerDecoder(d2l.AttentionDecoder): def __init__(self, vocab_size, key_size, query_size, value_size, num_hiddens, norm_shape, ffn_num_input, ffn_num_hiddens, num_heads, num_layers, dropout, **kwargs): super(TransformerDecoder, self).__init__(**kwargs) self.num_hiddens = num_hiddens self.num_layers = num_layers self.embedding = nn.Embedding(vocab_size, num_hiddens) self.pos_encoding = d2l.PositionalEncoding(num_hiddens, dropout) self.blks = nn.Sequential() for i in range(num_layers): self.blks.add_module("block"+str(i), DecoderBlock(key_size, query_size, value_size, num_hiddens, norm_shape, ffn_num_input, ffn_num_hiddens, num_heads, dropout, i)) self.dense = nn.Linear(num_hiddens, vocab_size)
def init_state(self, enc_outputs, enc_valid_lens, *args): return [enc_outputs, enc_valid_lens, [None] * self.num_layers]
def forward(self, X, state): X = self.pos_encoding(self.embedding(X) * math.sqrt(self.num_hiddens)) self._attention_weights = [[None] * len(self.blks) for _ in range (2)] for i, blk in enumerate(self.blks): X, state = blk(X, state) # 下面这个存起来是用来画图用的 # 解码器自注意力权重 self._attention_weights[0][i] = blk.attention1.attention.attention_weights # “编码器-解码器”自注意力权重 self._attention_weights[1][i] = blk.attention2.attention.attention_weights return self.dense(X), state
def attention_weights(self): return self._attention_weights7.训练
xxxxxxxxxxnum_hiddens, num_layers, dropout, batch_size, num_steps = 32, 2, 0.1, 64, 10lr, num_epochs, device = 0.005, 200, d2l.try_gpu()ffn_num_input, ffn_num_hiddens, num_heads = 32, 64, 4key_size, query_size, value_size = 32, 32, 32norm_shape = [32]# 超参数这么多,关键的其实就num_hiddens(32/64,Bert可以取到1024),num_heads(8/12/24)这两个参数
train_iter, src_vocab, tgt_vocab = d2l.load_data_nmt(batch_size, num_steps)
encoder = TransformerEncoder(    len(src_vocab), key_size, query_size, value_size, num_hiddens,    norm_shape, ffn_num_input, ffn_num_hiddens, num_heads,    num_layers, dropout)decoder = TransformerDecoder(    len(tgt_vocab), key_size, query_size, value_size, num_hiddens,    norm_shape, ffn_num_input, ffn_num_hiddens, num_heads,    num_layers, dropout)
# 这都是跟以前一样了,自己查查11章的函数吧net = d2l.EncoderDecoder(encoder, decoder)d2l.train_seq2seq(net, train_iter, lr, num_epochs, tgt_vocab, device)xxxxxxxxxxloss 0.030, 5202.9 tokens/sec on cuda:0比RNN不会慢到哪里去
8.预测
xxxxxxxxxxengs = ['go .', "i lost .", 'he\'s calm .', 'i\'m home .']fras = ['va !', 'j\'ai perdu .', 'il est calme .', 'je suis chez moi .']for eng, fra in zip(engs, fras): translation, dec_attention_weight_seq = d2l.predict_seq2seq(net, eng, src_vocab, tgt_vocab, num_steps, device, True) print(f'{eng} => {translation}, ', f'bleu {d2l.bleu(translation, fra, k=2):.3f}')xxxxxxxxxxgo . => va !, bleu 1.000i lost . => j'ai perdu ., bleu 1.000he's calm . => il est calme ., bleu 1.000i'm home . => je suis chez moi ., bleu 1.0009.一些可视化
当进行最后一个英语到法语的句子翻译工作时,让我们可视化Transformer的注意力权重。编码器自注意力权重的形状为(编码器层数,注意力头数,num_steps或查询的数目,num_steps或“键-值”对的数目)。
xxxxxxxxxxenc_attention_weights = torch.cat(net.encoder.attention_weights, 0).reshape((num_layers, num_heads, -1, num_steps))enc_attention_weights.shapexxxxxxxxxxtorch.Size([2, 4, 10, 10])逐行呈现两层多头注意力的权重:
xxxxxxxxxxd2l.show_heatmaps( enc_attention_weights.cpu(), xlabel='Key positions', ylabel='Query positions', titles=['Head %d' % i for i in range(1, 5)], figsize=(7, 3.5))为了可视化解码器的自注意力权重和“编码器-解码器”的注意力权重,我们需要完成更多的数据操作工作。例如用零填充被掩蔽住的注意力权重。值得注意的是,解码器的自注意力权重和“编码器-解码器”的注意力权重都有相同的查询:即以序列开始词元(beginning-of-sequence,BOS)打头,再与后续输出的词元共同组成序列。
xxxxxxxxxxdec_attention_weights_2d = [head[0].tolist() for step in dec_attention_weight_seq for attn in step for blk in attn for head in blk]dec_attention_weights_filled = torch.tensor( pd.DataFrame(dec_attention_weights_2d).fillna(0.0).values)dec_attention_weights = dec_attention_weights_filled.reshape((-1, 2, num_layers, num_heads, num_steps))dec_self_attention_weights, dec_inter_attention_weights = dec_attention_weights.permute(1, 2, 3, 0, 4)dec_self_attention_weights.shape, dec_inter_attention_weights.shapexxxxxxxxxx(torch.Size([2, 4, 6, 10]), torch.Size([2, 4, 6, 10]))xxxxxxxxxx# Plusonetoincludethebeginning-of-sequencetokend2l.show_heatmaps( dec_self_attention_weights[:, :, :, :len(translation.split()) + 1], xlabel='Key positions', ylabel='Query positions', titles=['Head %d' % i for i in range(1, 5)], figsize=(7, 3.5))与编码器的自注意力的情况类似,通过指定输入序列的有效长度,输出序列的查询不会与输入序列中填充位置的词元进行注意力计算。
xxxxxxxxxxd2l.show_heatmaps( dec_inter_attention_weights, xlabel='Key positions', ylabel='Query positions', titles=['Head %d' % i for i in range(1, 5)], figsize=(7, 3.5))尽管Transformer架构是为了序列到序列的学习而提出的,但正如本书后面将提及的那样,Transformer编码器或Transformer解码器通常被单独用于不同的深度学习任务中。
12.6 BERT预训练
芝麻街的大门由此被打开🥵
NLP里的迁移学习
使用预训练好的模型来抽取词、句子的特征
- 例如 word2vec 或语言模型
不更新预训练好的模型
需要构建新的网络来抓取新任务需要的信息
- Word2vec 忽略了时序信息,语言模型只看了一个方向
在NLP中,普通的nn.Embedding层与用word2vec嵌入有什么区别?
普通的 nn.Embedding 层是一个可训练的查找表,用于将词索引映射到随机初始化的嵌入向量,而 word2vec 嵌入是通过无监督学习从大规模文本中预训练得到的固定向量。这意味着 nn.Embedding 在训练过程中可以更新嵌入,而 word2vec 的嵌入通常是静态的,不能在模型训练期间进一步调整。
BERT的动机
- 基于微调的NLP模型
- 预训练的模型抽取了足够多的信息
- 新的任务只需要增加一个简单的输出层
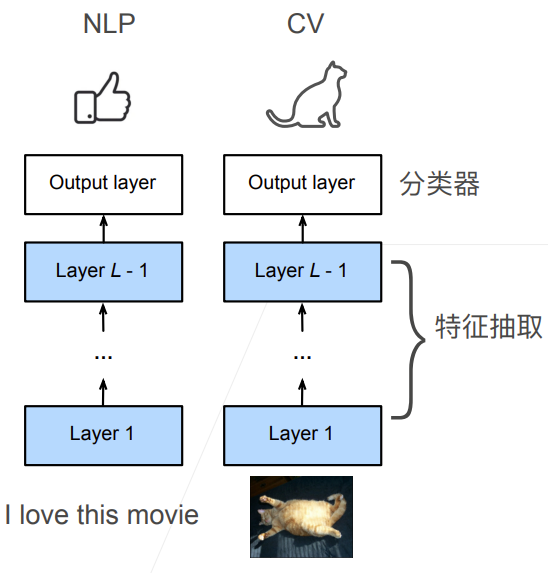
视频表述:https://www.bilibili.com/video/BV1yU4y1E7Ns?t=449.5
BERT架构
idea很简单,但是效果非常好
只有编码器的Transformer
两个版本:
- Base: #blocks = 12, hidden size = 768, #heads = 12, #parameters = 110M
- Large: #blocks = 24, hidden size = 1024, #heads = 16, #parameter = 340M
在大规模数据上训练 > 3B词
对输入的修改
- 每个样本是一个句子对
- 加入额外的片段嵌入,
<cls>表示句子开头,<sep>表示句子分隔 - 位置编码可学习

当然可以做更多的句子,譬如一次性输入三条上下文,但是一般都采取两条就够了。
注意最终的结果是把他们三层的结果按位加和在了一起。
Token Embedding:
这个<cls>,有说法的,具体看 点击跳转
Segment Embedding:
如果仅仅通过引入句子分隔符,对于transformer来说可能还不是很够,因此我们再引入SegmentEmbedding层来增加句子之间的区分。
第一个句子的Segment是0,第二个句子为1。或者第一个句子给一个固定的向量,第二个也给一个固定的向量。
Position Embedding:
原先的sin、cos的位置编码是不可学习的,这里不再用了,变成一个可以学的位置编码方式。
预训练任务1:带掩码的语言模型
Transfomer的编码器是双向,标准语言模型要求单向。
带掩码的语言模型每次随机(15%概率)将一些词元换成
因为微调任务中不出现
,所以微调策略修改为: - 80%概率下,将选中的词元变成
- 10%概率下换成一个随机词元
- 10%概率下保持原有的词元
- 80%概率下,将选中的词元变成
80%mask用来训练模型有效抓去信息,10%用来提升鲁棒性,10%用来保持和微调时同样的分布
预训练任务2:下一句子预测
预测一个句子对中两个句子是不是相邻
训练样本中:
- 50%概率选择相邻句子对:
this movie is great i like it - 50%概率选择随机句子对:
this movie is great hello world
- 50%概率选择相邻句子对:
将
对应的输出放到一个全连接层来预测
代码实现-BERT模型本身
这里我把BERT分为了本身的
模型实现、训练数据处理、以及到底怎么进行预训练这三部分代码
xxxxxxxxxximport torchfrom torch import nnfrom d2l import torch as d2l1.输入表示
xxxxxxxxxxdef get_tokens_and_segments(tokens_a, tokens_b=None): """获取输入序列的词元及其片段索引""" tokens = ['<cls>'] + tokens_a + ['<sep>'] # 0和1分别标记片段A和B segments = [0] * (len(tokens_a) + 2) if tokens_b is not None: tokens += tokens_b + ['<sep>'] segments += [1] * (len(tokens_b) + 1) return tokens, segmentsxxxxxxxxxxTokens: ['<cls>', 'hello', 'world', '<sep>', 'this', 'is', 'a', 'test', '<sep>']Segments: [0, 0, 0, 0, 1, 1, 1, 1, 1]
Tokens (only A): ['<cls>', 'just', 'one', 'sentence', '<sep>']Segments (only A): [0, 0, 0, 0, 0]2.BERTEncoder class
xxxxxxxxxxclass BERTEncoder(nn.Module):    """BERT编码器"""    def __init__(self, vocab_size, num_hiddens, norm_shape, ffn_num_input,                 ffn_num_hiddens, num_heads, num_layers, dropout,                 max_len=1000, key_size=768, query_size=768, value_size=768,                 **kwargs):        super(BERTEncoder, self).__init__(**kwargs)        self.token_embedding = nn.Embedding(vocab_size, num_hiddens)        self.segment_embedding = nn.Embedding(2, num_hiddens)        # 在BERT中,位置嵌入是可学习的,因此我们创建一个足够长的位置嵌入参数        self.pos_embedding = nn.Parameter(torch.randn(1, max_len, num_hiddens))        self.blks = nn.Sequential()        for i in range(num_layers):            self.blks.add_module(f"{i}", d2l.EncoderBlock(                key_size, query_size, value_size, num_hiddens, norm_shape,                ffn_num_input, ffn_num_hiddens, num_heads, dropout, True))
    def forward(self, tokens, segments, valid_lens):        # 在以下代码段中,X的形状保持不变:(批量大小,最大序列长度,num_hiddens)        X = self.token_embedding(tokens) + self.segment_embedding(segments)        X = X + self.pos_embedding.data[:, :X.shape[1], :]        for blk in self.blks:            X = blk(X, valid_lens)        return X
注意上述三个
假设词表大小为10000,为了演示BERTEncoder的前向推断,让我们创建一个实例并初始化它的参数:
xxxxxxxxxxvocab_size, num_hiddens, ffn_num_hiddens, num_heads = 10000, 768, 1024, 4norm_shape, ffn_num_input, num_layers, dropout = [768], 768, 2, 0.2encoder = BERTEncoder(vocab_size, num_hiddens, norm_shape, ffn_num_input,                      ffn_num_hiddens, num_heads, num_layers, dropout)
tokens = torch.randint(0, vocab_size, (2, 8))segments = torch.tensor([[0, 0, 0, 0, 1, 1, 1, 1], [0, 0, 0, 1, 1, 1, 1, 1]])encoded_X = encoder(tokens, segments, None)encoded_X.shapexxxxxxxxxxtorch.Size([2, 8, 768])下面这两个与训练任务都是在BERT已经跑出结果的基础上进行⬇️
3.掩蔽语言模型(Masked Language Modeling)
xxxxxxxxxxclass MaskLM(nn.Module):    """BERT的掩蔽语言模型任务"""    def __init__(self, vocab_size, num_hiddens, num_inputs=768, **kwargs):        super(MaskLM, self).__init__(**kwargs)        self.mlp = nn.Sequential(nn.Linear(num_inputs, num_hiddens),                                 nn.ReLU(),                                 nn.LayerNorm(num_hiddens),                                 nn.Linear(num_hiddens, vocab_size))
    # X是刚刚BERTEncoder的输出    def forward(self, X, pred_positions):        num_pred_positions = pred_positions.shape[1]        pred_positions = pred_positions.reshape(-1)        batch_size = X.shape[0]        batch_idx = torch.arange(0, batch_size)        # 假设batch_size=2,num_pred_positions=3        # 那么batch_idx是np.array([0,0,0,1,1,1])        batch_idx = torch.repeat_interleave(batch_idx, num_pred_positions)        masked_X = X[batch_idx, pred_positions]        masked_X = masked_X.reshape((batch_size, num_pred_positions, -1))        mlm_Y_hat = self.mlp(masked_X)        return mlm_Y_hat
使用样例:
xxxxxxxxxxmlm = MaskLM(vocab_size, num_hiddens)mlm_positions = torch.tensor([[1, 5, 2], [6, 1, 5]])mlm_Y_hat = mlm(encoded_X, mlm_positions)mlm_Y_hat.shapexxxxxxxxxxtorch.Size([2, 3, 10000])xxxxxxxxxxmlm_Y = torch.tensor([[7, 8, 9], [10, 20, 30]])loss = nn.CrossEntropyLoss(reduction='none')mlm_l = loss(mlm_Y_hat.reshape((-1, vocab_size)), mlm_Y.reshape(-1))mlm_l.shapexxxxxxxxxxtorch.Size([6])4.下一句预测(Next Sentence Prediction)
xxxxxxxxxxclass NextSentencePred(nn.Module):    """BERT的下一句预测任务"""    def __init__(self, num_inputs, **kwargs):        super(NextSentencePred, self).__init__(**kwargs)        self.output = nn.Linear(num_inputs, 2)
    def forward(self, X):        # X的形状:(batchsize,num_hiddens)        return self.output(X)
使用样例:
xxxxxxxxxxencoded_X = torch.flatten(encoded_X, start_dim=1)# NSP的输入形状:(batchsize,num_hiddens)nsp = NextSentencePred(encoded_X.shape[-1])nsp_Y_hat = nsp(encoded_X)nsp_Y_hat.shapexxxxxxxxxxtorch.Size([2, 2])xxxxxxxxxxnsp_y = torch.tensor([0, 1])nsp_l = loss(nsp_Y_hat, nsp_y)nsp_l.shapexxxxxxxxxxtorch.Size([2])5.整合代码
xxxxxxxxxxclass BERTModel(nn.Module):    """BERT模型"""    def __init__(self, vocab_size, num_hiddens, norm_shape, ffn_num_input,                 ffn_num_hiddens, num_heads, num_layers, dropout,                 max_len=1000, key_size=768, query_size=768, value_size=768,                 hid_in_features=768, mlm_in_features=768,                 nsp_in_features=768):        super(BERTModel, self).__init__()        self.encoder = BERTEncoder(vocab_size, num_hiddens, norm_shape,                    ffn_num_input, ffn_num_hiddens, num_heads, num_layers,                    dropout, max_len=max_len, key_size=key_size,                    query_size=query_size, value_size=value_size)        # 这个hidden是给nsp用的        self.hidden = nn.Sequential(nn.Linear(hid_in_features, num_hiddens),                                    nn.Tanh())        self.mlm = MaskLM(vocab_size, num_hiddens, mlm_in_features)        self.nsp = NextSentencePred(nsp_in_features)
    def forward(self, tokens, segments, valid_lens=None,                pred_positions=None):        encoded_X = self.encoder(tokens, segments, valid_lens)        if pred_positions is not None:            mlm_Y_hat = self.mlm(encoded_X, pred_positions)        else:            mlm_Y_hat = None        # 用于下一句预测的多层感知机分类器的隐藏层,0是“<cls>”标记的索引,下面讲解⬇️        nsp_Y_hat = self.nsp(self.hidden(encoded_X[:, 0, :]))        return encoded_X, mlm_Y_hat, nsp_Y_hat
encoded_X 的形状是 (batch_size, seq_len, num_hiddens),其中:
batch_size是批次的大小(即输入样本的数量)。seq_len是输入序列的长度(即 tokens 的数量)。num_hiddens是隐藏层的特征维度(通常是嵌入的维度)。
encoded_X[:, 0, :] 取的是所有样本在第一个时间步(即位置 0)对应的特征向量。这通常对应于序列中的 <cls> 标记,代表整个输入序列的聚合信息。
代码实现-训练数据预处理
xxxxxxxxxximport osimport randomimport torchfrom d2l import torch as d2l1.WikiText-2数据集
xxxxxxxxxxd2l.DATA_HUB['wikitext-2'] = (    'https://s3.amazonaws.com/research.metamind.io/wikitext/'    'wikitext-2-v1.zip', '3c914d17d80b1459be871a5039ac23e752a53cbe')

def _read_wiki(data_dir): file_name = os.path.join(data_dir, 'wiki.train.tokens') with open(file_name, 'r') as f: lines = f.readlines() # 大写字母转换为小写字母 paragraphs = [line.strip().lower().split(' . ') for line in lines if len(line.split(' . ')) >= 2] random.shuffle(paragraphs) return paragraphs2.生成下一句预测任务的数据
xxxxxxxxxxdef _get_next_sentence(sentence, next_sentence, paragraphs):    if random.random() < 0.5:        is_next = True    else:        # paragraphs是三重列表的嵌套        next_sentence = random.choice(random.choice(paragraphs))        is_next = False    return sentence, next_sentence, is_next
def _get_nsp_data_from_paragraph(paragraph, paragraphs, vocab, max_len): nsp_data_from_paragraph = [] for i in range(len(paragraph) - 1): tokens_a, tokens_b, is_next = _get_next_sentence( paragraph[i], paragraph[i + 1], paragraphs) # 考虑1个'<cls>'词元和2个'<sep>'词元 if len(tokens_a) + len(tokens_b) + 3 > max_len: continue tokens, segments = d2l.get_tokens_and_segments(tokens_a, tokens_b) nsp_data_from_paragraph.append((tokens, segments, is_next)) return nsp_data_from_paragraph3.生成遮蔽语言模型任务的数据
xxxxxxxxxxdef _replace_mlm_tokens(tokens, candidate_pred_positions, num_mlm_preds,                        vocab):    # 为遮蔽语言模型的输入创建新的词元副本,其中输入可能包含替换的“<mask>”或随机词元    mlm_input_tokens = [token for token in tokens]    pred_positions_and_labels = []    # 打乱后用于在遮蔽语言模型任务中获取15%的随机词元进行预测    random.shuffle(candidate_pred_positions)    for mlm_pred_position in candidate_pred_positions:        if len(pred_positions_and_labels) >= num_mlm_preds:            break        masked_token = None        # 80%的时间:将词替换为“<mask>”词元        if random.random() < 0.8:            masked_token = '<mask>'        else:            # 10%的时间:保持词不变            if random.random() < 0.5:                masked_token = tokens[mlm_pred_position]            # 10%的时间:用随机词替换该词            else:                masked_token = random.choice(vocab.idx_to_token)        mlm_input_tokens[mlm_pred_position] = masked_token        pred_positions_and_labels.append(            (mlm_pred_position, tokens[mlm_pred_position]))    return mlm_input_tokens, pred_positions_and_labels
def _get_mlm_data_from_tokens(tokens, vocab):    candidate_pred_positions = []    # tokens是一个字符串列表    for i, token in enumerate(tokens):        # 在遮蔽语言模型任务中不会预测特殊词元        if token in ['<cls>', '<sep>']:            continue        candidate_pred_positions.append(i)    # 遮蔽语言模型任务中预测15%的随机词元    num_mlm_preds = max(1, round(len(tokens) * 0.15))    mlm_input_tokens, pred_positions_and_labels = _replace_mlm_tokens(        tokens, candidate_pred_positions, num_mlm_preds, vocab)    pred_positions_and_labels = sorted(pred_positions_and_labels,                                       key=lambda x: x[0])    pred_positions = [v[0] for v in pred_positions_and_labels]    mlm_pred_labels = [v[1] for v in pred_positions_and_labels]    return vocab[mlm_input_tokens], pred_positions, vocab[mlm_pred_labels]
... 这部分的代码实际上都是一些预处理,比较无聊,我这里就不继续写了,完整版跳转
n.最终使用示例
xxxxxxxxxxbatch_size, max_len = 512, 64train_iter, vocab = load_data_wiki(batch_size, max_len)
for (tokens_X, segments_X, valid_lens_x, pred_positions_X, mlm_weights_X, mlm_Y, nsp_y) in train_iter: print(tokens_X.shape, segments_X.shape, valid_lens_x.shape, pred_positions_X.shape, mlm_weights_X.shape, mlm_Y.shape, nsp_y.shape) breakxxxxxxxxxxDownloading ../data/wikitext-2-v1.zip from https://s3.amazonaws.com/research.metamind.io/wikitext/wikitext-2-v1.zip...torch.Size([512, 64]) torch.Size([512, 64]) torch.Size([512]) torch.Size([512, 10]) torch.Size([512, 10]) torch.Size([512, 10]) torch.Size([512])xxxxxxxxxxlen(vocab)xxxxxxxxxx20256其实我是没太搞懂为什么还需要
mlm_weights_X的,明明用一个pred_positions_X就可以了啊:
代码实现-BERT预训练
xxxxxxxxxximport torchfrom torch import nnfrom d2l import torch as d2l首先,我们加载WikiText-2数据集作为小批量的预训练样本,用于遮蔽语言模型和下一句预测。批量大小是512,BERT输入序列的最大长度是64。注意,在原始BERT模型中,最大长度是512。
xxxxxxxxxxbatch_size, max_len = 512, 64train_iter, vocab = d2l.load_data_wiki(batch_size, max_len)1.定义一个小的BERT,使用了2层、128个隐藏单元和2个自注意头。
xxxxxxxxxxnet = d2l.BERTModel(len(vocab), num_hiddens=128, norm_shape=[128], ffn_num_input=128, ffn_num_hiddens=256, num_heads=2, num_layers=2, dropout=0.2, key_size=128, query_size=128, value_size=128, hid_in_features=128, mlm_in_features=128, nsp_in_features=128)devices = d2l.try_all_gpus()loss = nn.CrossEntropyLoss()2.辅助函数,计算遮蔽语言模型和下一句子预测任务的损失
xxxxxxxxxxdef _get_batch_loss_bert(net, loss, vocab_size, tokens_X, segments_X, valid_lens_x, pred_positions_X, mlm_weights_X, mlm_Y, nsp_y): # 前向传播 _, mlm_Y_hat, nsp_Y_hat = net(tokens_X, segments_X, valid_lens_x.reshape(-1), pred_positions_X) # 计算遮蔽语言模型损失 mlm_l = loss(mlm_Y_hat.reshape(-1, vocab_size), mlm_Y.reshape(-1)) *\ mlm_weights_X.reshape(-1, 1) mlm_l = mlm_l.sum() / (mlm_weights_X.sum() + 1e-8) # 计算下一句子预测任务的损失 nsp_l = loss(nsp_Y_hat, nsp_y) l = mlm_l + nsp_l return mlm_l, nsp_l, l3.训练
函数的输入num_steps指定了训练的迭代步数,而不是像train_ch13函数那样指定训练的轮数
xxxxxxxxxxdef train_bert(train_iter, net, loss, vocab_size, devices, num_steps):    net = nn.DataParallel(net, device_ids=devices).to(devices[0])    trainer = torch.optim.Adam(net.parameters(), lr=0.01)    step, timer = 0, d2l.Timer()    animator = d2l.Animator(xlabel='step', ylabel='loss',                            xlim=[1, num_steps], legend=['mlm', 'nsp'])    # 遮蔽语言模型损失的和,下一句预测任务损失的和,句子对的数量,计数    metric = d2l.Accumulator(4)    num_steps_reached = False    while step < num_steps and not num_steps_reached:        for tokens_X, segments_X, valid_lens_x, pred_positions_X,\            mlm_weights_X, mlm_Y, nsp_y in train_iter:            tokens_X = tokens_X.to(devices[0])            segments_X = segments_X.to(devices[0])            valid_lens_x = valid_lens_x.to(devices[0])            pred_positions_X = pred_positions_X.to(devices[0])            mlm_weights_X = mlm_weights_X.to(devices[0])            mlm_Y, nsp_y = mlm_Y.to(devices[0]), nsp_y.to(devices[0])            trainer.zero_grad()            timer.start()            mlm_l, nsp_l, l = _get_batch_loss_bert(                net, loss, vocab_size, tokens_X, segments_X, valid_lens_x,                pred_positions_X, mlm_weights_X, mlm_Y, nsp_y)            l.backward()            trainer.step()            metric.add(mlm_l, nsp_l, tokens_X.shape[0], 1)            timer.stop()            animator.add(step + 1,                         (metric[0] / metric[3], metric[1] / metric[3]))            step += 1            if step == num_steps:                num_steps_reached = True                break
print(f'MLM loss {metric[0] / metric[3]:.3f}, ' f'NSP loss {metric[1] / metric[3]:.3f}') print(f'{metric[2] / timer.sum():.1f} sentence pairs/sec on ' f'{str(devices)}')xxxxxxxxxxtrain_bert(train_iter, net, loss, len(vocab), devices[:1], 50)xxxxxxxxxxMLM loss 5.849, NSP loss 0.8229518.3 sentence pairs/sec on [Place(gpu:0)]4.用BERT表示文本
xxxxxxxxxxdef get_bert_encoding(net, tokens_a, tokens_b=None):    tokens, segments = d2l.get_tokens_and_segments(tokens_a, tokens_b)    token_ids = paddle.to_tensor(vocab[tokens]).unsqueeze(0)    segments = paddle.to_tensor(segments).unsqueeze(0)    valid_len = paddle.to_tensor(len(tokens))
encoded_X, _, _ = net(token_ids, segments, valid_len) return encoded_X一个单句子的BERT特征提取:
考虑“a crane is flying”这句话。插入特殊标记“encoded_text[:, 0, :]是整个输入语句的BERT表示。为了评估一词多义词元“crane”,我们还打印出了该词元的BERT表示的前三个元素。
xxxxxxxxxxtokens_a = ['a', 'crane', 'is', 'flying']encoded_text = get_bert_encoding(net, tokens_a)# 词元:'<cls>','a','crane','is','flying','<sep>'encoded_text_cls = encoded_text[:, 0, :]encoded_text_crane = encoded_text[:, 2, :]
encoded_text.shape, encoded_text_cls.shape, encoded_text_crane[0][:3]xxxxxxxxxx([1, 6, 128], [1, 128], Tensor(shape=[3], dtype=float32, place=Place(gpu:0), stop_gradient=False, [ 1.23072958, -0.46575257, -0.91060257]))一个句子对的BERT特征提取:
xxxxxxxxxxtokens_a, tokens_b = ['a', 'crane', 'driver', 'came'], ['he', 'just', 'left']encoded_pair = get_bert_encoding(net, tokens_a, tokens_b)# 词元:'<cls>','a','crane','driver','came','<sep>','he','just',# 'left','<sep>'encoded_pair_cls = encoded_pair[:, 0, :]encoded_pair_crane = encoded_pair[:, 2, :]
encoded_pair.shape, encoded_pair_cls.shape, encoded_pair_crane[0][:3]xxxxxxxxxx([1, 10, 128], [1, 128], Tensor(shape=[3], dtype=float32, place=Place(gpu:0), stop_gradient=False, [ 1.19337428, -0.45544022, -0.01078355]))12.7 BERT微调
就是载入一个训练好的模型,给下游任务,继续训练
🚩 BERT微调的时候,一般是不会固定预训练模型的参数的,固定会快,不固定效果会更好。
BERT在实际部署的时候,一般搬到C++到后端。
如果设备性能不够,可以通过 模型蒸馏 等技术将模型变成原本的十分之一(举例)大小
微调Bert
BERT对每一个词元返回抽取了上下文信息的特征向量
不同的任务使用不同的特性
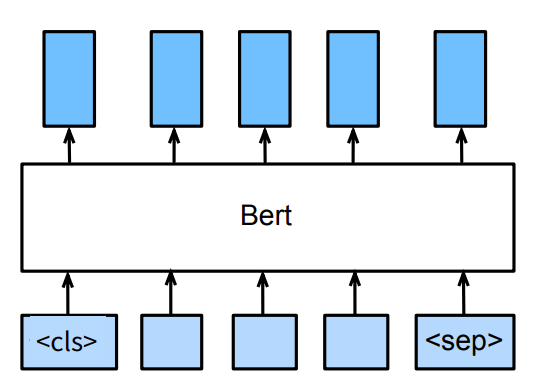
对下面这几种应用场景的详细介绍:15.6. 针对序列级和词元级应用微调BERT — 动手学深度学习 2.0.0 documentation (d2l.ai)
句子分类
将
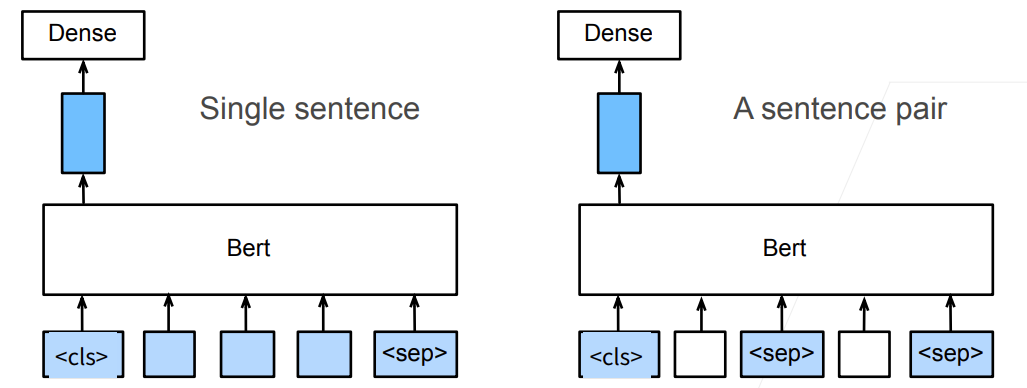
命名实体识别
识别一个词元是不是命名实体,例如人名、机构、位置
将非特殊词元放进全连接层分类
问题回答
给定一个问题,和描述文字,找出一个片段作为回答
对片段中的每个词元预测它是不是回答的开头或结束
表述不清楚,可以看这个 自然语言处理:bert 用于问答系统_bert 问答-CSDN博客
当使用BERT做问答时,找到答案的开始和结束位置之后,中间的文本就是答案(目前可以就这么粗略的理解)
代码实现-自然语言推理数据集
1.斯坦福自然语言推理(SNLI)语料库
xxxxxxxxxximport osimport reimport torchfrom torch import nnfrom d2l import torch as d2l
#@saved2l.DATA_HUB['SNLI'] = (    'https://nlp.stanford.edu/projects/snli/snli_1.0.zip',    '9fcde07509c7e87ec61c640c1b2753d9041758e4')
data_dir = d2l.download_extract('SNLI')2.读取数据集
xxxxxxxxxxdef read_snli(data_dir, is_train): """将SNLI数据集解析为前提、假设和标签""" def extract_text(s): # 删除我们不会使用的信息 s = re.sub('\\(', '', s) s = re.sub('\\)', '', s) # 用一个空格替换两个或多个连续的空格 s = re.sub('\\s{2,}', ' ', s) return s.strip() label_set = {'entailment': 0, 'contradiction': 1, 'neutral': 2} file_name = os.path.join(data_dir, 'snli_1.0_train.txt' if is_train else 'snli_1.0_test.txt') with open(file_name, 'r') as f: rows = [row.split('\t') for row in f.readlines()[1:]] premises = [extract_text(row[1]) for row in rows if row[0] in label_set] hypotheses = [extract_text(row[2]) for row in rows if row[0] \ in label_set] labels = [label_set[row[0]] for row in rows if row[0] in label_set] return premises, hypotheses, labels打印前3对前提和假设:
0、1和2分别对应于“蕴涵”、“矛盾”和“中性”
xxxxxxxxxxtrain_data = read_snli(data_dir, is_train=True)for x0, x1, y in zip(train_data[0][:3], train_data[1][:3], train_data[2][:3]): print('前提:', x0) print('假设:', x1) print('标签:', y)xxxxxxxxxx前提: A person on a horse jumps over a broken down airplane .假设: A person is training his horse for a competition .标签: 2前提: A person on a horse jumps over a broken down airplane .假设: A person is at a diner , ordering an omelette .标签: 1前提: A person on a horse jumps over a broken down airplane .假设: A person is outdoors , on a horse .标签: 0训练集约有550000对,测试集约有10000对。下面显示了训练集和测试集中的三个标签“蕴涵”“矛盾”和“中性”是平衡的。
xxxxxxxxxxtest_data = read_snli(data_dir, is_train=False)for data in [train_data, test_data]: print([[row for row in data[2]].count(i) for i in range(3)])xxxxxxxxxx[183416, 183187, 182764][3368, 3237, 3219]3.定义用于加载数据集的类
xxxxxxxxxxclass SNLIDataset(torch.utils.data.Dataset):    """用于加载SNLI数据集的自定义数据集"""    # vocab=None一般都是要把你选择的那个bert的词汇表传进来    def __init__(self, dataset, num_steps, vocab=None):        self.num_steps = num_steps        all_premise_tokens = d2l.tokenize(dataset[0])        all_hypothesis_tokens = d2l.tokenize(dataset[1])        if vocab is None:            self.vocab = d2l.Vocab(all_premise_tokens + \                all_hypothesis_tokens, min_freq=5, reserved_tokens=['<pad>'])        else:            self.vocab = vocab        self.premises = self._pad(all_premise_tokens)        self.hypotheses = self._pad(all_hypothesis_tokens)        self.labels = torch.tensor(dataset[2])        print('read ' + str(len(self.premises)) + ' examples')
    def _pad(self, lines):        return torch.tensor([d2l.truncate_pad(            self.vocab[line], self.num_steps, self.vocab['<pad>'])                         for line in lines])
    def __getitem__(self, idx):        return (self.premises[idx], self.hypotheses[idx]), self.labels[idx]
    def __len__(self):        return len(self.premises)
代码通过 self.vocab[line] 查找词汇表中的词,如果词不在词汇表中,会自动处理为 <unk>(未知词)。
4.整合代码
xxxxxxxxxxdef load_data_snli(batch_size, num_steps=50): """下载SNLI数据集并返回数据迭代器和词表""" num_workers = d2l.get_dataloader_workers() data_dir = d2l.download_extract('SNLI') train_data = read_snli(data_dir, True) test_data = read_snli(data_dir, False) train_set = SNLIDataset(train_data, num_steps) test_set = SNLIDataset(test_data, num_steps, train_set.vocab) train_iter = torch.utils.data.DataLoader(train_set, batch_size, shuffle=True, num_workers=num_workers) test_iter = torch.utils.data.DataLoader(test_set, batch_size, shuffle=False, num_workers=num_workers) return train_iter, test_iter, train_set.vocabxxxxxxxxxxtrain_iter, test_iter, vocab = load_data_snli(128, 50)len(vocab)xxxxxxxxxxread 549367 examplesread 9824 examplesxxxxxxxxxx18678现在我们打印第一个小批量的形状。与情感分析相反,我们有分别代表前提和假设的两个输入X[0]和X[1]。
xxxxxxxxxxfor X, Y in train_iter: print(X[0].shape) print(X[1].shape) print(Y.shape) breakxxxxxxxxxxtorch.Size([128, 50])torch.Size([128, 50])torch.Size([128])代码实现-Bert微调
xxxxxxxxxximport jsonimport multiprocessingimport osimport torchfrom torch import nnfrom d2l import torch as d2l1.加载预训练的BERT
xxxxxxxxxxd2l.DATA_HUB['bert.base'] = (d2l.DATA_URL + 'bert.base.torch.zip', '225d66f04cae318b841a13d32af3acc165f253ac')d2l.DATA_HUB['bert.small'] = (d2l.DATA_URL + 'bert.small.torch.zip', 'c72329e68a732bef0452e4b96a1c341c8910f81f')2.加载预先训练好的BERT参数
xxxxxxxxxxdef load_pretrained_model(pretrained_model, num_hiddens, ffn_num_hiddens,                          num_heads, num_layers, dropout, max_len, devices):    data_dir = d2l.download_extract(pretrained_model)    # 定义空词表以加载预定义词表    vocab = d2l.Vocab()    vocab.idx_to_token = json.load(open(os.path.join(data_dir, 'vocab.json')))    vocab.token_to_idx = {token: idx for idx, token in enumerate(vocab.idx_to_token)}    bert = d2l.BERTModel(len(vocab), num_hiddens, norm_shape=[256],                         ffn_num_input=256, ffn_num_hiddens=ffn_num_hiddens,                         num_heads=4, num_layers=2, dropout=0.2,                         max_len=max_len, key_size=256, query_size=256,                         value_size=256, hid_in_features=256,                         mlm_in_features=256, nsp_in_features=256)    # 加载预训练BERT参数    bert.load_state_dict(torch.load(os.path.join(data_dir,'pretrained.params')))    return bert, vocab

devices = d2l.try_all_gpus()bert, vocab = load_pretrained_model( 'bert.small', num_hiddens=256, ffn_num_hiddens=512, num_heads=4, num_layers=2, dropout=0.1, max_len=512, devices=devices)xxxxxxxxxxDownloading ../data/bert.small.torch.zip from http://d2l-data.s3-accelerate.amazonaws.com/bert.small.torch.zip...3.微调BERT的数据集
大致看看得了
xxxxxxxxxxclass SNLIBERTDataset(torch.utils.data.Dataset):    def __init__(self, dataset, max_len, vocab=None):        all_premise_hypothesis_tokens = [[            p_tokens, h_tokens] for p_tokens, h_tokens in zip(            *[d2l.tokenize([s.lower() for s in sentences])              for sentences in dataset[:2]])]
        self.labels = torch.tensor(dataset[2])        self.vocab = vocab        self.max_len = max_len        (self.all_token_ids, self.all_segments,         self.valid_lens) = self._preprocess(all_premise_hypothesis_tokens)        print('read ' + str(len(self.all_token_ids)) + ' examples')
    def _preprocess(self, all_premise_hypothesis_tokens):        pool = multiprocessing.Pool(4)  # 使用4个进程        out = pool.map(self._mp_worker, all_premise_hypothesis_tokens)        all_token_ids = [            token_ids for token_ids, segments, valid_len in out]        all_segments = [segments for token_ids, segments, valid_len in out]        valid_lens = [valid_len for token_ids, segments, valid_len in out]        return (torch.tensor(all_token_ids, dtype=torch.long),                torch.tensor(all_segments, dtype=torch.long),                torch.tensor(valid_lens))
    def _mp_worker(self, premise_hypothesis_tokens):        p_tokens, h_tokens = premise_hypothesis_tokens        self._truncate_pair_of_tokens(p_tokens, h_tokens)        tokens, segments = d2l.get_tokens_and_segments(p_tokens, h_tokens)        token_ids = self.vocab[tokens] + [self.vocab['<pad>']] \                             * (self.max_len - len(tokens))        segments = segments + [0] * (self.max_len - len(segments))        valid_len = len(tokens)        return token_ids, segments, valid_len
    def _truncate_pair_of_tokens(self, p_tokens, h_tokens):        # 为BERT输入中的'<CLS>'、'<SEP>'和'<SEP>'词元保留位置        while len(p_tokens) + len(h_tokens) > self.max_len - 3:            if len(p_tokens) > len(h_tokens):                p_tokens.pop()            else:                h_tokens.pop()
    def __getitem__(self, idx):        return (self.all_token_ids[idx], self.all_segments[idx],                self.valid_lens[idx]), self.labels[idx]
    def __len__(self):        return len(self.all_token_ids)
生成训练和测试样本:
xxxxxxxxxx# 如果出现显存不足错误,请减少“batch_size”。在原始的BERT模型中,max_len=512batch_size, max_len, num_workers = 512, 128, d2l.get_dataloader_workers()data_dir = d2l.download_extract('SNLI')train_set = SNLIBERTDataset(d2l.read_snli(data_dir, True), max_len, vocab)test_set = SNLIBERTDataset(d2l.read_snli(data_dir, False), max_len, vocab)train_iter = torch.utils.data.DataLoader(train_set, batch_size, shuffle=True, num_workers=num_workers)test_iter = torch.utils.data.DataLoader(test_set, batch_size, num_workers=num_workers)xxxxxxxxxxread 549367 examplesread 9824 examples4.微调BERT
用于自然语言推断的微调BERT只需要一个额外的多层感知机,该多层感知机由两个全连接层组成(请参见下面BERTClassifier类中的self.hidden和self.output)。这个多层感知机将特殊的“
xxxxxxxxxxclass BERTClassifier(nn.Module):    def __init__(self, bert):        super(BERTClassifier, self).__init__()        self.encoder = bert.encoder        self.hidden = bert.hidden        self.output = nn.Linear(256, 3)
def forward(self, inputs): tokens_X, segments_X, valid_lens_x = inputs encoded_X = self.encoder(tokens_X, segments_X, valid_lens_x) return self.output(self.hidden(encoded_X[:, 0, :])) net = BERTClassifier(bert)5.训练
xxxxxxxxxxlr, num_epochs = 1e-4, 5trainer = torch.optim.Adam(net.parameters(), lr=lr)loss = nn.CrossEntropyLoss(reduction='none')d2l.train_ch13(net, train_iter, test_iter, loss, trainer, num_epochs, devices)xxxxxxxxxxloss 0.520, train acc 0.790, test acc 0.77910442.5 examples/sec on [device(type='cuda', index=0), device(type='cuda', index=1)]
13 优化算法
之前都学过,这里只写一些需要注意的知识点
1.凸函数

这个概念容易混淆,记住上面这个才是凸函数,而不是凹函数。
目前为止只有两个是凸的:
- 线性回归
- Softmax回归
2.冲量法
梯度模拟物理中的动量
冲量法使用平滑过的梯度对权重更新
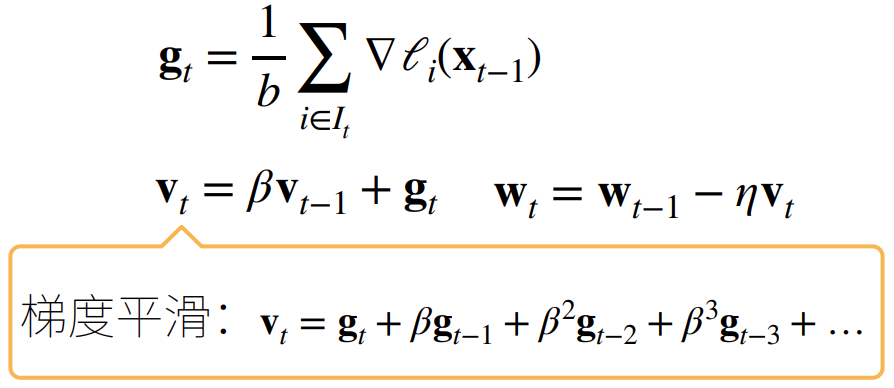
使用随机梯度下降:
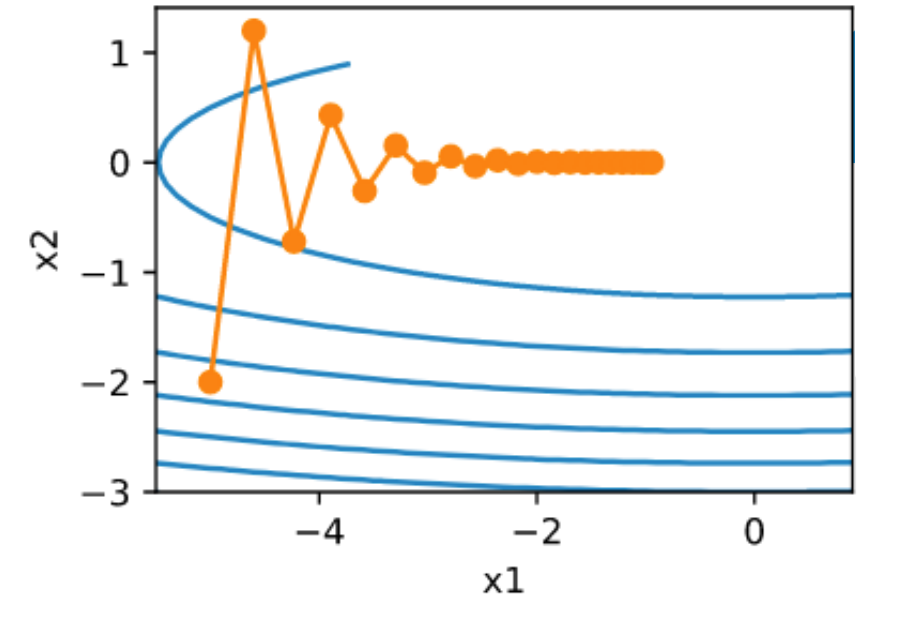
使用冲量法的随机梯度下降:

基本上所有的SGD都有这个选项。
3.Adam详解
他对学习率远不如SGD敏感,做了相当多的平滑处理。
https://www.bilibili.com/video/BV1bP4y1p7Gq?t=1674.8

